Baseboard is often the last trim element installed in a house. But it’s often the first task given to a rookie carpenter. Aspiring carpenters commonly learn about cut lists, coping, mitering, splicing, and other trade basics by doing this task. Aesthetically, baseboard provides a visual transition between the floor and the wall. If the floors are flat and the walls are straight, installing baseboard is usually straightforward.
Objective:
To explain an efficient method for installing baseboard in a room.
Prerequisite skills:
- Ability to take accurate measurements and record them
- Familiarity and basic skills with cutting on a miter saw
- Ability to use a coping saw
Tools:
- Hand tools including tape measure and coping saw
- Miter saw (compound miter saw recommended)
- Pneumatic or cordless finish nailer recommended
Vocabulary:
Cut list: A written list of components (in this case, lengths of baseboard) and the length you intend to cut them to. For baseboard, the cut list includes the type of cut that each end will receive.
Coping: Cutting the profile on the end of a piece of molding with a coping saw or jigsaw.
Coped joint: An inside-corner joint made by cutting the profile of a molding on one piece so it mates with the profile on another piece.
Butt cut: A cut that is square in both depth and width on the end of a piece of trim.
Butt joint: A joint between two square edges.
Scarf joint: A splice made by overlapping angled cuts on the ends of two pieces of trim. In a run of baseboard, this splice is made with two equal-angled, but oppositely oriented, cuts on the ends of two mating pieces.
Miter joint: A joint that forms a corner with two pieces of wood cut at an evenly divided angle. With baseboard, the angles are typically 45-degree angles that are cut across the depth of intersecting boards.
Miter cut: One of two matching angles cut on a board to form a miter joint.
Back bevel: An angled cut made at a greater-than-required angle. Cutting a back angle relieves the “shoulder” (short point) of intersecting miters to ensure that the long points meet tightly.
Tim Healey
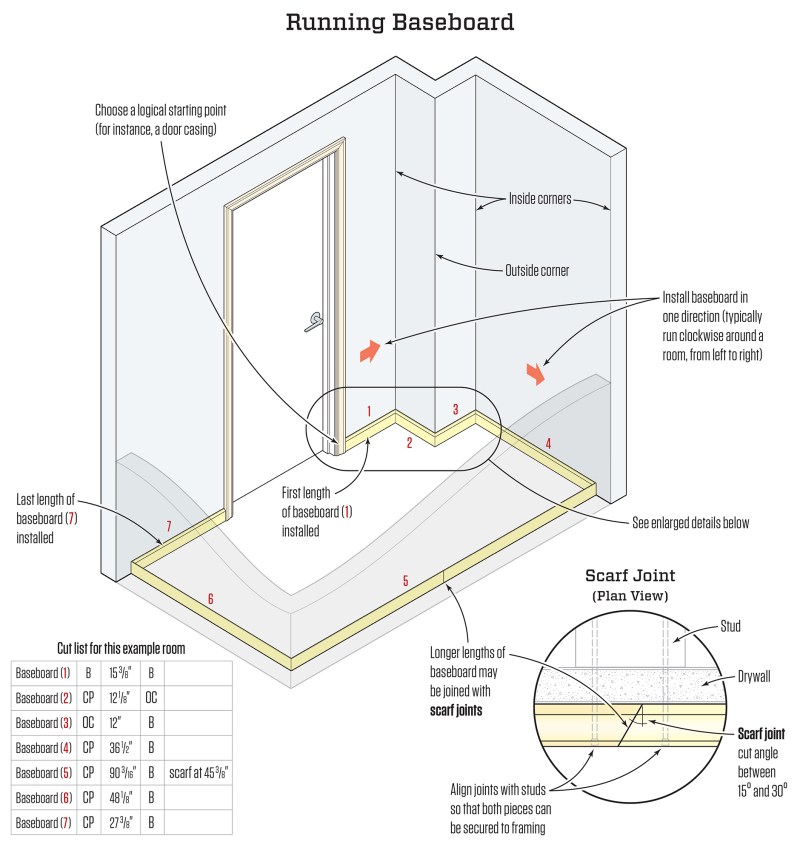
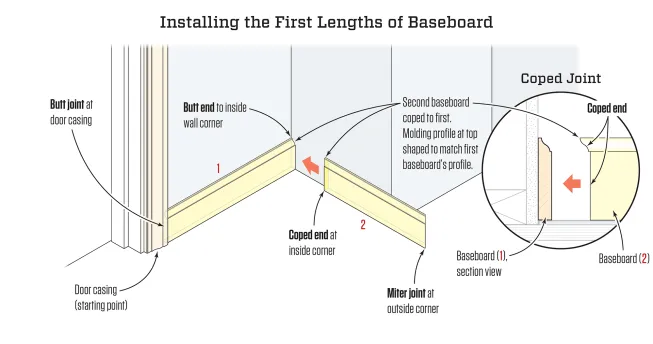
A coped joint is the most effective way to finish an inside corner. The first piece (1) goes in with a butt joint on both ends – one against the door casing and one in the corner. The second piece (2) is "coped" (cut to the profile of the molding). When the two pieces are joined, a coped joint makes for the tightest joint, and it can hide minor variations in the corner angle.
Tim Healey
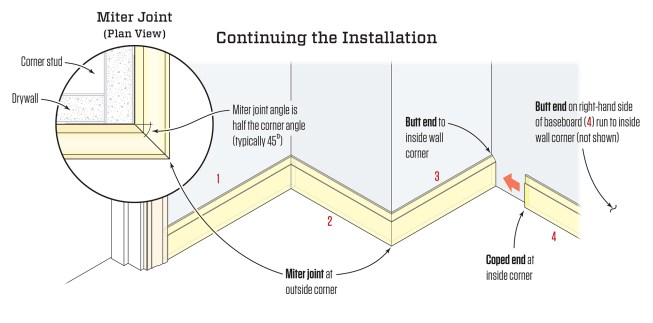
At outside corners, pieces of trim are joined with a miter joint whose mating pieces have the same angle cut in opposite directions. For a tight miter joint, the angle cut on the ends of the two pieces should be half the overall angle of the outside corner.