I’ve heard it said that there are two types of windows: ones that leak and ones that will leak. That may sound a little harsh, but the fact is that leaks frequently occur at windows. The perimeter flashings are a good first line of defense, but if the window itself fails to keep water out — a fairly common occurrence — the framing and interior finishes can get wet. The surest way to avoid that problem is to install sill pans under all windows and exterior doors.
A sill pan is a three-sided pan installed across the bottom of the opening and integrated into the weather-resistive barrier (WRB). Any water that makes it through to the rough opening will be caught by the pan and drained to the surface of the WRB. While there is a cost to installing a sill pan, it’s a lot less than the price of a callback or a lawsuit.
On the West Coast, where I live, sill pans have traditionally been bent and soldered from galvanized sheet metal — expensive work done at a sheet-metal shop. But in recent years, installing pans has become cheaper and easier. They can be purchased as ready-to-assemble kits or fabricated on site from coil stock or peel-and-stick flashings (see “Sources of Supply”). In this story I’ll explain how to make and install all three types.
Bending Pans on Site
Site-bent pans can be made from vinyl or metal coil stock to fit any size door or window opening. They’re not difficult to fabricate, but you do need a brake. I use a Mark II TrimMaster — the TM460 “contractor model” — with a 4-foot 6-inch capacity (Van Mark Products, 800/826-6275, www.van-mark.com). Small, light, and easy to transport, the tool costs about $1,000. The slitter attachment for cutting the flashing material costs another $325 — money well spent, in my opinion.
Coil stock is inexpensive: a 2-foot-by- 50-foot roll (vinyl or painted aluminum) retails for about $80. So, for example, if the openings are 3 feet wide, you’ll get 39 pans from a roll, at a material cost of less than $2 each. I prefer vinyl to aluminum because building materials like fiber cement and stucco contain cement, which tends to corrode aluminum. The front edge of door pans is often visible, so if the budget allows, I make those pans from copper.
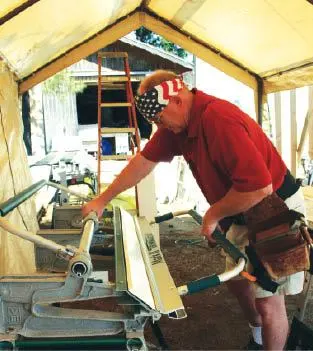
Considering set-up time, it might not make sense to site-bend pans for just one or two windows or doors. But if you’re installing a lot of pans, bending them yourself is definitely the most cost-effective way to go. Bending the stock. There are two 90-degree bends along the length of the pan — a 1/2-inch upturned dam in back and a 2-inch downturned lip in front. The flat part in between is the width of the jamb — 4 9/16 inches for the pans shown here. After cutting the vinyl coil stock to rough length, I use the slitting attachment to cut it to the right width — 7 1/16 inches — then make the bends. Gauge blocks are useful for quickly positioning the material in the brake.
Once these two bends are made, I make the end dams, using ordinary PVC cement — the kind used to solvent-weld pipe — to secure the laps. There’s no need to use primer: I just wipe the surface clean and apply glue to one of the laps, sliding the mating surfaces against each other to spread the glue. Then I unfold the corner, refold it, and clamp the joint for a few minutes until the glue has set. If I’m making the pan from metal, I glue the joint with sealant and use two-sided tape to hold the connection until the sealant cures.
To complete the pan, I cut the piece to exact length, then fold and glue the other end. The length, measured from the finished end dam, should be the width of the rough opening plus the width of the jamb.
Installing the pan. The pan can be installed as soon as the glue is dry. It has to slope to drain to the exterior, so before installing it, I nail a scrap of beveled siding — or other material ripped to a bevel — to the rough sill. Since it’s best not to drive fasteners through the pan, I hold it in place with construction adhesive.
I slit the housewrap so that it laps over the flanges on the front of the pan, lap the housewrap covering the trimmers onto the end dams, and seal the seams with peel-and-stick flashing. When installing the window, I squirt a bead of sealant along the rear dam to prevent wind-blown rain from getting in.
Flexible Flashing Pans
Sill pans have long been made by wrapping the bottoms of rough openings with peel-and-stick membrane material, but getting a perfectly waterproof seal with this method is difficult because the membrane has to be slit and folded at inside corners. In the last few years a number of companies have introduced flexible flashings — peel-and-stick material that can be stretched to fit around three-way corners. It’s simple to make pans from these materials; all that’s required is a beveled piece of wood and a roll of flexible flashing.
On the job shown here, I’m installing a pan on a home that will be clad with traditional three-coat stucco. In this application the pan and window are installed before the WRB, which is usually a double layer of Grade D building paper.
I begin the installation by stapling a strip of flashing paper below the bottom of the opening. This piece will be an apron under which the lathers will tuck their building paper. The apron should extend a good 12 inches beyond the ends of the opening. I create a slope by nailing a beveled piece of wood to the bottom of the opening.
I cut the flashing 12 inches longer than the width of the opening so it can run 6 inches up both sides. The release paper on the peel-and-stick I’m using, DuPont’s FlexWrap, is pre-slit in two places. After removing the center strip, I position the flashing in the opening and use a roller to press it onto the framing. The next step is to remove the outer piece of release paper and fan the flashing around the corners of the opening. I use a cap staple to hold the flashing against the wall and run a J-roller across the surface to ensure a good bond.
No back dam. The opening is now ready for the installation of a window. The pan does not have a back dam, which in theory is the greatest weakness of this approach. Most carpenters install the window on a thick bead of sealant at the inside edge of the jamb and count on the sealant to prevent wind-driven rain from getting through.
An alternative method is to run the flashing far enough into the opening so there is excess material that can be folded up to form a dam. Since the edge will not stay up on its own, you’ll need to nail a stop behind it or make sure the finish carpenters turn the flashing up before they install the trim.
Cost. Flexible flashing material is relatively expensive — about $2 per lineal foot. At that price the pan for a 3-foot opening would cost $8.
Manufactured Pans
Made from plastic, manufactured pans come in pieces so they can be cut and assembled to fit the opening. Typically, there’s a straight center section that’s cut to the width of the opening and glued to left and right end pieces. Once the glue’s dried, you install the pan the same way you’d install one bent on site.
A number of companies make these pans. The better ones have presloped bottoms and are channeled to drain water. Jamb widths are standard; prices vary based on the length of the opening.
Manufactured pans are the simplest way to go — they’re easy to assemble and require no special tools. However, they often have to be special-ordered and can add around $20 to the cost of a window installation. Dow’s Weathermate two-piece sill and door pans are the exception; they add around $5 per opening.
Bill Robinson is a contractor in Arroyo Grande, Calif. He moderates the JLC Online exterior-details forum and is a speaker at JLC Live.
To watch the author make a vinyl sill pan, go to www.jlconline.com and click on the JLC Extra tab.
Sources of SupplyVinyl Coil StockDuraFlash, 888/835-4171 Pro-Trim DuroBend, 800/421-2586 Flexible Flashings Contour Stretchable Flashing, 877/832-0333 www.covalencecoatedproducts.com EZ-Flex, 800/527-7092 FlexWrap, 800/448-9835 www2.dupont.com/Tyvek_Construction/en_US GreenGuard SuperStretch Flashing, 800/241-4402 Protecto Flex Window & Door Sealing Tape, 877/271-9661 Tite-Seal Flex, 800/333-6700 Typar Flashing Flex, 800/284-2780 Weathermate Flexible Flashing, 866/583-2583 WindowSeal ArcFlash, 800/541-4994 WindowWrap-Flex, 800/882-7663 Manufactured Pans AstroPan, 800/952-7876 DamSill, 888/326-7455 Jamsill Guard, 800/526-7455 Sillsaver, 604/999-1576 SureSill Sloped Sill Pan, 800/440-7873 Weathermate Sill Pan and Door Pan, 866/583-2583 Weather Out Flashing, 866/568-0050 For a list of companies that make hybrid systems, go to www.jlconline.com and click on the JLC Extra tab. |


