Like many carpenters, I always thought there was no good way to install crown molding on a cathedral or vaulted ceiling. For years, I would just shake my head whenever anyone suggested it. “Nah,” I’d say knowingly, “that never looks good.” Most of the time I got away with that, but occasionally customers insisted, and it was always a struggle. But I kept my eyes and ears open for a better method, and in the last few years I’ve discovered several, each of which has advantages and disadvantages.
No matter which of these methods I use, the back of the crown molding installed on the horizontal runs must first be ripped with a new shoulder or foot bevel to follow the sloped ceiling or the wall. Sometimes both angles must be modified (see “Ripping a New Bevel Angle,” below). If you fudge the inside corner using just one size of crown, you sometimes have to rip both the top and bottom bevels; if you use two sizes of crown, you only have to rip the top.
Ripping a New Bevel AngleAltering the back of crown molding isn’t a job for amateurs. I’ve seen carpenters make this cut freehand with a circular saw, but I wouldn’t recommend it. Running a circular saw at an angle on the narrow edge of crown molding is asking for it. If I’m installing only a few pieces, I use a power plane and just knock down the shoulder until it’s out of the way, being careful not to cut anything off the face or top edge of the crown. It doesn’t matter how much is removed from the back because only the top face and edge of the molding bear on the ceiling or wall. However, when I’m running a lot of crown, I don’t have the patience to make so many multiple passes with a plane, so I set up a jig on my table saw. Take my word for it, this is one operation that requires a jig. Fingers are much too valuable to donate to a job. Besides, it seems like every time I make any jig, I end up having to use it again, and soon. The jig is a simple sled that gets clamped to the table saw fence (see sketch). The crown molding slides on a piece of 1-by beveled at 45 degrees on both edges. Along the front edge of the sled, I attach a 1/2×3/4-inch stop, which keeps the crown from kicking out at the bottom. Tipping the blade provides all the adjustment necessary to cut right on a fillet line. Because the blade comes up through the molding at a severe angle, I use a push stick to shove the last few feet of crown through the jig. Using a jig and a push stick is the safest way to recut bevel angles on the back of crown molding. |
Forcing the Inside Corners
This is the first method I learned and the one most carpenters use to solve the problem of vaulted ceilings. To join the inside corners, you just tip the crown on the horizontal runs until it’s nearly plumb (see Figure 1). Before making the scribe, a new foot must be ripped on the bottom of the crown so the material will sit flat on the wall. I use two short pieces of scrap to get the right angles. First, I cut the end of the raked piece so that it’s close to the spring angle of the horizontal piece; then I rock the horizontal piece toward plumb until the profiles line up best. Crown isn’t supposed to be plumb, and that’s why this method doesn’t look so great. In fact, on ceilings that are steeper than 6/12, forcing the corner looks terrible. It works on a 4/12 ceiling but only after some serious scribing.
Figure 1.To “force” a crown molding corner on a cathedral ceiling, the author tips the molding on the horizontal run closer to plumb. That way, the height of the crown on the horizontal run more nearly matches the height of the crown coming down the rake, though the profiles will rarely match perfectly, especially on steeply sloped ceilings. Rebeveling the back of the crown at the bottom allows it to close tightly against the wall.
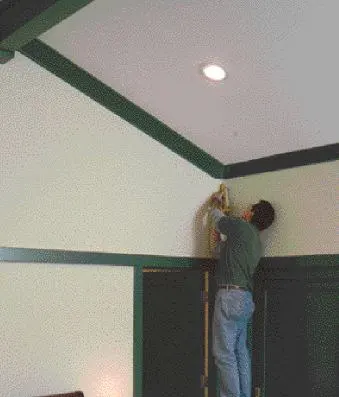
For the cut to work, the scribes must be held perfectly level — they can’t tip even a little. This requires patience and a good eye. And following an S-curve requires a very steady hand. To make these crazy scribes, I alternate between a jigsaw equipped with a Collins Coping Foot (888/838-8988, www.collinstool.com) and a small grinder (Figure 2). I use the jigsaw to follow and relieve the scribe line, back cutting as I normally would. Then I turn to the grinder to remove even more material from the back of the molding, because these scribes must be severely relieved on the back or the joint won’t close up tightly.
Figure 2.To cut the unusual scribes that are required when fudging an inside corner (above), the author uses a jigsaw fitted with a coping foot (above right), as well as a grinder (right), for making extra steep back bevels.
To get a tight fit, arm yourself with lots of patience; it’s best to plan on two or three attempts. And be careful on the horizontal cuts: If you remove too much material from a horizontal line, you’ll probably have to start over from scratch.
Using Two Sizes of Crown
A couple of years ago, I learned another way to join miters when two pieces of crown molding meet at different planes — by using the same profile crown moldings in two sizes, a larger crown for the horizontal runs and a smaller size for the rakes (Figure 3). Some of the carpenters who visit the Finish Carpentry Forum at jlconline.com have pointed out that craftsmen have been using this method for centuries. The corners still require careful scribing, but the result is pleasing — even on steep-pitched ceilings. However, not every profile of crown molding is available in a variety of sizes like standard S-and-Cove or S-profile crown moldings, which are available off the shelf from many lumber yards in 2 1/4-, 3 1/2-, and 4 1/2-inch widths. Fortunately, if the molding is made in only one size, there’s another method.
Figure 3.Using two sizes of the same profile — wider stock for the horizontal run, narrower for the rake — can sometimes work to turn a cathedral corner. The horizontal run still has the same spring angle, so the bottom doesn’t have to be rebeveled, only the top, to match the slope of the ceiling.
Running Crown on Cathedral Ceilings, continued
Using Transition Pieces
When two pieces of molding — like casing, chair rail, or baseboard — meet at different planes, a triangular transition piece often solves the problem. But that solution for vaulted ceilings never dawned on me until JLC Live presenter Mike Sloggatt suggested it about a year ago at a show. Opinions vary on this technique. Some people think that corner transitions don’t look good because of the extra miter in the crown molding at every corner. But I like the technique: The additional lines emphasize the molding profiles, like running three-piece crown around bull-nosed corners or breaking crown around end blocks on a mantelpiece (Figure 4).
Figure 4.When working with a single size of crown, a pie-shaped transition piece, mitered so its bottom edge is level, can make a tight transition between the rake and the horizontal crown.
Before cutting cathedral-ceiling transitions, you first need an understanding of how to cut miters for a gable-end peak. When cutting crown molding in position for standard horizontal runs, the material is always placed in the saw upside down, with the base of the saw representing the ceiling plane. But when cutting gable-end crown, the crown sits in the saw the same way it sits on the wall, right side up.
Understanding that makes cutting the transition pieces much easier. These are basically triangles of molding, with both miters at the top of the transition coming to a sharp point. The miter on the edge that meets the horizontal run is a standard inside corner, which could also be coped. This piece must be placed upside down in the saw and cut at 45 degrees, with the long point against the fence (Figure 5).
Figure 5.When cutting the transition piece, the first cut, made on the edge that meets with the level run of crown molding, is made in upside-down position — a standard inside corner cut (left). The other edge, which mates with the rake crown, is cut right side up (below).
But the miter on the other edge of the pie-shaped transition piece, which meets the raked crown running up the gable, is cut right side up, with the short point against the fence. The angle of the miter is not 45 degrees; in this case, it’s 78 degrees, which means you cut at 12 degrees on the miter saw.
Determining the miter angle isn’t quite as easy as sticking an angle finder in the corner. In the case shown here, the angle of the wall-ceiling intersection is 114 degrees, but that’s not the angle you need to cut. Figure 6, next page, shows a couple of ways to solve this.
Figure 6.To figure the miter angle for the bottom end of the rake molding, the author first measures the ceiling-wall angle (top), then uses basic geometry to solve for the cut angle.
Making the cuts. I cut transitions from short pieces of scrap material, and I make a lot more scraps doing it. But I never use a piece that’s too short to hold comfortably — I like my fingers.
Using Pendants
If all those angles and miters are too confusing, pendants might be the right alternative (Figure 7). I like making pendants, and I like the way they look, especially in homes with abundant moldings. But many homeowners (and lots of other carpenters I’ve heard from) think they look cheesy. Still, I have yet to find a better way to handle an outside corner in a room with a cathedral ceiling.
Figure 7.Pendants can provide a point of termination for crown molding and eliminate the need to join a rake run with a horizontal run (top). The author makes pendants from scraps, mitering four pieces together using spring clamps, glue, and pin nails (bottom).
Pendants are easy to make, and they don’t require a lot of molding. I typically make them from the pieces of waste that are left after installing crown in all the easy rooms. The first step is cutting the miters to exactly the same size. I’ve used a pencil mark on the base of my saw as a stop guide, but clamping a repetitive stop to the extension wing is a more reliable way to ensure that every piece is identical. After assembling the pendants, I make the base blocks 1/4 inch wider than the widest part of the pendant, which provides a perfect reveal line.
For small pendants, I rip down a block of 4×4 until the reveal is right, then cut the block to match the slope of the ceiling. For large crown molding, I make the block from pieces of 1-by with mitered corners.
Outside Corners
When it comes to outside corners that intersect a vaulted ceiling, I draw a blank and install a pendant (Figure 8).
Figure 8.Pendants provide a ready solution for outside corners that interrupt a cathedral ceiling.
The problem I’ve had is, with the top cut to fit the slope of the ceiling, the horizontal crown molding installs much higher than the raked crown molding. Joining the two in an outside-corner miter has stumped me. If anyone has a solution to this problem, I invite you to share it with me and other readers by writing to the magazine or posting a message on the Finish Carpentry Forum.
Gary Katz is a finish carpenter in Reseda, Calif., a frequent contributor to The Journal of Light Construction , and author of Finish Carpentry: Efficient Techniques for Custom Interiors


