In 1979 I was trying hard to get a handle on my costs. I’d been a general contractor for only a few years, but I was already tired of late nights and blurry eyes trying to bid plans. I worried about my prices, too: I wasn’t confident about the numbers I used. I found it especially hard to keep track of labor costs.
Then I met a fellow contractor at the lumberyard who started talking about his new Tandy computer. I was all ears. He invited me over to see this astounding instrument, and I left his home that night buzzing with new ideas. Not long after, I started specializing in finish carpentry, and I’ve been using a computer to track my costs and help me bid jobs ever since. I don’t use any fancy programs — just a simple spreadsheet. I use the same system for bidding an elaborate custom home that I use for standard jobs. My spreadsheets might change size, but the basic approach is always the same (see “Tracking Costs With a Spreadsheet,” below).
Tracking Costs With a SpreadsheetFor a finish carpenter, mastering a spreadsheet is as important as mastering a miter saw. You can’t expect to make money in this business and have any free time unless you have a fast, accurate tool for tracking labor and material costs, and there’s none better than a spreadsheet. A simple one-page spreadsheet is all many finish contractors need, especially if you supply labor but no material. I often supply both, and some of my jobs get a little complicated, so I use a multiple-page workbook in which I’ve made separate worksheets for windows, exterior doors, interior doors, trim, and hardware. All sums are calculated and totaled on each spreadsheet, but they’re also combined automatically on a summary sheet, which forms a cover for the workbook. The summary sheet imports all the totals; that’s the page I copy and paste from when I submit a bid. I’ve picked up a lot of bidding tricks for residential work from the commercial work I also do. For a finish carpenter, bidding commercial work is pretty simple because the plans and schedules often include every conceivable specification, and they’re well organized. For instance, each door opening is often listed separately on the door schedule, and under that opening is a complete list including jamb type and size, door type and size, model number of the lockset and the deadbolt, type and manufacturer of the hydraulic closer, the threshold, the weatherstripping, and even the floor stop. I’ve borrowed the same technique for bidding over-the-top complex custom residential jobs. For the exterior trim on a recent custom Victorian, for instance, I broke down the house into specific parts, starting with each gable end — there were 14, but only 3 were alike. I further broke each gable into its parts — built-up truss, pendant, pendant ball, pendant corbel, barge crown, eaves crown, and so forth — and listed those pieces on the spreadsheet. It took weeks to finish the list, but then I was able to quickly e-mail and fax the spreadsheet to suppliers. Their quotes were easy to add into my spreadsheet file. And keeping track of the final order, as well as changes made during construction, including extras, was easy, because I had all the material and labor organized on the same spreadsheets. –G.K. |
Even more important than learning to use a spreadsheet, I began keeping track of labor costs in a daily journal, so that I could get a handle on how long it really took me and my crew to finish different tasks (see “Keeping a Labor Journal,” below). Over time, that information, gathered by hand in plain notebooks, allowed me to refine my bids so that I knew I was making a profit. In this article, I want to share some tips for estimating labor on various phases of a trim job.
Keeping a Labor JournalAs readers who participate in the Finish Carpentry forum at jlconline.com have discovered, labor costs vary from region to region. Some carpenters complain if they’re not making $40 per hour, while others would like to know where they can move to make $30. Labor costs are also dependent on how much work there is in your region and how busy you are. There are no magic numbers for piece prices. The amount you should charge for hanging doors or installing baseboard and crown depends on average installation rates in your region and your labor cost. If you’re not sure about installation rates in your area, call other carpenters or millwork suppliers, or ask your wife to make the calls. Regardless, labor costs should be the primary means for figuring piece prices. The best way to determine piece prices is by keeping a detailed journal of labor costs on your jobs. There’s no other method for developing a streamlined bidding procedure. In your daily labor-cost journal, list the type of work you’re doing that day or partial day, then note how many hours you (or your employees) spent on the job. It’s important to include roll-out and roll-up time, as well as layout time. Remember, prices aren’t always flat — there’s a curve depending on the quantity or footage of the material you’re installing. Developing a footage price for installing baseboard is easy if the job you’re on is a new home and your crew spends one or two full days on baseboard. But you’ll also need to record how much time you spend on a remodel, installing baseboard in just two rooms, or fitting several pieces back into a bathroom. The quantity curve applies to every aspect of finish work. If you’re only installing one or two prehungs, the piece price must be significantly higher than a job with 15 to 20 doors. After all, installing one prehung requires the same amount of roll-out and roll-up time; plus, you’re never able to build up a head of steam and develop real production. — G.K. |
Stain-Grade vs. Paint-Grade
This subject sparks frequent discussions on the Finish Carpentry forum at jlconline.com. Some carpenters charge the same for both types of work, feeling that the same energy and time should be applied to paint-grade installations as to stain-grade jobs. In my experience, stain-grade work is always more time consuming than paint-grade, so I raise my prices between 30% and 50% for the following reasons: Stain-grade joinery must be grain-matched, which means spending more time sorting material; many types of stain-grade moldings only come in short lengths (like alder, which is only available in 10-foot pieces), so splices are far more frequent; and stain-grade joints must be cut with greater accuracy than paint-grade material, which can be caulked (whether by the finish carpenter or the painter). Finally, having kept my eye on the bottom line for many years, I know that our carpenters (including me) slow down when they’re working with more expensive materials, whether it’s a cherry door or a piece of walnut crown molding.
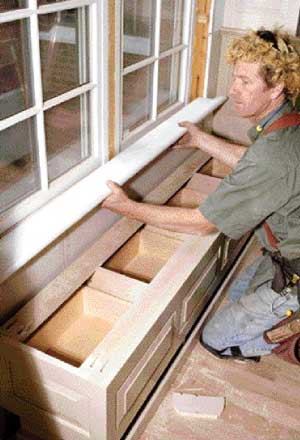
Windows
Installing windows is a pretty straightforward task. For new construction, I usually figure a two-man crew can install one one-man window (a window that one crew member can lift and place alone) in an hour. Sure, any two-man crew worth a darn can set more windows than that, but I allow the extra time for scattering and placing all the windows, and then checking the window types to be sure that, say, a tempered-glass window isn’t accidentally installed in the wrong opening.
If the windows are large, I figure a third man on the crew. Of course, this figure doesn’t include reframing openings or installing special sills or peel-and-stick flashing — only standard staple-on flashings like Moistop. The piece price I use for installing windows doesn’t include interior or exterior casing.
Hanging Doors
I use piece prices for door hanging, too, based on competitive rates in my area and the speed of the door hangers on my crew. Prices for 8/0 doors are 50% higher than for 6/8. Prices for hanging new doors in old jambs are 50% higher, too. Exterior door-hanging prices also include lock preparation — boring and mortising for standard locks. Mortise locks are priced separately. I discount those prices for any quantity over five.
Prehung Doors
On production jobs with more than eight doors, I figure 1 man-hour for setting 6/8 prehung doors. Usually a good carpenter can set ten in a day without difficulty. But installing prehung doors is one of those areas where quantity and job-site conditions affect price. If the job has four floors, I bump the price, knowing I’ll lose a lot of time moving material and tools. If there are only three or four doors, I forget piece prices and use day rates that include overhead and profit. If the job has only a couple of doors, it might be a one-man, one-day fee (8 hours). That’s the only way to come out ahead and still price fairly.
Casing, Stools, and Apron
I’ve never been able to figure out a footage price for installing casing because it’s not the lineal footage that counts but the individual pieces and the miters. That means my spreadsheets require a separate labor category for installing casing on windows and exterior door jambs. As with setting windows, I estimate how many units a workman can case in one hour and use that number as a piece price. If you or your carpenters can install casing on one window in an hour (don’t forget to include setup and layout time), and you charge $25 per hour, then use that hourly rate as a starting point for developing a piece price. But don’t forget all that stool and apron — ripping, scribing, and notching stool take time.
Baseboard
Baseboard is almost always a piece-price job, and it’s easy to determine what the footage price for your crew should be. Just keep close tabs on several jobs, both paint-grade and stain-grade. Stain-grade jobs are generally 50% more. And be sure to notice how much longer it takes to install those round corners. I add $15 for each one. If a job is particularly cut up — for instance, a kitchen or entryway with a dozen corners, columns, or end walls — I include additional time for those areas. For flexible moldings or radius trim, I also use hourly rather than footage prices.
Crown Molding
Believe it or not, bidding crown molding is similar to bidding base. In fact, while I’m taking off a set of plans, I use the same measurements for the crown as I do for the base. The only difference is, I charge a footage price and a corner price, for inside or outside corners. That way, my piece price for crown can be used on all types of jobs (except remodels with furniture in the rooms; then I add an hourly estimate for moving furniture). Again, keep close track of your time on several crown jobs. Figure $10 to $15 for every corner, then divide the remaining money you made (or would like to make) by the lineal footage.
For instance, imagine you recently finished a paint-grade job, with a dining room, living room, and kitchen, that totaled 230 lineal feet and had 15 corners (inside and outside). You had two guys on the job for a day, for which you billed $600, including overhead and profit. To arrive at a piece price for future bidding, subtract the corner fee, divide the remainder ($450) by the lineal footage ($230), and you’ll have a piece price of $2 per foot. But remember, that price is only good for jobs of that size. Jobs with substantially more crown will cost less per foot, while jobs with less crown will cost more per foot, as will jobs with higher ceilings or lots of furniture.
Coffered Ceilings
There are two ways to bid a coffered ceiling, and I usually use both, just to be sure. I estimate the job by man-days (figuring a two-man crew for ceilings up to 12 feet high and three men for higher). With the system we use for installing coffered ceilings (which I’ll explain in an upcoming issue), almost any fair-sized living room can be finished in four days (one day for layout and backing, one for beam bottoms and most of the base molding, one to finish the base molding and crown molding, and an extra day for pickup). But I also compare the size of the room to the size of previous jobs I’ve done.
Shelving
When I worked in apartment buildings and tract housing, I bid closets by the shelf — the going rate was $10 each — and it didn’t matter how long the shelf was. I don’t do that anymore. I look at each closet and estimate the man-hours. For new construction and whole-house remodels (if the closets are empty and our crew doesn’t have to remove the clothing, toys, boxes, and golf clubs), I look at the house and figure how many days one man will spend on the closets. For an average job, it’s usually two or three at the most: Several bedroom wardrobes can be finished in one day, leaving another day for the pantry and master bedroom walk-in.
Hardware
Hardware is one area where piece prices always work well. The next time you start installing finish hardware, keep an eye on your watch. Record how long it takes you to install a single lockset, or four locksets, or a towel bar, or a new threshold, sill cover, and door shoe. These prices and times will rarely vary, and if they do, there’s usually a reason — an “extra” to watch out for.
Remember, keep close track of your time if you want to develop profitable yet fair piece prices. Prices may vary from state to state, and even from one town to the next, but in the same metropolitan area, piece prices are often comparable. Where I live, $100 is the standard fee for installing a mortise lock (cut the door, install the hardware, active door only), while $15 to $20 is standard for installing a cylindrical lock in a predrilled and mortised door. (I add $15 for drilling the door if there are more than five doors.)
Accurate Takeoffs
While knowing your labor costs is a critical first step in bidding finish work, reading and taking off a set of plans accurately are also a must. Whether the house is a one-week job or a five month job, I always start the same way, with the floor plans and a set of colored highlighters. Before looking at any lists, I like to become familiar with the job, so I start work on the plans by entering at the front door and touring the whole house, noting all the details with highlighters and a sharp pencil.
Windows and doors. First, I fill in the icons for every window and door. I use one color for windows and another for exterior doors. For transom windows, I often use a third color, so they’ll stand out. On the interior of the house, I use one color for 2/8 doors (the predominant size today), another color for odd-size doors, and a third color for custom openings, like double-acting and pocket doors. I also highlight any door openings that get simple jambs or arched jambs. And I count doors and windows three or four times. I’m always amazed at how easy it is to make a mistake, even when I’m just counting to ten.
After I finish coloring in the windows and exterior doors, I cross-reference the elevation drawings. On almost every set of plans, there are inconsistencies between the floor plans, the elevations, and the window and door schedules. The only way to be certain that you’ve bid the job according to the expectations of the builder, homeowner, and architect is to discover and note those inconsistencies. I do that by transferring the window and door numbers to the elevation drawings so that any missing items show up. It also allows me to confirm all window and door configurations — double-hung vs. casement, active vs. stationary, lite layout, and so forth.
Extensions. Because I bid material, too, I note rough wall widths for jambs beside each window and door opening, but I make those notes in pencil. Once I’ve been awarded the job, I walk the job with my plans before ordering the jambs, noting stud size, shear panel or sheathing dimension, and any other finishes that affect wall thickness, like double drywall or paneling. Of course, ordering windows usually can’t wait that long, so I refer to the floor and framing plans and the shear or sheathing schedules to determine exterior-wall framing dimensions.
I always err on the wide side: It’s easier to rip down jamb extensions than to make new ones. If your clients are like mine, they’re not going to pay for additional work, so be sure to get jamb extensions in your bid and your order. If the client provides the windows, make sure your contract protects you from problems with the jamb extensions — no doubt there will be plenty!
Base and crown. The size and location of crown molding are usually found on the reflected ceiling pages. I highlight those drawings, using different colors wherever the molding changes style or size, as often happens in living areas, the master bedroom, and in smaller bedrooms and hallways. I use a red highlighter for radius areas and for coffered ceilings, light wells, niches, and other decorative elements, so that I won’t miss them. In my bid, I break out the crown by room, because it’s typically one of the first line items clients want to change or cut in order to save money, so getting to those numbers easily saves time.
As mentioned above, I use the same takeoff quantities for base as for crown.
Closets. For production jobs and typical “custom” homes, I bid closets off the plans. If the plans don’t include detailed closet layouts, then I bid all the closets as “single shelf-and-pole,” and any changes become extras. Extras are billed at an hourly rate. (Our last insurance increase bumped that rate to $48.) If the plan has specific closet layouts, I highlight them in red pencil — they always change — and I specify in my bid “closets according to plans.”
A Word About Markup
I’m frequently asked about markup in the online forum; unfortunately, there’s no pat answer. Yes, I mark up my materials on every job — a lot — but that’s because we have our own retail store as part of our finish carpentry business. But, depending on the size of your operation, how much volume you do, and what discount you’re able to get from your material suppliers, you should be able to mark up your materials, too. That’s one good reason to stick with the same suppliers, so that you can point to your loyalty and volume and hammer on them for bigger discounts. Never pass those discounts on to your clients, of course, unless you’re in a bidding war. Many times, those small amounts will cover the cost of material problems, ordering snafus, callbacks, and so forth. As I said, there’s no magic number for how much to mark up your materials, but generally, 10% to 15% is about all the market will bear. Gary Katz is a finish carpenter in Reseda, Calif., a frequent contributor toThe Journal of Light Construction, and author ofFinish Carpentry: Efficient Techniques for Custom Interiors. Gary’s spreadsheets are available at his website, www.garymkatz.com.