Today’s kitchens serve multiple functions—everything from preparing meals to entertaining friends around the island. Meeting all those diverse needs requires a “layered” lighting plan. Well-planned kitchen lighting with layered lighting levels provides a safer environment for the range of activities that a kitchen serves, and it doesn’t have to break the budget.
The layers. There are three basic levels of lighting to consider in every kitchen—ambient, task, and accent—and each level serves a different purpose. There are many options for each level; for the most pleasing and effective light, the choices should reflect the architecture of the house and the style of your client.
The lamps. The brightness and color for all kitchen lighting is as important as placement of the fixtures. I recommend using dimmable, energy-efficient LED bulbs that are 2,700K to 3,000K in color temperature everywhere in a kitchen. These bulbs emanate warmth. I never use bulbs above 3,000K and always try to steer clear of fluorescent bulbs—even CFLs. They don’t provide good-quality light and they’re toxic when broken. Check the lumens on the bulb packaging for the equivalence to incandescent bulbs.
Roe Osborn
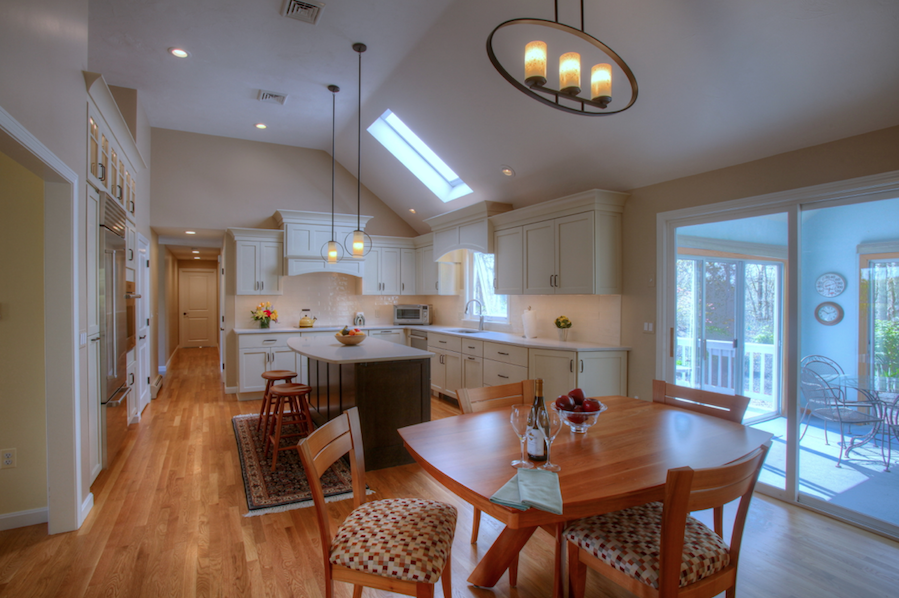
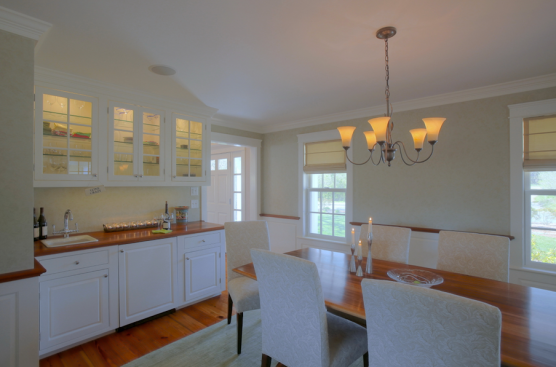
Ambient. Pendants can be used in concert with a flush-mount light.
Ambient Light
Ambient light is the general lighting for the entire kitchen space, and it should closely mimic the natural daytime light in the room. When choosing ambient light sources for a kitchen, consider kitchen size and ceiling height. The bigger the kitchen and the higher the ceiling, the more ambient light output is required, which usually means that more fixtures will be needed.
Fixtures for providing ambient light can vary, and different sources can be combined to create a pleasing balance. The important thing is to avoid creating dead zones—areas that are dim, with little or no light. At the same time, be conscious of creating hot spots where light from multiple sources overlaps and creates an overly bright area. Here are some typical sources for ambient lighting.
Recessed downlights are the most common choice for ambient kitchen lighting. They’re the most effective type of lighting, although in small kitchens, they should be used judiciously. Recessed downlights are typically spaced 4 to 5 feet apart, either on a grid or in a line depending on the kitchen layout and ceiling height.
Be aware that recessed downlights often serve double-duty as task lighting. So positioning of these lights above counters and cabinets is critical (more on this later, in the discussion of task lighting). If downlights are the only ambient light sources, 6-inch-diameter fixtures that have a wider spread of light are the best choice.
Ceiling-mount fixtures come in either flush-mount models that attach directly to the ceiling or semi-flush-mount models that drop a short distance below the ceiling. Either type is a good choice for an older, smaller kitchen with a low ceiling. In such a kitchen, a single flush-mount fixture can be placed centrally; or two fixtures can divide a larger kitchen into thirds.
Ceiling fixtures can also work well when supplemented by other light sources, such as pendants over an island or a peninsula. In a home with low ceilings (7 to 7 ½ feet), ceiling-mount fixtures can provide more comfortable light than downlights. These fixtures typically have translucent lenses or glass shades that diffuse the light throughout a room. Downlights, on the other hand, direct a more concentrated cone of light downward and tend to create uneven light in kitchens with low ceilings.
The lower positioning of semi-flush-mount fixtures lets more light reflect from the ceiling, but they work better with slightly higher ceilings because they hang down lower than flush mounts.
Chandeliers and pendants. For two-story, tray, cathedral, or pitched ceilings that are 10 or more feet high, chandeliers and pendants can provide effective ambient light. These fixtures bring light down to a more human scale in rooms with high ceilings and are often used to supplement other light sources. In addition to providing light, pendants and chandeliers can be a focal point in an otherwise simple design.
For small kitchens, a single fixture may be enough, especially if supplementing downlights. If the kitchen is very large, two or more fixtures work well in areas such as over a large island. When multiple pendants are used for ambient lighting, they should be no less than 6 feet apart and no less than 6 feet from any structure such as a wall or upper cabinet. The bottom of pendants and chandeliers should be at least 7 feet above the floor so they don’t block views, and they should be controlled with a dimmer to be effective for ambient lighting. The output of these lights should be between 100W to 250W equivalent, bright enough to light the kitchen when it’s entered.
Wall sconces. When kitchens have free wall space, wall sconces can provide visual relief from overhead lighting and provide pleasant ambient light in the kitchen. Place sconces that are oriented downward at a height of 6 ½ feet (assuming the ceiling is 8 feet or higher). Upward-oriented sconces can be placed at a 6-foot height. Sconces don’t need a lot of light output to be effective, so use a 60W equivalent bulb.
Roe Osborn
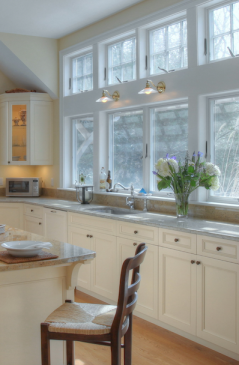
Task. Over-sink lighting is necessary for safety reasons. Sconces work well for this urpose and can add visual interest to a design.
Task Lighting
Task lighting ensures ample, focused light where it is needed for working. Most of my clients love to cook. When you’re working with older clients with older eyes, adequate lighting for kitchen workspaces is also a safety factor, because of the sharp implements used for many kitchen tasks.
Recessed downlights. Earlier, I said that attention should be paid to the placement of recessed downlights that are used for task lighting. These fixtures should be placed 18 to 24 inches out from the wall to minimize the shadows created on a counter-top by an overhead light behind a person working there. With 12-inch-deep wall cabinets, the downlight fixtures should then be just 6 to 12 inches from the face of the cabinet.
If they are more than 7 feet high and project out far enough, soffits above cabinets are a good place for recessed downlighting. And if the cabinets are white or light-colored, the reflected light from the cabinet faces will enhance the task lighting. I typically use 4-inch downlights for task lighting because they produce a more focused beam of light than the 6-inch fixtures I use for ambient light.
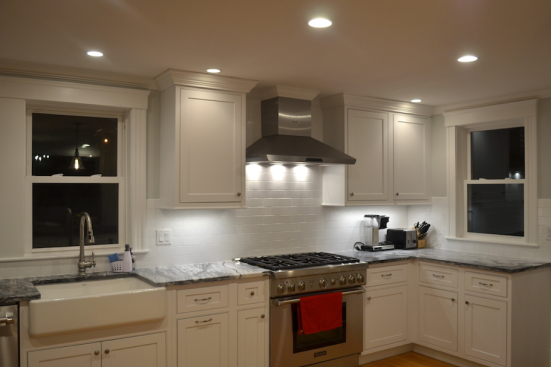
Carolyn Anderson
Task. Downlights placed in the ceiling in front of the cabinets work best when used along with under-cabinet LED lighting.
Fixture spacing should be a function of ceiling height. The higher the ceiling or soffit, the farther apart fixtures can be, but higher output is needed with the light source farther from the work surface. That said, I usually center lights on upper cabinets so the fixtures light the interior when the doors are open. Make sure that the cones of illumination light the work surface evenly.
Under-cabinet lighting. Though recessed downlights can offer adequate task lighting by themselves, they work best in concert with under-
cabinet lighting, which puts a light source below the upper cabinets, where small appliances and cooking implements are often stored and where food is placed as meals are prepared.
The under-cabinet fluorescent fixtures of 20 years ago have been replaced by low-profile dimmable LED strip lights that create pleasing, warm-colored lighting. Whenever possible, I specify upper cabinets with a light rail (a 2-inch addition to the lower face frame), with the light strips directly behind the rail. The fixtures I prefer are 1 inch wide and only ½ inch deep so they aren’t visible to someone sitting in the kitchen. Be sure that they provide a minimum of 60W equivalent light per cabinet. For corner cabinets, I often use a single puck light instead of a strip, also with 60W equivalent.
Pendant task lighting. Peninsulas and islands often offer the largest work surfaces in a kitchen, and many islands have prep sinks. Pendant lights in these areas can be a single fixture or multiple ones, or multiple lights suspended from a single bar. Pendants for task lighting should be 30 to 36 inches above the countertop height (66 to 72 inches off the floor) to avoid blocking the view. They should be placed 24 to
30 inches apart, with each light providing a minimum output of 75W equivalent.
Pendants come in a variety of styles and prices. These fixtures are often a distinct design feature, so be careful that they blend with the style of the kitchen. If you’re using chandeliers or pendants for ambient light in the kitchen, avoid replicating this type of lighting over an island or peninsula, to prevent visual competition in your design. If the kitchen opens into the dining area, make sure the fixtures in both rooms relate to each other in shape, finish, or style.
Over-sink lighting. For safety reasons, task lighting over the sink is essential and should never be overlooked or skimped on. A 4-inch downlight, a pendant (12 inches out from the wall), or a sconce over a window can serve this purpose equally well. A 60W equivalent is fine here.
Walk-in pantry. If there’s a walk-in pantry in the kitchen, place a downlight or flush-mount light in the pantry, controlled with a jamb switch or motion sensor. When a homeowner dashes into the pantry in the middle of preparing a meal, good lighting makes it much easier to find things. The cost for the fixture and switch is minimal, and a 60W equivalent should do the trick.
Motion-sensor drawer and cabinet lighting. For high-end kitchens or for clients with limited vision, motion sensors or magnetic switches for certain drawers and cabinets can provide extra light in places that are not well lit, or where extra light might be helpful for finding a small item (a typical junk drawer comes to mind). This type of lighting is also helpful for a dedicated charging station for mobile devices in a drawer or cabinet. A sensor switch automatically turns the light on when the drawer or cabinet door is pulled open. These applications don’t require bright light; because of its low profile, an LED light strip usually works well.
Roe Osborn
Accent. Lighted glass-front cabinets show off glassware. Glass shelving allows the light to shine through to the lowest shelf.
Accent Lighting
The third level of kitchen lighting, accent lighting, can provide depth to your design and highlight architectural details or the homeowner’s special objects. It can also provide low-lighting for a kitchen after the work is done.
Glass-cabinet lighting. Homeowners often ask for glass panels in upper cabinets to display fine glassware and china or favorite ceramic objects while keeping them in a safe, clean environment. Interior cabinet lighting lends depth and dimension to cabinetry, while what is shown inside adds texture and interest to the kitchen.
For this application, dimmable LED light tape or puck lights provide light inside and at the front of a glass-paneled cabinet. If the cabinets have face frames, light tape can be mounted behind the frame to direct the light back into the cabinet. For box-style cabinets without face frames, puck lights are the best option. For cabinets 36 or more inches wide, use two pucks to cast light onto, and not behind, the objects inside. Installed one-third of the depth into the cabinet, these fixtures cast light on the items inside.
Use glass shelving so the lights shine through to more than one level. Light levels for glass cabinets should be standard output for light tape and no more than 60W equivalent on the puck light.
Open shelves and uplighting. Lighting on open shelves is a nice feature and makes it easier to find things on them. As with under-cabinet lighting, adding a stiffener that is at least 1 ½ inches wide to the shelf face lets you hide the light tape behind it. Another nice accent in kitchens with high ceilings is uplighting over cabinets; light strips can be placed against the wall to wash it with light and accent the height of the ceiling. Standard-output light tape can be used for open shelving, but high-output light strips work better above cabinets and light more of the ceiling.
Carolyn Anderson, an interior designer in Asheville, N.C., specializes in kitchens and baths (carolynandersondesign.com). This article was adapted and updated from an article that originally appeared in The Journal of Light Construction.