In our area of Greenville, South Carolina, high wind resilience isn’t just “a nice to have” home feature—it’s a baseline for building a durable home. That made our decision to aim for Fortified Gold—the highest level in the Institute of Business and Home Safety (IBHS) Fortified Home standard—feel right for our Attainable Zero project.
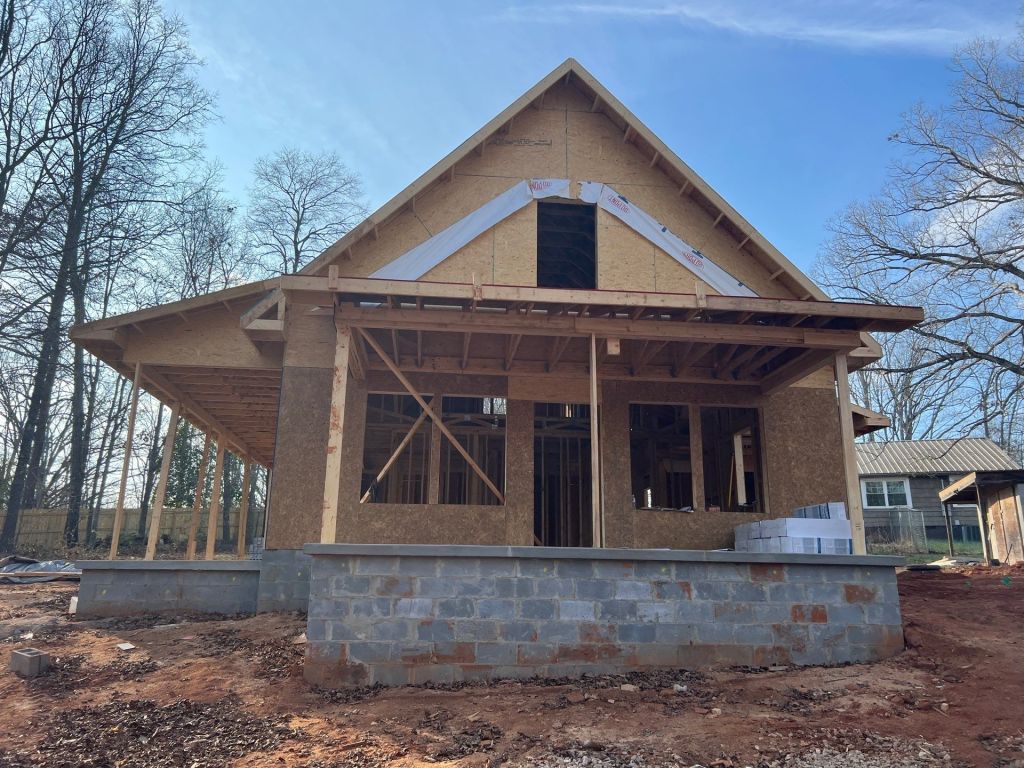
Attainable Zero. We embarked on this project—a three-bedroom, two-bath, 1,300-square-foot home that when complete will be a certified DOE Efficient New Home (formerly DOE Zero Energy Ready Home) to showcase what my company, Addison Homes, does best: build high-performance homes at an attainable price for middle-class families in our market. This home will include on-site power generation through solar roof shingles, battery storage, and ducted heating and cooling with an air source heat pump, at a price around $400,000 for design and construction costs.
Building above-code homes that deliver maximum value to our clients has been the defining principle for Addison Homes for over 20 years. I feel strongly that doing the right thing for the environment doesn’t have to be at odds with doing right by the customer. The opposite is true. The more I learned about quality sustainable construction practices, the more I connected the benefits of these practices to my customers, employees, community, and business.
One of the appeals of the Efficient New Home program is that it combines the requirements for a comfortable, healthy, duruable and energy-efficient home under a single standard. DOE requires new homes to meet the latest energy codes as well as to achieve Energy Star and EPA Indoor AirPlus certifications. The program also includes requirements that ensure water savings, HVAC and water-heating efficiencies, and third party-verified air sealing.
The DOE program promotes the IBHS Fortified Home standard, though it’s not a requirement. Building in S.C., however, we feel it’s crucial to build to a robust high-wind standard. While we are not in a wind zone, per se, typical design wind speeds for our upstate counties fall in the 85- to 100-mph range. And while we are inland, hurricanes that hit the state still wreak havoc. In 1989, Hurricane Hugo brought 90-mph winds that snapped off trees and power lines, triggered inland tornadoes, and left most of Greenville county without power. During Hurricane Helene in 2024—the deadliest hurricane in state history—over 600 properties in Greenville suffered major damage, 55 were destroyed, and more than 80% of the county lost power, with outages in some neighborhoods lasting more than two weeks. Living through such events made a strong impression on many of my clients, and that has been the reason we adopted Fortified Roof for the majority of our builds as a baseline protection that few clients ever question.
Fortified Home Levels
The Fortified Home standards are divided into three levels: Fortified Roof, Fortified Silver, and Fortified Gold. The levels are successively more stringent.
Roof. Fortified Roof, as the name says, focuses on keeping the home’s roof intact during a storm event. It requires nailing off the roof deck every 4 inches along panel edges and 6 inches in the field with 8d ring-shank nails, as well as “locking down” roof edges by nailing down a minimum 26-gauge drip edge over the underlayment. This must be paired with a fully adhered starter strip or 8-inch-wide bed of mastic on eaves and rakes. The roof deck must be sealed with tape or with a continuous peel-and-stick underlayment. (For details on achieving Fortified Roof, see “Toughening Up the Roof,” 2/19).

Fortified Gold requires first meeting Fortified Roof specifications, including a tight nailing schedule for roof sheathing (left), using a minimum ⁷/16-inch sheathing panel (center), and a sealed deck, which the author accomplished with continuous peel-and-stick membrane (right).
Silver. Fortified Silver adds reinforcement of other critical elements. At this level, we must meet all Roof requirements, brace gable-ends and chimneys, add impact- and pressure-rated garage doors, and anchor any structures attached to the house, such as porches and carports. (In hurricane zones this level also requires impact-protected windows and doors.)
Gold. The Fortified Gold designation includes all the requirements of the Roof and Silver standards, and also requires an engineered continuous load path. All roof-to-wall and wall-to-roof connections must be designed by a structural engineer, and like all the Fortified standards must be verified by a third-party inspector.
Finding The Right Engineer
The Attainable Zero project was the first time we have pursued Fortified Gold, and based on my experience with Roof and Silver, I thought achieving Gold would be straightforward. However, getting the right engineer involved wasn’t as easy as I assumed it would be.
We first engaged our truss designer, who’s a licensed engineer, but he said he didn’t understand what was being asked to complete the formwork. I reached out to the Fortified field engineering services, who referred me to an evaluation service based in Missouri, which covers our area. They referred me to an engineering firm in North Carolina. I waited two weeks, calling them daily, but was told repeatedly that their team was still reviewing our case. I learned later that this firm had never done engineering for a project at the Gold level and they were trying to figure out what was required before calling me back. Concerned about the extended delay, I reached out to a local engineer we had used in the past. I wished I had done so earlier. He came out to the site, looked at the standards, and within a few days came back to us with compliant details for our project.
The big lesson here, of course, is to “start early.” I should have begun the planning and gotten everyone—engineer, third-party evaluator, and local code officials—on board much sooner.
Marrying Framing with Performance
Most of the lessons we learned on this project centered around framing, but they weren’t isolated structural details. They had to be integrated with advanced insulation and air sealing details, and overall building performance.
Foundation to wall. A good example of this integration occurred early on. When we designed the slab foundation, we planned on using our typical perimeter insulation detail: We use an 8-inch concrete block (CMU) for the stem wall with a 4-inch CMU for the top course, set to the outside to create a step that supports the slab ledge. Our subslab insulation comes across the bottom of this step and turns up on the inside of the 4-inch CMU. When we build our 2×6 walls, we set them back 11/2 inches from the outside of the stem wall so the wall ends flush to the outside of the foundation after they are sheathed and continuous wall insulation is installed on the walls. That puts our bottom wall plate over the insulation that turns up the 4-inch CMU along the perimeter.
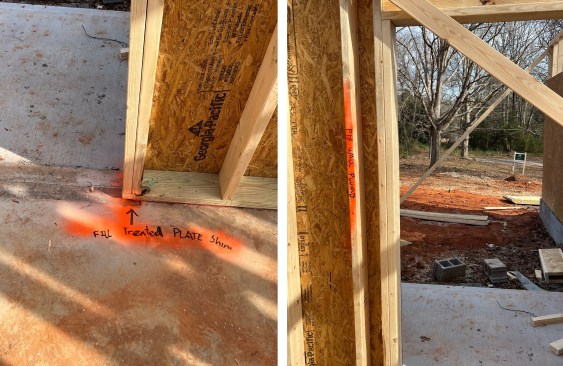
Typically, we use 1-inch XPS foam for our subslab insulation, but because we were aiming at a higher level of thermal performance on this job I switched to 2 inches of perimeter insulation. But that reduced the concrete area we had to anchor into. For a bit I thought we might not be able to anchor the plates properly to the foundation. Fortunately, we were able to use two screw-in Titan anchors, one on the CMU wall and one into the slab, to get a solid uplift connection.
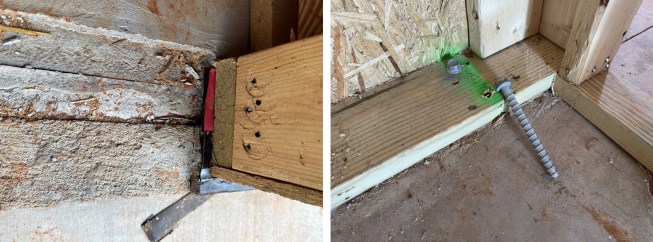
Visible in the center of a door opening (left), the 2-in. perimeter slab insulation left just a sliver of the slab under the wall plates for securing the plates with two Titan anchors (right).
We were able to use Titan anchors for anchoring the plates around the entire house. This was nothing new. We have been using Titans for a while. They are so much easier to place than anchor straps because we’re able to install them as we attach our sill plates, rather than before the foundation pour.
The difference with the anchors for meeting Gold is that we had to get these and all the other uplift connections and nailing schedules inspected before we started installing the continuous insulation and the housewrap that served as our primary air barrier. We did schedule the inspections with the evaluator, but then our start date got pushed back due to supply chain issues and pricing uncertainty last summer. This set up a chain reaction of delays. In the future we will know to build in extra time to accommodate such uncertainties.
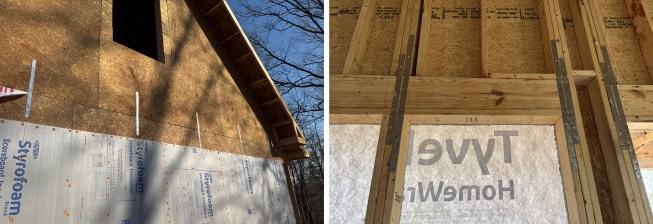
Gable-end trusses were tied to the gable-end walls with metal straps. To meet Fortified Gold, the size, frequency, and nailing needed to be specified by an engineer.
Wall to roof. For the top plate to truss connection we relied on FastenMaster’s FrameFAST screws instead of metal hurricane clips. In most parts of the house, we were able to screw these up through the wall plates from below. Where we had LVL headers we needed to come in from above, but, overall, these screws are much easier and faster to install than metal hurricane ties. The material cost is higher for the screws than for ties, but the labor savings is considerable.
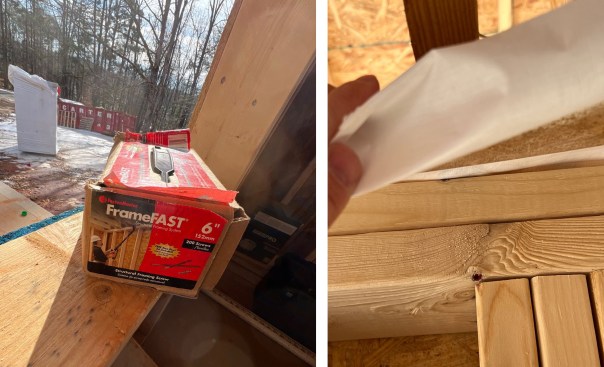
Top plate to plate connections were made with FrameFAST screws.
Also, for our primary air barrier we ran the Tyvek over the top plate, leaving a flap on the inside that we attached to the ceiling drywall with wide-spray foam sealant. This detail would have been nearly impossible with hurricane ties. In theory, you can install ties over the housewrap, but the number of penetrations would seriously compromise the air barrier.
Trusses. The main living room and kitchen area of the house has a vaulted ceiling so we used raised heel scissors trusses. The raised heel gave us the vertical space we need to get full insulation thickness over the exterior wall plates. Without that space, insulation can get compressed at the eaves and lose its effectiveness, something we were absolutely trying to avoid, especially since this project is aligned with net-zero performance goals.
The truss system over the unvaulted portion of the house included a built-in floor system—what I refer to as a “bonus truss.” In this section, the bottom of the trusses is formed with parallel chords that create a floor structure integrated into the attic truss above it. This floor structure provides more room to run our mechanicals—ductwork, plumbing, electrical—without having to cut any holes or drill into structural members, which, of course, is especially problematic with trusses.
Using a bonus truss for the upstairs living area provided one simplification in meeting Gold: The structure acts like a one-story home. If we had stick-framed a more typical story-and-half to gain the upstairs living area, we would have had to install a lot more mid-floor connections (metal straps) to tie the two stories together.
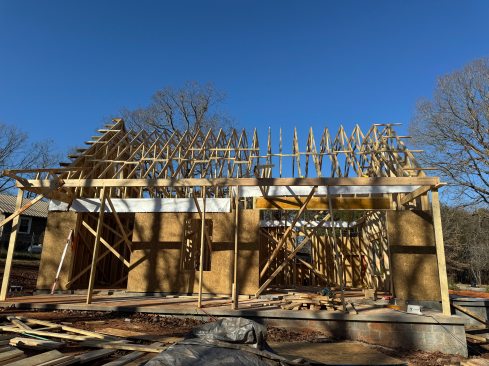
Scissors trusses over the great room (to the right) bear on 10-foot walls. The bonus trusses (on the left) sit on 9-foot walls.
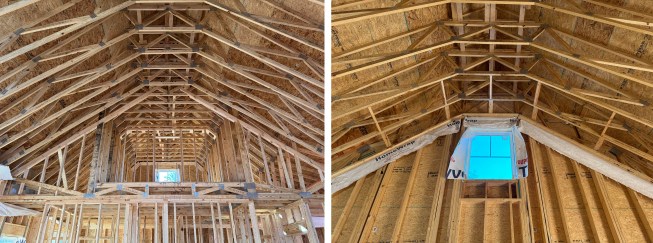
The "bonus" trusses have a parallel-chord floor structure where mechanicals will run (left). Horizontal bracing ties the gable-end truss to the next two scissors trusses (right).
Attached structures. On this project we have two porches facing south and east that provide critical shading to reduce summer cooling loads. To meet Gold, the connections of the porch posts to the porch slab were included in the engineering design. These were easily done with metal post anchors. The trickier details involved the porch trusses, which tied back to the main house truss system.
In the vaulted ceiling area, the walls are 10 feet tall, and in the area we have the bonus trusses the walls are 9 feet tall. The porch spans both wall heights but the porch roof ceiling remains level across this distance. To get all these areas to align, the porch trusses that bear on the 10-foot wall had to drop down one foot on the exterior side to maintain the level porch ceiling. This drop-down portion of the truss also had to bump out an inch and a half so that we could slide our wall sheathing and continuous insulation up onto that 10-foot wall behind that drop down of the truss. It was a bit of a booger of a detail that required close communication with the framers.
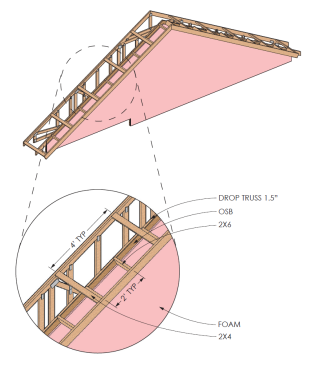
The author relies on isometric drawings, such as this one of the rake overhang detail, to better communicate plan details to installers.
Better Communication
A big advantage of using engineered trusses is clarity. The whole system—roof, attic floor, load paths—is designed by the truss manufacturer, eliminating the need to interpret prescriptive framing tables or spans. On this project, our manufacturer used MiTek design software, which allowed them to generate a 3D model of the entire truss system. Before we placed an order, we reviewed that model to make sure everything would fit exactly as intended.
In addition, we have begun to build a library of isometric details that better show complex or unusual details that are a departure from how the framers normally do things. An example is the isometric (see facing page) of the rake overhang detail. Since we’re not in a hurricane zone we don’t need engineering on the reinforced soffits. But we have devised a rugged detail that involves more than just toenailing 2×6 blocks to the gable end to support the rake overhang. Our detail relies on a gable-end truss that’s held down 1½ inches so we can slide a flat 2-by member over the truss and tie back to the first full truss. We print the isometrics on waterproof paper and collect them in a binder that we can hand to subcontractors. The isometric drawings help explain details much better than a page or two of section views buried in the plans.
Early coordination with our trade partners is a huge part of our process. Almost every home we build is unique, at least in some way, but we effectively build each home six or seven times at the computer before it ever goes up in the field. That includes reviewing drawings, the estimate. mechanical layouts, and, in this case, the 3D truss model. This helps reduce the unknowns, prevents field conflicts, and gives everyone—framers, HVAC contractors, plumbers, electricians—a head start on understanding the job. We review the 3D truss models both internally and with our subcontractors. When we know a project is coming up, we’ll walk them through the model so they can see exactly how the structure is going to come together. This transparency helps everyone prepare for the complexity of the job. It’s also part of our pricing discussions with trade partners, which is particularly important when we are trying something different, as we were on this project. Rather than telling them, “Trust us, it’s easy,” we can show them exactly what they’ll be working with.
It’s not just the production team who benefits from the 3D model and isometric drawings. We use them with our customers as well. Architectural plans can be hard for homeowners to interpret. When we can show them the actual truss layout as a 3D “box” that represents their attic and bonus space, they immediately understand things like clearances, knee wall heights, and the amount of flat ceiling area they’ll have. It’s much more intuitive than trying to read lines on a plan.
An additional communication step and quality control process we have devised involves “tagging” and marking out critical framing connections with fluorescent orange spray paint and a Sharpie (see photo below). We tag anything that needs special attention by the framers and write on it what needs to be addressed. We also mark out the rough opening sizes at doors and windows. We start tagging and marking up the frame before the framers are done, and we tell them not to freak out about all the orange. It’s not meant to be anything punitive; we’re just being clear and asking them to address each issue when they’re working in that area. Once an item is addressed, we paint it white. This strategy proved especially important on this project to ensure we had all the engineered connections properly resolved before inspection.
Practical Lessons
Pursuing Fortified Gold involved more inspections, coordination, and careful planning than for a typical build. But at the end of the day, the result is a stronger, more resilient home.
Our process highlights how much easier everything becomes when you prioritize design and communications on the front end—modeling, aligning with the truss designer, and making sure every trade partner understands the plan. The work that happens before framing ever starts is what makes the rest of the build more predictable. And for us, that planning is what allows the home to perform—not just structurally, but thermally, mechanically, and as a complete system.
The lessons we’re learning will help us serve clients with limited budgets—a key demographic for our company. The combination of Fortified Gold, DOE certification, and a disciplined building process shows that durability, resilience, and energy efficiency need not be luxury upgrades. That’s great news: My goal as a builder has always been to deliver real performance to many people, not just a few, and this project is showing us some new ways of making that happen.