Exterior Water Management
Matt Risigner
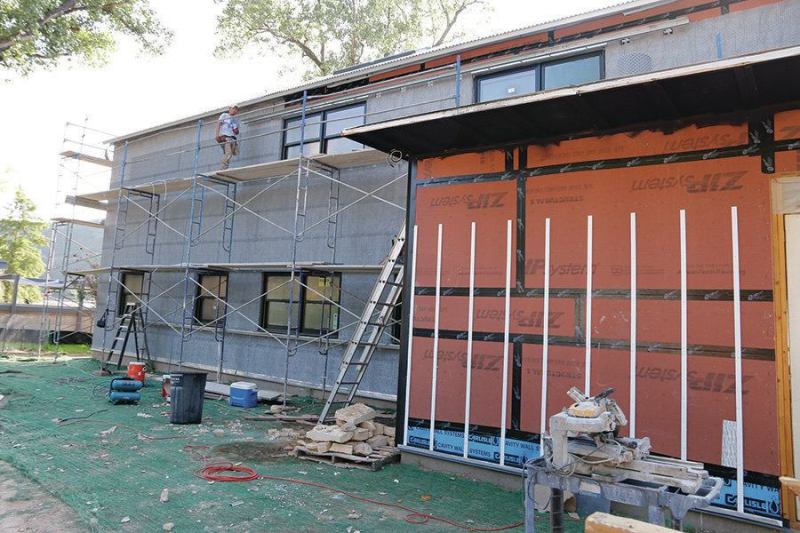
Water will always get behind siding. Wind blows in through gaps, and when the sun beats down on wet siding, it drives moisture inward. If the siding is pressed tight against plastic housewrap or applied over foam sheathing, the front of the siding tends to dry while the back stays wet. This stresses all types of siding: It cups boards, curls shingles, accelerates stucco cracks, and weakens mortar bonds in brick veneer.
Don’t rely on caulks and sealants to stop water, as they will deteriorate over time. Instead, apply the siding over a good weather-resistive barrier (WRB), or sheathing wrap, and properly installed flashing. This system should be used under any type of siding.
A WRB does not act as a drainage plane by itself; you need to create a space between the WRB and the siding. The most effective way to do this is with a rainscreen: battens or a drainage mat that creates a space behind the siding. The space should have vents at the top of the wall to promote convective air flow, and weep holes at the base of the wall to let water drain out. Nailing the siding to battens has the added advantage of reducing the nail penetrations through the house wrap.
Drainage Planes
Different sidings call for different drainage details. Typical details for well-draining walls are shown for different types of siding (below):
Figure: Drainage Planes
Board Siding
Stucco
Vinyl Siding

Brick Veneer
Shake and Shingle Siding

The key elements in rain control are a drainage plane, a drainage space under the cladding, flashings that integrate with the drainage plane, and weep holes to allow water to escape. These principles can be applied with any cladding system and with many different drainage plane and flashing materials.
Rain screens are especially important on highly insulated walls, where the drying potential of the cladding is greatly reduced.
An alternative rainscreen can be provided with a self-draining, three-dimensional building wrap. These products include ridges that hold the siding a few millimeters away from the sheathing. They’re not as effective as a true rainscreen but provide enough of a gap to let water drain.
Sheathing Wrap Materials
Although some contractors still wrap houses with asphalt-saturated felt, synthetic housewraps have become the industry standard. They’re easier to detail correctly and offer better performance.
Asphalt-Saturated Felt
Asphalt-saturated organic felt is made from recycled paper mixed with sawdust and an asphalt resin. It used to be made from cotton felt with weights of 15 or 30 pounds per square. Asphalt felt now only weighs 6 or 12 pounds per square, but is still designated No. 15 or No. 30.
With No. 15 or No. 30 asphalt felt, look for material rated ASTM D4869 or ASTM D229. The ASTM D229 standard is more stringent: it ensures a weight of at least 11.5 lbs. per square.
The biggest drawback to using asphalt felt as a WRB is that it’s difficult to apply well on walls. Generally, wrinkles are not a problem, but tears – particularly at inside corners – are common. Try to prevent sags between the relatively narrow (36-in.) courses.
Type D kraft paper (a lighter black paper than asphalt felt), sisal kraft paper (asphalt sandwiched between two layers of kraft paper), and cross-woven plastic housewraps all perform poorly in rainy and snowy climates. However, two layers of Type D paper work well beneath stucco, synthetic stone and brick veneer in most climates. Three-dimensional “drainable” building wraps (often called “crinkled” building wrap or channel wrap) create a drainage plane behind the stucco, but for best results behind stucco and adhered concrete masonry, drainable building wrap should be covered with kraft paper or felt, which acts as a bonding surface.
Synthetic Housewrap
In cold temperatures, synthetic housewrap stays more flexible than paper and felt. They also resist tearing, making them easier to apply. And they’re engineered to repel liquid water while allowing the passage of water vapor.
Perforated products are made from a vapor-tight plastic, and then needle-punched to allow vapor to pass through. Unfortunately, field-testing has shown that these holes also allow liquid water to seep through, particularly when the siding is pressed tight against the wrap. These products slow water penetration but don’t stop it.
Non-perforated housewraps are made from a plastic fiber that allows vapor to pass between the fibers. These are more resistant to water than perforated products and should be used where possible.
Effect of tannins. Tannins that leach out of woods (cedar and redwood have a high tannin content but other woods can leach tannins) lower the surface tension of water and allow water to seep directly through plastic housewraps. This can be prevented in two ways:
Install the siding over a rainscreen, which reduces contact between the housewrap and the siding.
Back-prime the siding. This reduces leaching. It also makes paint finishes last longer by blocking the migration of moisture from the back of the siding to the front.
Effect of solar-driven moisture. A plastic housewrap with high permeability (the ability to pass water vapor) may be a disadvantage on an air-conditioned house with water-absorbent cladding (e.g. brick or synthetic stone). In these cases, solar-driven vapor movement can penetrate through the housewrap into the wall framing. Back-priming the siding, and painting the cladding a light color to reduce solar gain, can help reduce the likelihood of this occurring. It’s not often a serious problem, as the direction of vapor flow will reverse when the sun is no longer beating on that side of the house.
WRB Permeance
In addition to keeping liquid water out of the wall, a building wrap should let water vapor from inside the home escape. Most building scientists downplay the importance of this permeance, pointing out that wall failures are caused by liquid water, not water vapor. One leading authority says that while the housewrap should have a perm rating more than 5, anything above 20 is overkill. That’s because the limiting throttle in most walls is the OSB and gypsum, which range from a low of 1 to a maximum of 10 perms.
Mechanically Attached vs. Peel-and-Stick WRBs
Building wraps come in mechanically attached and peel-and stick versions.
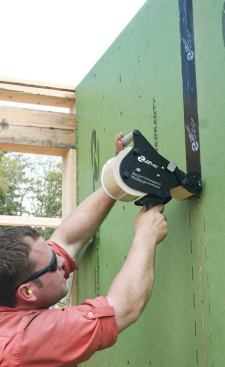
- Mechanically attached housewraps should be fastened to the wall with cap nails or cap staples. The caps increase the surface area of the fastener, reducing the chance for tearing at each penetration when subjected to wind pressures. The caps also form a gasket to reduce the chance of leaks at each fastener. A mechanically attached housewrap can serve as an air barrier if all the seams are taped with a compatible tape, or otherwise sealed.
- Fully adhered, peel-and-stick membranes resist wind damage and can serve as an air barrier, as well as a water barrier, without the use of tape. Peel-and-stick WRBs are just what the sound like: a release paper is peeled off the back of the sheet and the sheet pressed onto the wall.
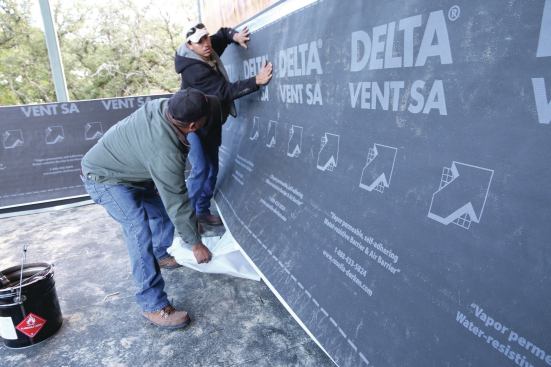
Matt Risinger
Delta-Vent SA peel-and-stick membrane air-seals walls as well as protecting them from moisture. It should be used with a rainscreen.
Typically, the sheathing must be primed before installing the membrane. No fasteners are needed but the membrane must be rolled in place with a J-roller in order to make a good bond. Sharp protrusions should be ground down. Voids wider than ¼ inch should be filled with foam or sealant.
WRB Exposure Limits
Most WRBs will degrade if exposed to UV-light for more than 30 to 60 days. However, some peel-and-stick products come with an aluminum face that can be left exposed for up to a year.
(Keep in mind that a foil-faced WRB will not be permeable. As a result, foil-faced products are appropriate in hot, humid climates, and care should be taken to avoid vinyl wall coverings and other impermeable interior finishes to avoid creating a double-sided vapor retarder. Foil-faced wall must be able to dry to the inside.)
Installing Sheathing Wrap
Apply housewrap from the bottom to the top, so upper courses lap over lower courses and shed water. Always carry sheets around corners, then reinforce the corner by applying a second layer, or spline. The spline should extend at least 6 in. beyond the joint between the siding and corner boards.
Taping Seams
The seams of a mechanically attached housewrap must be taped if it is to serve as an air barrier as well as a WRB.
Some tape can be used to repair rips (particularly tears around staples) and for securing the wrap to flashing before the siding goes on. For best results, use a polypropylene tape intended for housewrap or a flexible, peel-and-stick flashing. This is not ideal, however, as it creates a reverse lap.
A high-quality polyurethane rubber caulk may also be used to seal plastic house wrap.
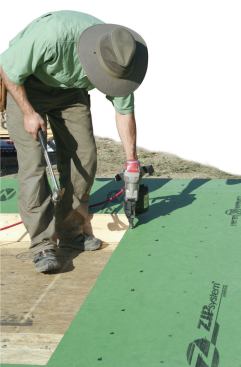
Weather-Resistive Sheathing
An alternative to installing a building wrap is a structural sheathing system that includes a water-resistant kraft-paper overlay. This material installs like ordinary OSB sheathing. After the panels are nailed off, the seams are sealed with a specially designed tape. The taped panels create a continuous air barrier at an installed cost that compares favorably to that of conventional sheathing with housewrap. The advantage is faster dry-in times and less wind damage to the weather barrier before siding and roofing gets applied.
Fluid-Applied WRBs
Fluid-applied WRBs are elastomeric products that can be sprayed, rolled, and even brushed on a wall. Depending on the product, some joint and seam filling or priming may be needed first. Once cured, the products form an elastic, airtight, vapor-permeable, and waterproof covering that will stretch and contract a bit as a building moves.
Residential-grade flui-applied products are thinner, however, than commercial-grade products, which range in thickness from 30 to 75 mils. At that thickness, the material is almost squishy when cured and provides something of a gasketing effect around fasteners for brick ties and the like.
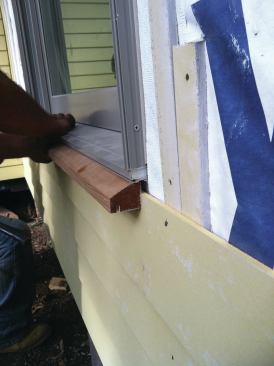
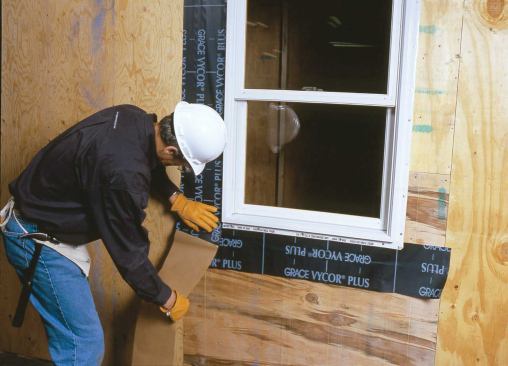
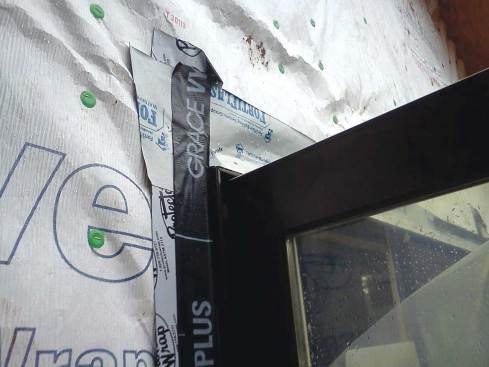
Choosing Flexible Flashing
Flexible flashing — a self-adhering tape — should be used to flash all the following: exterior door sills; deck ledgers; inside and outside corners of wall sheathing; stucco shelves and parapets; below-grade concrete cracks; and wall areas subject to splashback.
Flexible flashing for residential work is available in thicknesses from 12 to 70 mils, in widths from 3 to 36 inches, and with several types of facings. It comes in peel-and-stick and mechanically attached types.
Peel-and-Stick Flashings
Peel-and-Stick flashings can be broadly categorized into three main types: rubberized asphalt, butyl, and acrylic. Manufacturers offer some different formulations and enhancements (such as a tap that combines butyl and acrylic), but the general performance expectations are the same within each category.
Rubberized Asphalt
Rubberized asphalt, or RA, is a good all-around flashing material. One face is usually laminated to a high-density polyethylene backing, though some tapes have a foil backing. The other covered with a release tape.
The asphalt is chemically modified to make it more elastic and more able to expand and contract with the substrate. RA sticks to a variety of substrates and is self-healing in that it’s supposed to seal around nails driven through it.
RA Flashing can lose adhesion under the following conditions:
- At the high temperatures reached in a south-facing wall in summer, solvents from the asphalt have been known to leach out and stain the siding.
- If temperatures fall below 45 or 55 degF some installers warm the product before using it with a heat gun or by placing it in an ice chest with an incandescent bulb.
- After long exposure to UV light. Because of this, asphalt-based flashings should not be left uncovered for more than 30 days after application. The one exception is foil-covered tapes, which have no exact exposure limitations. However they will eventually will dry
The solvents in rubberized asphalt will stain rolled vinyl flashing – the flexible coiled trim stock – but generally will not hurt the more rigid vinyl used for window fins and siding.
On concrete, masonry, or OSB, rubberized-asphalt flashings may not stick well unless a primer is applied. On these surfaces, a butyl flashing works better.
Butyl Rubber
Butyl rubber flashings are made by laminating a synthetic, butyl rubber compound to a polyolefin based film. They contain no solvents or VOCs (volatile organic compounds). They are self-healing like rubberized asphalt but stick better to more materials and have better long-term stability.

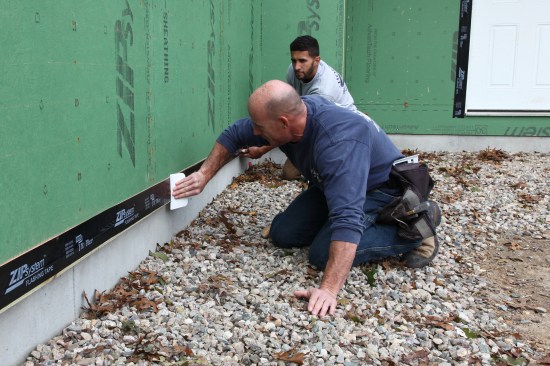
Acrylic flashings are thinner and form stronger adhesive bonds than rubberized asphalt or butyl. The best acrylic tapes use a VOC-free solid adhesive that makes a molecular bond to the substrate. Some acrylic tapes are pressure-activated, and won’t make a bond unless firmly rolled into the substrate (photo below). Acrylic flashings can withstand for longer UV exposure than RA products, with warranties starting at 90-days.
Acrylic tapes form a strong molecular bond with the substrate but need to be rolled to activate teh adhesive.
Nonstick Flashings
Not all flexible flashings are self-adhering. Some must be secured with staples or roofing nails. While generally thinner and the quickest to deteriorate in sunlight, these are often the best choice for applying beneath siding and trim in consistently cold temperatures, or when the surface is rough or dirty – factors that can diminish the bond of peel-and-stick flashings. Cover nonstick flashing as soon as possible to protect from sunlight.
Liquid-Applied Flashings
Liquid-applied flashing typically comes in sausage packs or cartridges, and gets applied to the surface, then tooled in place with a knife. Installers say that it’s sticky and has a tendency pull away from itself, so it’s important to use enough product for proper coverage, especially at corners. You can tell when you’ve achieved the minimum thickness of 12 to 15 mils: when you can no longer see the substrate underneath.
Compatibility
Compatibility is a big issue with flexible flashing, so make sure that the flashing is compatible with all substrates it will contact, including the housewrap. The safest route is to use a flashing and housewrap made by the same manufacturer.
Certain caulks and sealants may be incompatible with particular flexible flashings. The high surface tension of silicone caulk makes it a bad choice to use with flashing tape. The silicone surface just too slick to make a good bond.
Where to Use Primers
Some substrates are problematic for all flashings. These include masonry and gypsum board, which have surfaces that are loosely bonded. Most flashings also have a tough time grabbing onto the rough side of OSB. The solution in all cases is to use an adhesive primer. Primers come in brush-on and spray-on types. Primers are also available to improve adhesion to wet or not-fully-cured masonry surfaces.
Common Installation Errors
The most common mistakes – the places where installers need to pay special attention – are reverse flashing, improper cuts, poor surface prep, and not properly seating the flashing on the substrate.
Reverse Shingling
Mark LaLiberte
Reverse shingling, where the upper layers go under the lower layers, is the most common installation mistake. All flashing details should provide 100% mechanical drainage paths so that they shed water even if the adhesive fails.
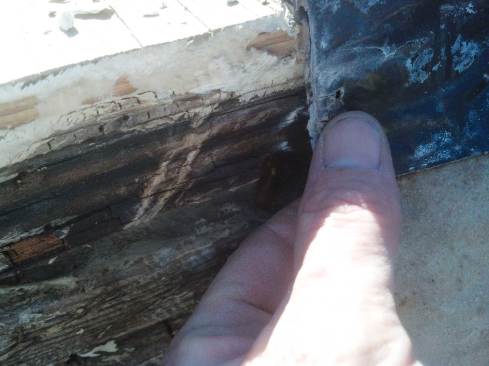
Improper Cuts
Water always follows an edge. Often a piece of flashing is cut then lapped over the piece below. The cut should direct water away from the vulnerable area, preferably out onto the WRB. The most problematic cuts are at windowsills – a good argument for using one-piece flexible product in that area.
Fastener Placement
The self-sealing properties of peel-and-stick flashings should be taken with a grain of salt. For instance fasteners should not be driven through the flashing in areas where water could collect, as in a windowsill.
Improper Surface Prep
Roe Osborn
Regardless of flashing type, the substrate needs to be clean and dry. No flashing will stick to dirty, cold, wet and frozen surfaces. There can also be adherence problems with the rough side of OSB – even if it’s bone dry and clean – as well as with gypsum and masonry-based substrates. In these cases, a primer will fill in any irregularities in the substrate and will also provide extra adhesion.
Seating Adhesive Flashing
Peel-and-stick flashing tape needs to be mechanically smoothed with a roller or other device that applies mechancial pressure to promote adhesion. Smoothing the flashing with hand pressure is not enough.
A plastic spreader is a great way to create the initial bond of the tape to the sheathing. If enough pressure is carefully and meticulously applied, the spreader can create the permanent bond. Whenever possible it is always best to go over the tape with a roller.
Flashing Windows and Doors
Refer to Windows and Doors for flashing flanged, unflanged, curved-top and recessed windows, as well as door thresholds.
Flashing Deck Ledgers
Flashing Cantilever Beams
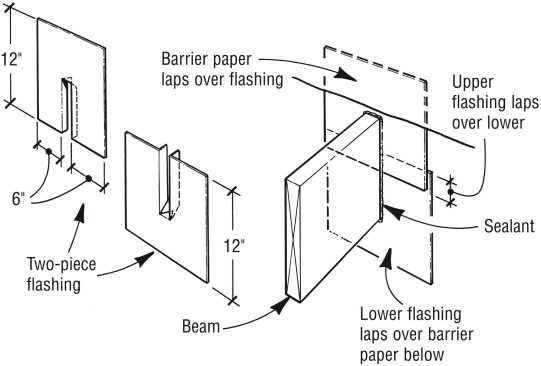
Cantilevered deck or balcony joists that project through the wall framing are trouble spots. Flash with a two-piece flashing membrane. The top flashing piece must lap over the bottom one.
Flashing Wall Penetrations
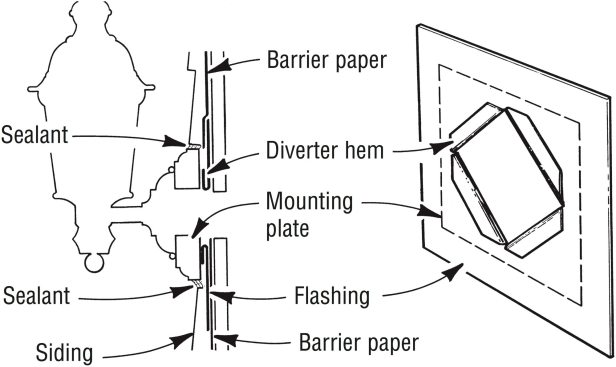
Install electrical boxes and lighting fixtures on a hemmed metal flashing plate. Do not tape the plate over the housewrap; slit the housewrap and tuck it beneath.
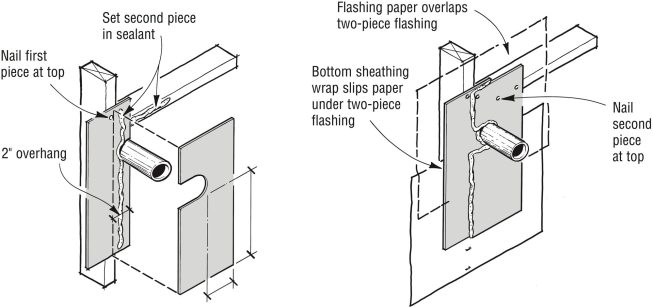
Gas line, conduit, water spigots, and other small penetrations should be flashed with a two-piece metal flashing plate. Seal the two plates with a "low modulus" urethane caulk (see Caulks and Sealants).
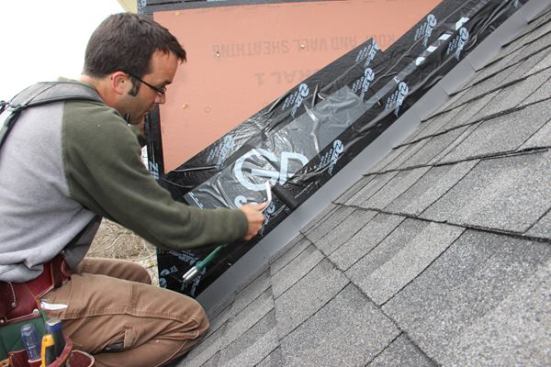
Step and Kickout Flashing
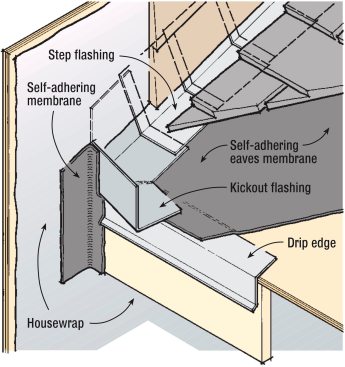
Where a roof butts into a wall. The roof should be flashed with a step flashing.