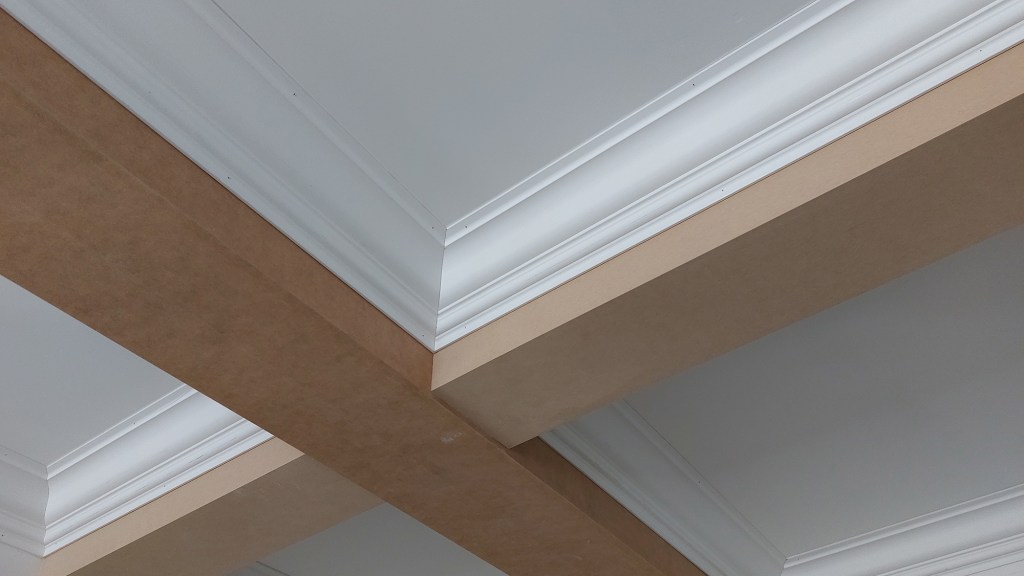
Crown molding has an elevated place (pun intended) within trim projects. This, I think, has more to do with its visibility than the complexity of its installation. While baseboard and even casing can blend into a home, crown is meant to and does draw the eye. Due to that attention grabbing, it leaves fewer places to hide imperfections and understandably intimidates many carpenters the first few times they tackle it. Let’s take away some of that mystery by walking through the steps of measuring, layout, cutting techniques, and installation.
Layout First
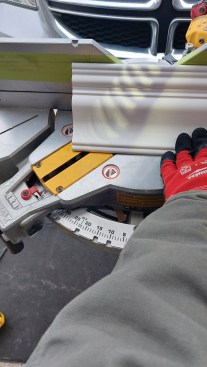
One of the first steps I take in laying out a room for crown is marking lines on the walls where the bottom edge of the crown will rest. To find the vertical distance down from the ceiling, I set a piece of crown in the corner of a framing square and read the measurement at the bottom edge of the crown where it meets the square. Next, I cut a scrap to that measurement, hold it against the ceiling, and use it to mark the crown layout around the room (photos, below). While I do this, I take measurements for a cut list and write them on the wall just above the lines I make. That way, I, or a partner, can access them at any time. I also plan out the installation, thinking out how I’ll use the material I have to reduce waste and checking for dips or bumps where I may need to adjust the nailing to float over these spots.
With an offcut of the crown squared up into the corner of a framing square, we can measure how far down it will sit from the ceiling.
Using a piece of scrap cut to match the distance that the crown will extend downward from the ceiling, the author can mark lines where the bottom of the crown will sit. Doing so helps to ensure that the molding is installed evenly around the room.
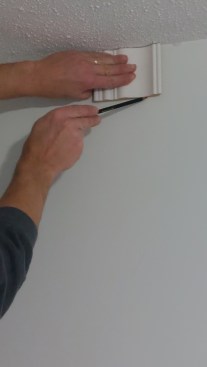
As you are taking these measurements, be sure to run your tape along the lines you marked on the wall. This is where the bottom of the crown is going to meet the wall, and running the tape there yields a more accurate measurement than would running the tape at the top of the wall. If I’m working alone, I stand at or near the middle of the wall, take a measurement from one side, and make a mark on the wall. Then I take a measurement from the other direction to that mark and add the two measurements. I may also use crown-molding hangers (photos, below). These hang on a nail in the wall just below the ceiling to hold the crown up as you nail. Just unhook the hangers as you install the crown; the crown will hide the nails. They’re great for installing crown solo, and they are also handy for setting a tape along when you’re taking long measurements.

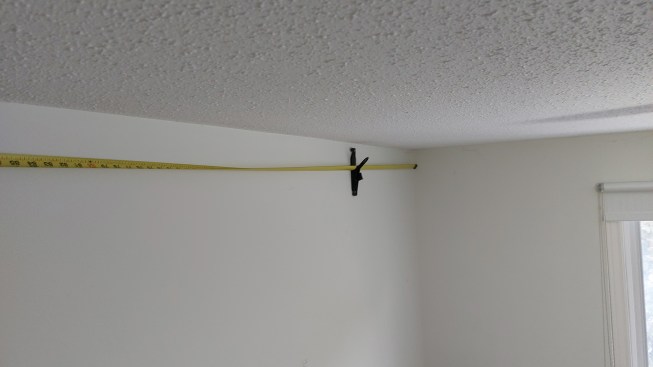
A crown molding hanger is an inexpensive way for someone to hold up crown while working alone. Beyond just holding crown up during install, the hanger is handy for taking longer measurements.
Cutting
With lines drawn and a cut list in hand, we have what we need to begin cutting the crown. First, you need to decide if you will cope or miter the inside corners. Should you cut on the flat with the material laying on its face or back, or in position with the crown “upside down and backward”? I was firmly in the “coped joints and upside down and backward” camp for most of my career; that was what I first learned to do. After working with a partner who has installed miles of crown, mostly with mitered inside corners and always cut on the flat, I came around to see the benefit of knowing both ways to join inside corners.
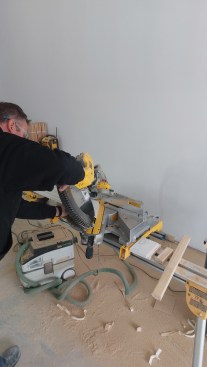
For the “upside down and backward” (or “in position”) method, the crown is set on the saw with the front of the molding facing the person cutting (slideshow below). If you think of the saw table as the ceiling and the fence as the wall, the crown is upside down and backward relative to its installed position.
I put masking tape on the saw fence and trace a line on it at the measurement equal to the distance between the bottom of the crown and the ceiling (we found that number earlier with a framing square). By always keeping the material on this line, I can be sure the compound angle I am cutting stays consistent. I make a mark to show where I am cutting on the top edge of the workpiece (installed, it will be the bottom edge of the crown that runs along the wall). Inside or outside miters are made by adjusting the table to the needed angle.
For cutting on the flat, the saw is beveled to 33.9 degrees and the miter is moved to 31.6 degrees (slideshow below). These angles, used with the most common 38-degree crown, are usually highlighted on a saw, and they may have indented stops. There are crown profiles that sit on the wall at 45 or 52 degrees; these sit higher up the wall (flatter to the ceiling) when installed and must be cut using different settings on the saw. However, in 20 years, I have run into these other types of crown only once, during a historical restoration project.
Cope or miter? Each method of joining inside corners has its benefits in terms of speed and appearance. Theoretically, a coped joint on the inside corners should separate less over time. With only one cut edge meeting the profiled face, the shrinkage from only one length of crown will show and, even then, this shrinkage will be visible from only one direction. On the other hand, with a miter, there is potential for both lengths of crown to shrink, doubling the gap. While this sounds bad, there are ways to overcome this shrinkage, and the speed of mitering makes for a far more efficient install.

Alternatively, hold the crown "in position" against the line dra…
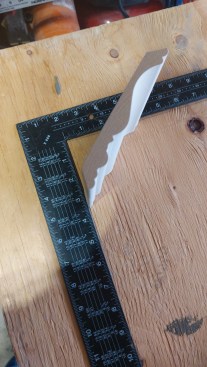
Coping
When you cope a joint, you are sculpting the profile on one end of crown so that it marries with the profile of another piece of crown in a corner. To make this cut, first cut an inside miter to expose the material you need to remove by following the profile with a jigsaw or a grinding wheel. I use a jigsaw to cut away the bulk of the material and then do some cleanup on the back with a grinder (see slideshow, above).
When using the jigsaw, I hold it at an angle opposite the mitered angle, creating a “back-cut” as I work along the profile. Removing material behind the front face of the crown allows the joint to sit tight to the piece it is being married to. It is best to use a blade that cuts on the downstroke when you’re cutting the way that’s shown in the photos; when the teeth are cutting on the upstroke, you can tear out the face of your trim. When I install a coped joint on crown, I run a generous bead of caulking on the back of the cut. This squishes into the crown and remains hidden while acting as an adhesive and backing for the joint.
Mitering
I make the first cut on the workpiece, then hook or place a tape on this point, run it to the measurement needed, and mark for the second cut. These marks are on the bottom edge of the crown where the crown will meet a corner.
To reduce the chances of an inside miter opening up, I will add PVA glue (Titebond Wood Glue, LePage Carpenter’s Glue, Gorilla Wood Glue) on the cut face and work the miter together tight. The PVA has a longer open time than a quick-set glue and allows for more manipulation before it sets. Be sure to wipe away any squeeze-out so it does not create an uneven surface for painting later.
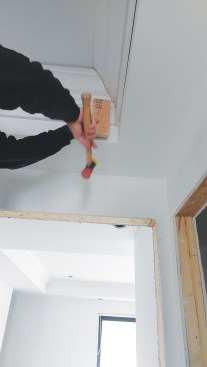
For the mitered joint, you can tap the pieces up or down with a block of wood to close the joint (slideshow above). Tap the trim up to close the gap at the bottom or work the crown down to close the miter at the top. Be sure to set the block on the thicker part of the profile; tapping on the thinner edge at the top or bottom can damage the material.
To keep the miter tight, I always overcut the ends by 1/16 inch. This holds for miters and coped joints. The extra length provides some leeway for future shrinkage. Be careful, though; more than 1/16 inch long, and the corners are driven into the drywall, resulting in overlapping at the miter. Forcing a coped joint too tight can break the thin leading edge.
For outside miters, I glue up the miters before installing the crown. It is much easier to get a perfect fit on the floor or a table than it is over your head on a ladder. I use a fast-set glue like Mitrebond or 2P-10, usually without the instant activator so I have a second to line up the pieces. I’ve had a great experience with these fast-set glues on MDF, as they penetrate the material and create a joint that doesn’t come apart without ripping material off. With pine, and more so with hardwoods, the bond seems brittle and doesn’t seem to penetrate as deep. With hardwoods, I will use a few drops of the fast-set for the quick hold but will use PVA glue, as well, to create a deeper bond.
An added step I take with outside corners is to lay a bead of hot glue on the inside of the joint. This weld line adds some strength to the joint and lets me flex the finished piece into place (below).
A bead of hot glue adds strength to the outside miter after the joint is preset. This added step gives the joint some flexibility during installation and helps prevent separation over time.
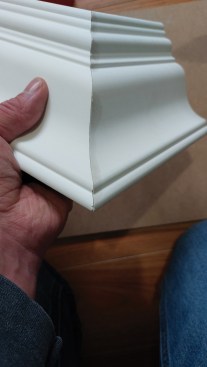
By gluing the outside miter on the ground before installing the crown, the author finds it easier to get a perfect fit.
Installing the Crown
With the parts cut, ladders in place, and glue at the ready, we’re almost ready to start nailing the crown in place. Before I start nailing, I take a moment to mark the positions of the studs and strapping on the walls and ceilings so I know where to place the fasteners. Shooting blind and using more steel than wood should be avoided for a professional result. Proper and consistent placement of nails into the studs or strapping will result in a better hold and make caulking and filling easier.
You may not have strapping to hit on some runs because of its layout in the room. In those cases, I cross the nails to increase hold. Fire one nail at an angle into the trim and ceiling and another in the opposite direction next to it. This tends to create a better hold in the ceiling than just nailing once up and into the drywall.
Note that even though the gun can hold 2-inch nails, you don’t have to use that size. To penetrate the thin edge of crown and hit studs or strapping, 1 1/2- or even 1 1/4-inch nails are plenty long. The added length of the 2-inch nail would be wasted and only increase the chance of finding a wire or pipe you didn’t know was there.
The final part of the installation should be to go over your work. While caulking and filling nail holes is not always part of a carpenter’s job, I often preferred to do at least the first pass myself. This gave me a chance to double-check joints and be sure the trim was securely fastened. All the better to do this now than get a callback later. While you are doing this, you can sight down the lengths of trim to be sure lines are straight. Bumps and dips in the wall and ceiling can make crown wavy. With crown being an accent feature, having it highlight those imperfections (even if they’re not your fault) will reflect badly on what you are trying to accomplish. I will pull the crown away from the wall or ceiling to keep it straight. Defects can be particularly noticeable in a long line of travel, as in a hallway or large room. In a custom home, a float of plaster is often needed to even out defects in the walls or ceiling.
While crown is an attention grabber, it does not need to be difficult to execute. Careful preparation and a series of small steps done well will yield the result that its name alludes to. There are many tutorials available online for these techniques and more. I recommend searching them out, but since none of them will replace practice, my best advice is to try out these techniques and discover what works best for you. Take some care and time, and you will get the result you want. As I would tell my long-suffering partner each time we finished a crown job, “It may not be the best crown we have ever done, but it’s up there.”


