As a builder of energy-efficient homes, I’m often approached by clients who want some form of solar energy at work in their new home or addition. A new house we recently designed and built had the two key components of a successful solar project: a great site and an enthusiastic client.
Active solar systems — which typically involve roof-mounted panels and related equipment — have been making great advances of late and are looking more attractive to a broader spectrum of homeowners. However, at my company we believe that passive solar design considerations should be applied to a design first, before expanding to active solar installations, which can always be a future option.
And in fact, as the design for this particular project evolved, it became clear that a full-blown, active solar system would break the budget. We determined that a passive solar approach was the most cost-effective solution and the best fit for this home.
No Moving Parts
From an investment perspective, building to take advantage of passive solar heating is often a prudent upgrade. Many of the key components add little or no cost, since they require only simple design modifications using conventional building materials.
Ordinary windows and patio doors, for instance, can act as solar collectors. On many sites, relocating the building’s footprint to a more favorable solar orientation costs nothing. The “extra” glazing needed for a house’s south wall can be deducted from the north and west elevations. And open floor plans and generous natural lighting are desirable features in any home, regardless of energy-efficiency issues.
What surprises many people is that, contrary to the popular image of a solar house as tortured into awkward shapes and covered with vast arrays of glazing panels and solar collectors, any home design can be adapted to benefit from passive solar.
Indeed, we now know that glazing need not be vast, let alone sloped. And we know that greenhouse-style enclosures, curved glass roofs, and vast skylight glazing not only detract from a building’s aesthetics, but tend to overheat the building during many parts of the year.
The key is to start with well-established solar design guidelines and then apply them with flexibility to meet the clients’ wishes and to complement the building’s architectural style.
Predicting the Solar Path
Capturing the sun’s warmth through south-facing glazing is a fundamental principle of passive solar design.
Since the sun’s path and angle are known throughout the seasons, we can design to optimize heat gain in cold seasons and optimize shade in hot ones. This strategy involves aligning the home’s solar facade to face close to true — or solar — south, an orientation that optimizes solar gain during the winter months by allowing the low angle of the winter sun to penetrate deep into the building.
The first step with this approach is to find solar south, which varies from magnetic south by a variable number of degrees depending on your location. For more information and to find your region’s correction factor — also referred to as its magnetic declination — go to the Web site www.ngdc.noaa.gov/seg/geomag/jsp/Declination.jsp and enter your zip code.
Our location in the Northeast dictates an orientation of 15 degrees west of magnetic south, or 195 degrees on a compass set to magnetic north.
To ensure ideal siting of the building and optimal placement of glazing, we turn to a design tool known as the Solar Pathfinder (317/501-2529, www.solarpathfinder.com).
Using a transparent convex plastic dome, this device combines a panoramic view of the site with a sun-path diagram. Anything that blocks sunlight — trees, buildings, and the like — is visible as reflections on the surface of the dome; the site’s potential shade is thus superimposed on the sun-path diagram. The diagram itself is calibrated to give solar data for every hour of daylight, 365 days a year.
With this information, we can plan building elevations and window placement for maximum winter gains and also decide which deciduous trees to leave for summer shade.
Vertical glazing preferred. The best solar designs strike a balance between aesthetics and solar performance. Achieving this balance requires a careful consideration of both the optimal amount and placement of glazing and the proper ratio of glass to wall and floor space.
Vertical glazing works best because it effectively captures the low-angled winter sun while rejecting much of the high-angled summer sun.
Skylights, roof glass, and sloped greenhouse-style glazing, on the other hand, should be avoided; they can lead to excessive summer heat gain.
Stationary glass is okay, but operable doors and windows are preferable, since they allow ventilation during summer months.
Low-E Glazing
Where I work, in New England, the standard residential window has low-E double glazing, which serves well in passive solar applications. However, it’s worth noting that what is sold as “standard” low-E has changed over time and varies from one region to another.
It seems that a lot of the windows being shipped now have “spectrally selective” low-E, which has high R-values but relatively low solar-transmittance values (SHGF — solar heat gain factor — of around .4 as opposed to .6 to .7 for “standard” low-E). These units minimize heat loss and reduce overheating problems, but aren’t great for passive solar gain because they deflect infrared radiation. (For good general information about windows and energy performance, visit the Web sites www.efficientwindows.org/ and www.nfrc.org/.)
Different glass coatings affect solar-transmittance values to varying degrees, but they always make the value lower than that of noncoated glass. In a passive solar application, the main advantage of low-E glass is its resistance to radiant heat loss after the sun goes down. If you’re aiming for optimal passive solar design, with maximum heat gain as the goal, you may want to consider using noncoated double- or triple-pane glazing instead of low-E coatings, along with some form of active insulating shade or shutter to block nighttime heat loss through the windows.
On the job shown in this article, we kept things simple; our main goal was to decrease daytime fuel consumption while enhancing comfort and aesthetics by allowing the sun to penetrate far into the living space.
Window placement. Typically, site conditions, landscape views, ventilation needs, and client preferences all play a role in dictating window placement. For optimal solar performance, the south-facing glass area should total between 7 percent and 15 percent of the total finished floor area. South glazing in excess of 7 percent requires adding thermal mass to absorb the excess solar heat on sunny days and keep the building from overheating. The thermal mass releases its stored heat to the room later in the day as temperatures drop.
While thermal mass reduces temperature swings in the interior space, it can also have a downside: A high-mass home in New England can be pretty uncomfortable if the mass is allowed to chill after a few days of cloudy weather and low thermostat settings. Then the homeowner will experience radiant cooling (which feels like standing next to a big cold rock) until the mass is brought up to comfortable temperatures, a process that can take a long time. The best defense against this experience is the backup heating system and a set-it-and-forget-it thermostat mindset — that is, set the thermostat at, say, 68°F, and then leave it alone.
Ideally, north-, east-, and west-facing glazing should each total less than 4 percent of the finished floor area. But when a desirable view lies in any of these nonsoutherly directions, natural or mechanical shade and insulating blinds can add some flexibility to those guidelines. Shading is most relevant with west-facing glass, a common source of overheating in summer months. East-facing glass doesn’t present a problem in New England, but this may not be the case in warmer climates. With north-facing glass, the problem is usually heat loss, not shading.
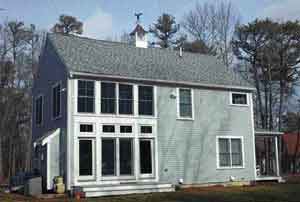
Our clients’ preference for an early start in the mornings called for east-facing bedroom and kitchen windows to jump-start their day. We located the open-space family room, used primarily during the day, on the south side of the house, where it could benefit from the prime solar-gain hours between 10 a.m. and 2 p.m. And we located the garage and storage areas on the home’s north side, where they’d help buffer the house against winter winds.
Shading. Shading can be an important way to prevent overheating, particularly in homes with large expanses of west-facing glass. But in my experience, configuring building overhangs to provide shade is often impractical. I once asked an architect to design an overhang for a westerly facade, where the late afternoon sun would pour in during the summer months. He estimated that we’d need an overhang that was about 12 feet deep.
In this project, the practical answer was as simple as installing and using window blinds. However, if a plan requires a lot of sun-shaded west-facing glass, then spectrally selective or heat-reflecting glass — plus shades — might be required to prevent overheating.
Shading south-facing windows with fixed overhangs is easier, due to the high angle of the midday sun during the summer months. Doing so is usually unnecessary, though; little of that high summer sun enters the building anyway. Operable windows can reduce the need for shade on the south facade even further.
Conservation First
All successful passive solar homes start with a tight, well-insulated building shell. Higher R-values and airtight shell details, along with advances in low-E glazing materials, combine to make the passive solar concept a practical reality, with today’s designs easily outperforming earlier solar homes.
Our standard insulation package — a combination of blown cellulose and airtight rigid-foam insulation — creates a high-performance thermal shell (see “Fixing the Holes Where the Air Gets In,” 1/04). By using dense-pack cellulose and a 1-inch layer of taped foam board under the drywall, we achieve a nominal value of R-24 in the 2×6 wall cavities. Ceiling values — again, using blown cellulose — are around R-45, and the floor system averages R-22, thanks to fiberglass batts and an application of sprayed foam around rim joists.
Simple Solar Storage
As mentioned previously, adding thermal mass for heat storage is an essential element in passive solar homes with south glass in excess of 7 percent of the total floor area. Solar heat gains are absorbed by the mass during sunny days and released after sunset to help maintain comfort levels. Strategic thermal mass also helps temper the rate of heat gain, helping to prevent overheating. A wide range of materials can be used to absorb both direct and indirect solar energy during the day, including interior masonry walls, poured concrete slabs, and stone, ceramic tile, or brick on floors and walls.
Mass thickness. Generally, the denser the material, the better its thermal-storage properties. Thermal mass works best in thicknesses of 2 to 4 inches, spread out over as large an area as possible. Mass thicker than about 4 inches tends not to absorb or release heat readily enough to be effective, so only the outer 2 to 4 inches should be counted as thermal mass. Note that light-colored mass may reflect, rather than absorb, the infrared spectrum. Stick to darker shades for the best heat absorption in direct-gain — mostly floor — areas.
Direct vs. indirect mass. The most effective thermal mass is located to receive direct sunlight. Of course, furniture has to be considered in a floor plan, and furniture blocks direct solar gain. However, thermal mass located out of direct sunlight — called indirect mass — also provides energy-storage benefits, which allows for great design flexibility. By using a mix of materials on various surfaces and locations, you can effectively spread the thermal mass around to accommodate a furnished passive solar home.
Glass-to-mass ratios and distribution. The ratio of south-facing glass to thermal mass areas has to be considered during the design phase.
The “ideal” ratio of thermal mass to glazing varies by climate. According to one of the guides we use in the design phase, Passive Solar Design Strategies, for every square foot of south-facing, direct-gain glazing at 7 percent of the overall floor area, you need about 6 square feet of combined direct and indirect thermal mass area. (Passive Solar Design Strategies is no longer published, but most of its content can be found in the Sustainable Buildings Industry Council’s newly updated publication Green Building Guidelines: Meeting the Demand for Low-Energy, Resource-Efficient Homes, which is available at www.sbicouncil.org.)
The 2,000-square-foot house shown on these pages happened to have 200 square feet of south-facing glass, equal to 10 percent of the floor area. This put us over the ideal glazing ratio by 60 square feet: 2,000 square feet x 7 percent = 140 square feet.
So, to avoid potential overheating on sunny days, we needed to add thermal mass to absorb the gain. For every square foot of south-facing glass exceeding 7 percent of the home’s overall square-footage, another 51/2 square feet of indirect-gain thermal mass needs to be provided. This meant we needed to add 330 square feet (60 x 5.5 = 330) of either direct or indirect-gain thermal mass.
We opted to install a concrete “thin slab” — 11/2 inches of poured concrete over wood framing as a base for a 1/2-inch-thick ceramic tile floor. To handle the dead load of the concrete, we upgraded the floor framing and moved the door headers up 2 inches to accommodate the extra floor thickness.
Since the owners wanted an open floor plan, most of this thermal-mass floor was directly exposed to the sun during the peak winter solar hours.
Because of the vagaries of furniture placement and actual “direct sunlight” in the room, it’s hard to get exact in defining “direct gain,” but we calculated the direct-gain value of the family room floor area at 275 square feet, giving us 135 square feet toward our aggregate goal of 330 square feet of additional mass. This still left us 195 square feet shy of the ideal ratio, so to achieve the total thermal mass requirement, we installed a 1/2-inch layer of cement backerboard behind the drywall on an interior partition that received direct winter sun.
This is a good example of the flexibility inherent in passive solar design. You don’t have to be slavishly precise with the ratio, and you can mix and match direct and indirect thermal mass to achieve the general levels required.
Growing Solar Demand
Against a backdrop of rising energy prices and growing consumer demand for increased comfort, solar strategies really start to make sense. In this home, we knew the passive solar features wouldn’t supply all of the home’s heating needs. Sunless days and heat loss through the glass at night will always compromise passive-solar performance. However, the house’s upgraded insulation and airtightness helped reduce the heating load to such an extent we could meet the home’s backup heating needs with a conventional high-efficiency water heater.
Basking in the radiant warmth of the sun during those cold winter months, with the thermostat turned down, is an appealing concept for potential clients. Suggesting they take advantage of these benefits is an easy sale and allows us to pursue the type of project that separates us from the competition.
Bruce Torrey is a consultant with Building Diagnostics in East Sandwich, Mass.


