Cabinet installation takes place after most of the other work in a kitchen has been completed, including framing, flooring, drywall, and rough-in for plumbing, electrical, and HVAC systems. Whether the cabinet installer is involved in this prep work directly or he arrives on site after it has been completed, he’s likely to be faced with a variety of conditions that will affect not only the installation process but also the final appearance and functionality of the cabinets. In this article, we look at the most common problems that cabinet installers face—especially in existing homes—and the methods, tools, and products that help them find solutions.
Check Dimensions
The best time to discover that cabinet dimensions don’t match up with room dimensions is before you start putting the cabinets together. Follow these two procedures to uncover mistakes that can derail an installation:
Mark the layout. Rather than check dimensions only on the plans, also mark the dimensions and the location of the cabinets on a strip of painter’s tape on the wall or floor. Draw lines on the tape to designate the left and right sides of each cabinet face, then write the cabinet number from the plan in the space between. Left in place for the remainder of the job, these marks serve double-duty—as a crosscheck for the cabinet package and as a spot check during installation. They will also help when it comes time to verify plumbing, electrical, and HVAC rough-in.
Dry-fit the cabinets. This can be done in the kitchen itself or in any space that’s large enough. Take each cabinet out of its box and check for damage, then match the cabinet to the plan. Next, dry-fit the cabinets by placing them (without fasteners) in relation to one another according to the planned layout. This makes it easy to spot any dimensional and alignment problems, as well as potential installation problems, such as missing end panels or filler strips. After dry-fitting, repack the cabinets in their boxes to prevent damage.
The entire kitchen doesn’t need to be dry-fit at once, but every run of cabinets should be checked for the following:
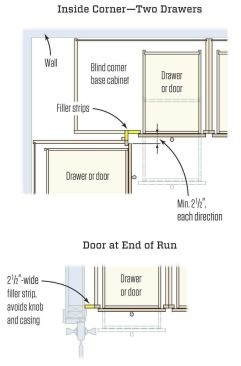
Inside Corner—Two Drawers. Where cabinets meet at an inside co…
Corner drawers or appliances. Where cabinets meet at a corner, use filler strips to provide at least 2 1/2 inches of clearance in each direction to ensure that doors and drawers can open without interference (see Inside Corner—Two Drawers illustration). Where an appliance must be located at a corner, a filler will also prevent interference with doors, drawers, pulls, and handles.
Door or window at the end of a run. Where a bank of cabinets terminates at a wall next to a window or a door (see Door at End of Run), use a filler strip to prevent interference from a door knob or trim.
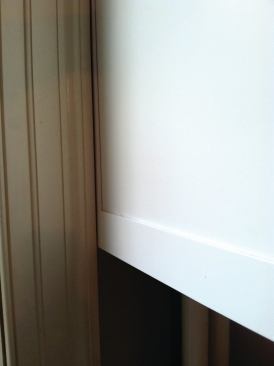
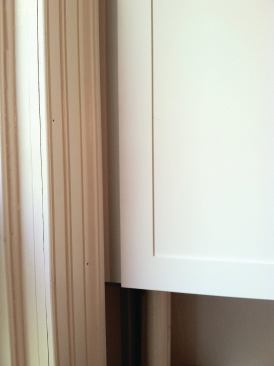
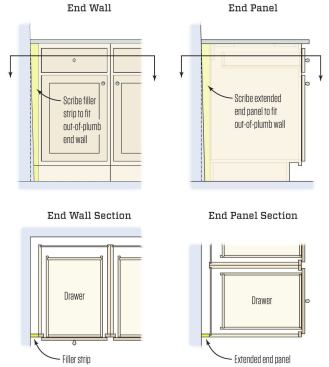
Out-of-plumb end wall. Where cabinet sides meet walls, use filler strips to close any gaps at the ends, scribing if necessary where a wall has an irregular surface or is out-of-plumb (see End Wall illustration).
Finish end panels. Cabinets at the end of a run may need an extended finish panel; the excess depth allows for scribing to walls that are out-of-square or out-of-plumb (see End Panel illustration).
Centering, symmetry, and alignment. Ensure cabinets align as planned with windows and doors (for instance, that sink bases are centered on a window or that wall cabinets are symmetrical on both sides of a door or window). Check for interference from window or door trim.
Upper/lower alignment. Check that base and wall cabinets properly align at inside and outside corners. A base-cabinet filler usually must be matched by a corresponding wall-cabinet filler.
Appliance openings. Make sure that all appliances will fit into the openings provided by the actual cabinets. This is especially important on jobs where the client orders the appliances. Check opening width and height, including where wall cabinets are hung above an appliance, such as a refrigerator, microwave, or range. (Most appliance width dimensions are finish-opening dimensions; for example, a 30-inch range needs exactly 30 inches between cabinets.)
Countertop alignment. Check all dimensions where countertops will need to align with room features, such as window sills, door and window trim, and chair rail or wainscoting.
Room access. Determine that all appliances and large cabinets will fit through archways or doorways, and that there is enough height in the room to stand up tall cabinets (a 96-inch-tall pantry cabinet 24 inches deep, for instance, needs at least 99 inches of headroom).
Click here for enlarged image
Level, plumb, & square
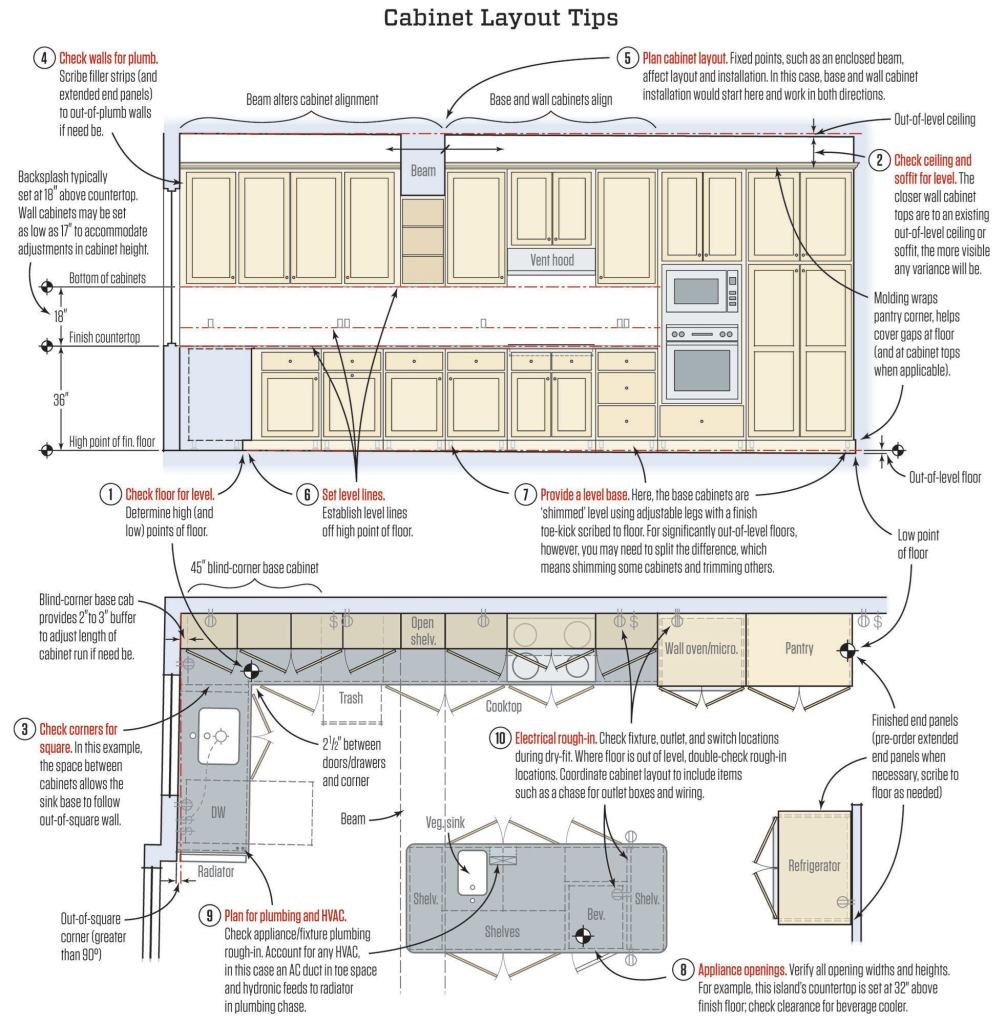
Floors, walls, and ceilings are never as level, plumb, or square as they look, and many kitchens—especially in existing homes—show variations in all three measures. Standard countertop height is 36 inches, but this may vary depending on where the high and low points are in the floor (see Cabinet Layout Tips illustration). Most installers are comfortable shimming or scribing cabinets to correct variances of 1 inch (possibly more, depending on the configuration of the cabinet run).
Check the floor for level. Using a laser level or long spirit level along the wall, find the high and low spots in the floor (check island or peninsula locations, too, particularly if they will house an undercounter appliance). Also spot-check a line about 2 feet out to see if the floor is at the same level across the depth of the cabinets. Mark high and low spots on the floor (or on painter’s tape), as well as any other humps or sags—these dimensions will help later when you are setting final base cabinet height.
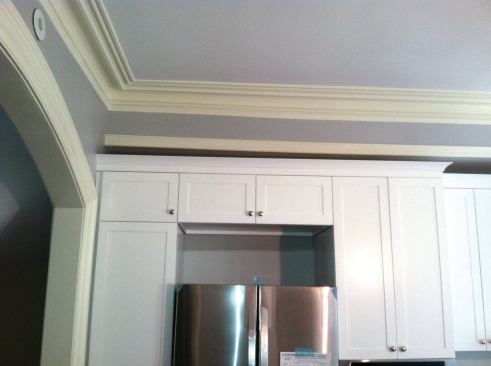
Check soffit and ceiling. The ceiling will usually follow the floor, but not always. Check whether an existing soffit compensates for an out-of-level ceiling, and make sure it is level across its depth. The closer that wall-cabinet tops are to the ceiling or soffit, the more visible any variance will be. Simple, square-profile molding may disguise a small variance; if there are larger problems, now is the time to fix them.
Check corners for square. Measure out a 3-4-5 triangle in three locations—at the floor, at the ceiling or soffit, and at approximate countertop height. Obtuse-angled corners may permit cabinets to be set flush against both walls, depending on the type of corner cabinet used; acute angles may require spacing cabinets away from the wall to accommodate carousel-type hardware. Even where walls are square, a buildup of joint compound may have to be removed to prevent interference with corner base and wall cabinets.
Check walls for plumb. If out-of-plumb walls are discovered before the cabinets are ordered, specify extended panels, whose extra depth will make it possible to scribe cleanly against the wall. (Added height at tall end panels may also be needed to compensate for low spots in the floor.) Where an out-of-plumb wall is discovered after the fact, adding a custom extension on site or adding molding to conceal any gaps may be the only solution.
Check backsplash. Wall cabinets are typically set at 18 inches above the finished countertop, but if you need to adjust this dimension, 17 inches is the recommended minimum. Where wall cabinets and backsplash are in different planes because of an out-of-plumb wall, you may need to use molding to conceal any gaps.
Systems Rough-in
The GC should have made sure that all appliances and equipment were properly roughed in, but cabinet installers should still compare the kitchen plans with the actual locations of pipes and wires in the walls, floor, and ceiling. Remember: Adjustments for out-of-level and out-of-square conditions may alter rough-in dimensions.
Appliances. Some installers insist on having all appliances and fixtures on site before cabinet installation begins so that they can verify rough-in dimensions on the actual equipment. Where this isn’t possible, check the plans against printed or online manufacturer spec sheets, or call the appliance dealer directly.
HVAC ductwork. Because wall space is at a premium in a kitchen, heating and cooling ducts or piping is typically routed through the toe space under cabinets, where it will be nearly inaccessible once cabinets are installed. Make sure that this equipment is in the right place, is properly secured, and will actually fit under or between cabinets. This is also the best time to seal around floor and wall penetrations to keep out air or small critters.
Electrical. The kitchen plans should indicate the types and positions of fixtures, outlets, and switches. Check these locations during dry-fit; where the floor is out of level, double-check rough-in locations for backsplash outlets and switches, and for undercabinet lighting that may be affected by adjustments to cabinet height. Make sure there is enough room in cabinets that will house low-voltage transformers.


