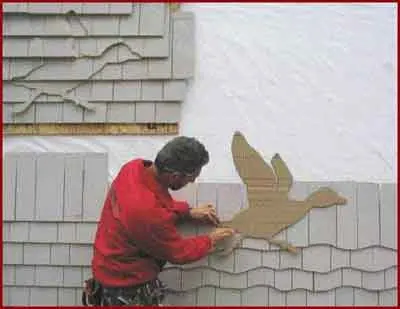
In two previous JLC articles on decorative shingling, I demonstrated how to layer shingles to create repeating geometric and free-form designs (see “Decorative Shingling,” 6/06, and “Shingle Art,” 1/07). The duck featured in this article requires a little extra planning but uses the same basic ramp-and-layer system.
This technique essentially silhouettes a shape, with regular or modified shingle courses running across the design. Ramping multiple shingle layers in the same course creates relief, which helps form shadow lines and makes the design stand out. Layers also form interesting edges where the exposure of a shingle climbs up and over other shingles in the same course.
To simplify the layout, I use a cardboard pattern. This method can be used to build virtually any design, including animals, buildings, people, and landscapes.
Making the Pattern
Google Image Search (images.google.com) is a great source of design ideas: Type in “duck” and instantly you have thousands of images to choose from. Once you’ve saved a few you like (either by printing them out or saving them to disk), the trick is to enlarge the image to the size you want and then trace it onto a piece of cardboard. There are several ways to do this:
• With an LCD projector, display the image onto a piece of cardboard and trace.
• With an overhead projector, project a small paper cut-out or printed transparency onto cardboard.
• To use a slide projector, first resize the image to fit within a 1-inch square; then print on a transparency, cut and mount the transparency image in a slide frame, and project.
• To use graph paper, resize the image to a full-size piece of paper, then print onto 1/4-inch-scale graph paper. Draw a scale graph on cardboard (or directly on a wall when doing a giant image) and trace freehand block-by-block. It’s crude, but effective.
To simplify planning, I size the image to fit my shingle course exposures. A typical exposure measures 5 inches, but I like to adjust shingle exposures slightly so that shingle butt lines match the tops and bottoms of windows and other horizontal elements, then record the layout on a story pole. To make sure the design fits, I transfer the story-pole marks for the area where I plan to install the design onto a large piece of cardboard. Then I draw (or snap) the shingle course layout lines across the cardboard. When I project the design onto the cardboard, I size it and adjust it up or down to suit the exposure layout.
Sometimes it also helps to rotate the design slightly. For example, this duck has two horizontal points on its body — the tips of the bill and the tail. To avoid having to glue a fragile piece of shingle to the course below, it’s best that these points align with butt lines rather than end in the middle of a course.
When I’m satisfied that I’ve got a good fit, I trace the design on the cardboard and cut out the pattern. I use tape to reinforce any narrow sections, like the duck’s legs.
Laying Out the Design
I don’t try to build a complex design on a wall. Instead, I first lay it out “dry” on a sheet of OSB or 1/2-inch-thick plywood placed across a set of horses or a workbench (thinner sheets or southern yellow pine can warp, making the process harder than it should be). This allows me to position shingles for joint offset, lay the pattern down for tracing, and experiment with different layering and ramping techniques without fighting gravity.
I cut the sheet (or cleat a couple of pieces together) so there’s about 12 extra inches around the perimeter of the design, which should be enough to support the ramp shingles on the sides. And I draw or snap chalk lines representing the shingle courses across the backerboard. I tack my small and medium-sized designs onto the shingle board, using 3/4- to 1-inch-long brads, headless pins, or thin wire staples located about 1 inch down from the top of each shingle. Later, when I’ve carried the whole assembly to the job site and it’s time to install the design on the wall, I can pull the shingles out in the proper order just by gently tugging on them. To simplify pattern orientation during layout and shingle installation, I snap two exposure course lines across each group of shingles that constitutes a course. I match the lines to the story pole so the exposures correspond to the courses on the wall, and I use white chalk, which can easily be brushed away if needed.
Installing the Shingles
Once I’ve shingled up to the area where I’ll install the design, I either screw the backing panel to the wall nearby or prop it on nearby staging. To help orient the pattern, I snap a few course lines across the tops of the last course of shingles and the housewrap. And to help give weight to the bottom of the design and create the appearance of water, I cut “waves” into the butts of the last two or three shingle courses.
With a gentle tug to pop the staples or brad nails holding the shingle groups in place, I remove them in sequence from the shingle board, then install them on the design. After each course of the design is applied, the field shingles to the left and right can be installed; it’s easier to run shingles from the design outward than from corners inward.
Laying out and cutting this design took about seven hours. For designs of similar size and complexity, I charge between $1,000 and $1,400.
By the way, before installing this duck, I redrew and cut out another set of shingles, which I applied to a shingle board for storage along with the cardboard pattern. Now, with the design in my portfolio, I can easily duplicate the same duck for another client in an hour or two — and charge the same price.
Mike Guertin is a builder and remodeler in East Greenwich, R.I., and a member of the JLC Live construction demonstration team.
The feet and belly of the duck in this design hang down over the regular courses below, giving the lower portion positive rather than negative relief (on top of instead of cut into). This gives extra weight to the bottom of the design. I begin by tacking two courses of regular shingles to the board, then redraw the duck pattern over them in chalk (A). Then I lay several shingles on top of the regular shingle courses so the bottoms of the shingles cover the duck’s feet, being careful that each leg and foot can be cut from a single shingle (B). With the pattern laid over these shingles and oriented to the sketch of the wings and head above (it may help to snap exposure chalk lines across these shingles to aid in orienting the pattern), I draw the outline of the duck’s legs and belly up to the point of the next shingle-course exposure line. Narrow pieces like the legs can snap off, so I take care when cutting them out (C). Since they’ll be overlying the course beneath, they’re prone to damage; for reinforcement, I laminate a layer of fiberglass mat on the back or glue them to the shingles beneath during final installation. After repositioning the shingles on the board and tacking them in place at the top, I chalk a “1” onto the shingle group to indicate the course (D). Collating them together with duct tape along the top edge before tacking them to the shingle board (or using precollated shingle strips) simplifies installation on the wall later, because the shingles can be withdrawn as a group rather than individually.
This course forms the breast of the duck as well as the back and tail. Here, I’ll run multiple groups of shingles up over the first group in the same course, using ramps to ease the transitions between levels. After applying regular course shingles from the right, I apply a ramp to the left of the last shingle in the group. When there are multiple layers of shingles in the same course, I use letters to differentiate each layer (A). For example, I marked this group of shingles “2A/3” (2 = second course; A = first group of shingles in this course; 3 = three overlaying shingle groups in this course). I chalk in the breast of the duck, using the pattern as a guide (B), then place the second group of shingles on top of the design. After placing the pattern over this group and drawing in the breast (in pencil) for cutting and the duck’s back (in chalk) for reference, I mark these shingles “2B/3.” Once I’ve cut out the pencil line for the breast and repositioned these shingles on the design, I need to add one thin ramp to the right of the bill and a thick ramp at the tip of the tail (C). Taping or stitch-stapling these extra ramp shingles to their shingle groups helps keep them organized. To finish the second course, I lay a third group of shingles over the tail ramp and up to the back of the duck’s head, place the pattern over the shingles, and pencil in the back of the duck for cutting (D). This is group 2C/3. Even though most of the shingles in the right half of the group will be cut short and covered by the next course (E), the half-shingle “undercourse” provides backup for the smaller “background” wing (F).
In this course, I want to create more depth so that I can highlight the wings and place the smaller background wing deeper in the design than the foreground wing. The easiest way to do this is to expose the top lap of the second course below (undercourse), following the same procedure for ramping groups of shingles up and over each other as in the previous step. The first group of third-course shingles starts a couple of inches to the left of the foreground wing (A). After tracing the pattern onto these shingles, I cut out the head and part of the background wing portion up to and across the horizontal exposure line. Before attaching this group (3A/3) to the backer, I add a ramp on the left side (B). The second group of shingles — 3B/3 — is short (C); it needs to run only a couple of inches beyond the leading edge of the background wing (with a ramp to the right), and a couple of inches to the left of the trailing edge of the foreground wing (D). The final group of shingles in the course (3C/3) forms the trailing edge of the forward wing (E). Here, instead of ramping, I’ll simply butt the shingles of two different courses together.
Before cutting out the last group of the third course (3C/3), I position the first shingle group (A) of the fourth course (4A/3) and mark out the background wing area for cutting (B). Because placing shingles of different courses together creates a discrepancy in thickness, I plane the left edge of the first fourth-course shingle to match the thickness of the top lap of the third-course shingles (C). I make registration marks where these offset shingle courses meet, to help keep them organized during installation. The second shingle group of the fourth course (4B/3) forms the leading edge of the foreground wing and has a cutout for the top of the background wing, which adds to the shadow line (D). The third shingle group (4C/3) forms the trailing edge of the foreground wing. The cutout for the background wing tip further deepens the shadow line (E).
The first group of shingles in the fifth course (5A/3) gets only a small cutout for the tip of the background wing and a planed ramp on the left side (A). The second shingle group (5B/3) forms the leading edge of the foreground wing. Leaving extra shingles to the right of the wing provides an extended undercourse for the sixth course of shingles (B); this lets me avoid having to place two ramps on top of one another, which would produce a pronounced bump in the overlying course right at the top of the foreground wing. The third shingle group (5C/3) forms the trailing edge of the foreground wing (C). To complete the design, a single group of shingles in the sixth course (6A/1) ramps up and over the top laps of two groups of shingles in the fifth course, with only the tip of the foreground wing cut out (D).


