On the surface, this may look like a story about a single exterior corner detail but it’s actually much more. No effective detail is just slapped on: It needs to serve both a functional and aesthetic purpose and to be integrated into the overall design of the building. Even the seemingly simplest of details can have a deeper backstory, and that’s certainly the case here.
This is really a story about design thinking. It’s also a story about how to work with, rather than against, the inherent properties of building materials. My hope is that it provides readers with a framework for thinking through challenging details and developing durable solutions that serve both aesthetics and performance.
Design Challenge
Trevor Kurz
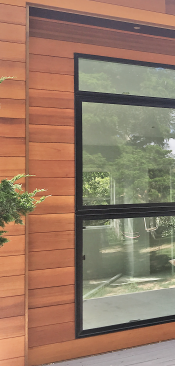
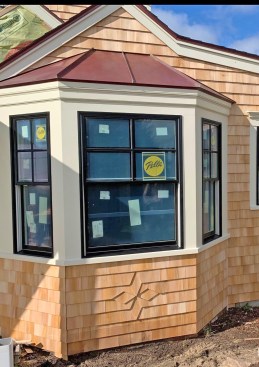
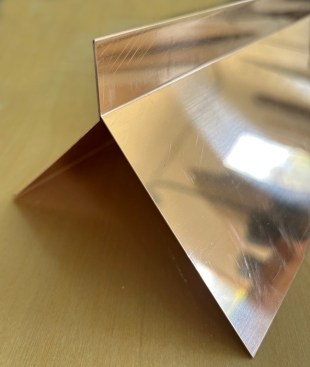
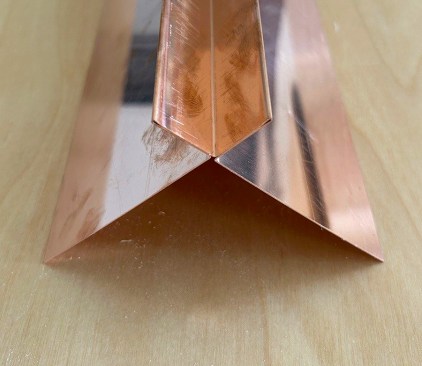
The author devised two different corner treatments using copper …
I have always had an affinity for classic New England architecture. For that reason, when my company was commissioned to design and build a modern guest house, I saw it as both an opportunity to step outside my design comfort zone and learn something new in the process.
The project involved an existing client who had purchased a large waterfront parcel on Cape Cod with a rundown antique home that they intended to restore as the primary residence. Their directive for the guest house was clear: They wanted a deliberate visual juxtaposition between old and new. The guest house was not meant to mimic the main house, but rather to stand apart from it while still feeling intentional and grounded.
That design brief opened the door to exploring materials and details I had not previously relied on, particularly at the exterior.
Our design process always begins with what I refer to as a client wish list. In my experience, most clients have spent considerable time thinking about their project before we ever meet. Some arrive with a simple spreadsheet. Others provide links to highly curated Pinterest boards. In this case, it was the latter.
A theme emerged almost immediately. The exterior siding was going to be clear, vertical-grain, red cedar shiplap installed horizontally with a nickel gap reveal. The clients even directed me to a local address where they had first seen the look and encouraged me to view it in person.
When I arrived, the material itself looked great. What stood out, however, were the outside corners. Every mitered corner had opened up. Visually, it was distracting. Functionally, it raised red flags. Trying to hide those openings with corner boards would have defeated the intent of the detail altogether.
My initial design for this project included numerous outside corners created by massing, roof overhangs, and exterior columns. There was no avoiding them. My woodworking instincts initially kicked in and I began thinking through ways to stabilize the miters: splines, biscuits, dominoes, or some variation thereof. I also knew I did not want to rely on sealants as the primary line of defense. Sealants will eventually fail.
Wood moves. In our local climate, it moves a lot. No matter how clever the joinery, the odds are high that the miters will eventually open.
The breakthrough came in an unlikely moment: One morning, while brushing my teeth, I found myself looking down at the floor tile I had installed at home. At the doorway, a Schluter-Systems aluminum transition bridged the gap between marble tile and white oak flooring. It was doing exactly what it was designed to do: managing movement, protecting edges, and clearly separating
two materials.
Just as importantly, it looked good.
That was the aha moment. The transition was not trying to hide the joint. It made the joint intentional.
Design Solution
I began searching for a comparable product that could serve a similar purpose at exterior siding corners. That search came up empty.
The next call was to our sheet metal fabricator. That conversation marked the beginning of developing a series of copper corner treatments that would address the functional shortcomings of mitered wood corners while also contributing positively to the building’s overall aesthetic. What started as a durability problem quickly evolved into a design opportunity.
With the decision made to abandon mitered outside corners, it was important that everything occurring beneath the siding supported the same goals of durability, drying potential, and predictability.
The wall assembly itself was relatively standard. Half-inch CDX sheathing was wrapped with Typar housewrap, installed per manufacturer specifications and fully integrated with window and door flashings. In lieu of traditional tar paper splines at inside and outside corners, we used 12-inch-wide self-adhered-membrane splines, providing 6 inches of protection in each direction.
Over the WRB, we installed a cedar breather to create a dedicated drainage and drying space behind the siding. This was not optional. When using wood siding, particularly in a coastal New England climate, the ability for the assembly to breathe and dry is as important as its ability to shed water.
The siding material was 1×8 clear vertical-grain red cedar, installed horizontally. Vertical grain was selected intentionally due to its dimensional stability and more uniform weathering pattern over time. That predictability matters, especially at termination points. As a brief side note, red cedar is chemically aggressive. It contains tannins and organic acids that can accelerate corrosion. Combined with the project’s proximity to salt water, this led us to default to stainless-steel fasteners throughout.
Copper (Beyond Aesthetics)
Copper was chosen for its functional characteristics, not just to serve as an accent. It is durable, easily formed, readily soldered, and performs well in exterior environments. Just as importantly, it ages honestly. Over time, it develops a patina that reveals exposure to the elements rather than disguising it. In both modern and traditional contexts, copper has a long track record of compatibility with wood construction.
The goal was not to introduce contrast for contrast’s sake, but to select a material that could handle exposure, movement, and time better than wood alone at the most vulnerable points of the assembly. That said, and to be candid, the combination of wood and metal also produced a clean, compelling visual result.
Because the copper pieces were custom bent, their dimensions were flexible. I settled on a 1/8-inch projection beyond the finished wall surface. With the cedar measuring approximately ¹¹/₁₆ inch thick and the breather adding an additional ¼ inch, the total copper projection from the wall sheathing ended up at roughly 1 ¹/₁₆ inches.
One unavoidable consequence of this approach is that siding boards terminate with square cuts and a 1/8-inch gap at the copper rather than wrapping continuously around the corner. That condition places the end grain of each board at the termination plane, which must be addressed deliberately.
Prior to installation, all cut ends of siding boards that would terminate at copper were treated with an oil-based end-grain sealer. Products of this type are designed to penetrate exposed end grain, slowing moisture absorption and reducing the likelihood of checking or splitting over time. This step does not prevent wood movement, nor is it intended to. Its purpose is simply to improve durability at the most vulnerable surface of the board.
The copper is not there to hide or cover something. Its job is to provide a crisp, stable termination point while allowing each siding board to move independently. The end-grain treatment helps protect the freshly cut cedar, while the copper eliminates the need to force two wood edges together in a condition that would almost certainly open over time.
Because wood is more susceptible to movement across its width, the 1/8-inch gap at the wood-to-copper transition tends to remain visually uniform as the siding expands and contracts. Instead of trying to maintain a fragile miter, each board simply dies into a consistent reveal.
That division of labor is what makes the detail work. The cedar is free to move. The copper stays put. And the corner continues to read as intentional rather than problematic.
Fabricating the Trim
I have limited experience working with sheet metal, so my first thought regarding the copper profile was relatively simple. I envisioned an L-shaped corner modeled loosely after the Schluter Jolly trim referenced earlier. The idea was straightforward: a clean 90-degree metal edge that would provide a durable termination while remaining visually minimal.
That concept was quickly vetoed only a few minutes into the first in-person meeting with our fabricator.
After I explained what I was attempting to accomplish, he stopped me mid-sentence, walked over to the brake, and quickly bent up two mockups. The first was a 45-degree fin. The second was a more substantial 90-degree profile with defined returns and a slight projection. Seeing those pieces in hand immediately shifted the conversation from whether the idea would work to which profile looked best and made the most sense architecturally.
We ultimately selected the 90-degree detail for the horizontal shiplap siding on this particular project. It created a crisp shadow line and a strong termination point without visually overpowering the façade. More importantly, that meeting made it clear that we were not developing a single copper corner. We were developing a family of options.
Once you stop trying to force a wood miter and instead begin thinking of the corner as a formed metal transition, the possibilities open up quickly. Depth, projection, reveal, shadow line, and profile geometry can all be adjusted. The same basic concept can be tuned to feel at home on a stark modern elevation or a much more traditional exterior. The only real limitation is what can be bent on a brake and the creativity of the person operating it.
The 45-degree fin, for example, has since been used as a termination detail for cedar shakes. Rather than weaving outside corners, which frequently open, split, or telegraph movement over time, the shakes die cleanly into a single vertical copper fin. It gives the corner a sharp, intentional look while preserving the overall traditional character of the siding.
What began as a solution to a durability problem has evolved into a flexible system. Whether used with horizontal shiplap, vertical siding, or cedar shakes, each variation follows the same basic principle: Give the wood a clean place to stop, allow it to move independently, and let the copper turn a problem area into a visual feature.
Once the profile dimensions were finalized, our fabricator bent each copper section in manageable 10-foot lengths that could be dry-fit and assembled onsite. This proved important because dimensions may work on paper, but field conditions are rarely as exact as the drawings suggest. In areas where the overall run exceeded 10 feet, we also had 2-inch joining inserts fabricated. These were designed to slip inside the profile and create a clean, concealed solder joint after installation.
Installation
Each copper termination was installed directly over the WRB and corner membrane splines before siding began. Cedar Breather followed completion of the copper installation. In effect, the copper established a permanent control line for every outside corner before the first siding board ever went on.
That sequencing made the siding install far more predictable. Each board was simply cut to length, the end grain treated, and the board run to a consistent 1/8-inch reveal using a temporary shim that was removed after fastening. Instead of trying to maintain a fragile wood miter while simultaneously climbing the wall course by course, every cut terminated against an already established reference point.
At corner transitions, the individual copper pieces were mitered. On long vertical runs, adjoining sections were butted together over the concealed joining inserts. Everything was then soldered after final fit-up.
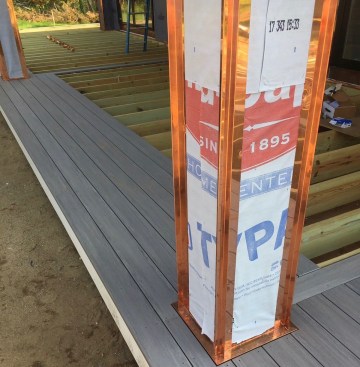
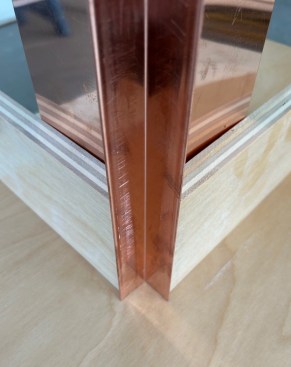
Instead of the usual decorative trim pieces that are applied aft…
Waiting until the end to solder was intentional. Minor field adjustments are inevitable, and pre-soldered sections would have made those adjustments difficult without damaging seams or distorting profiles. By dry-fitting first and soldering last, we were able to keep all lines straight, all joints tight, and all transitions clean.
Once soldered, the copper ceased to be a collection of separate trim pieces and became one continuous skin wrapping the vulnerable corner conditions.
That distinction is important. These are not decorative copper covers applied after the siding is complete. They are integrated metal terminations installed as part of the siding system itself.
No exterior detail remains frozen in time, and this one is no exception. The cedar will continue to move seasonally, the copper will darken and eventually patina, and the visual relationship between the two materials will mature with exposure.
What should not happen, however, is the progressive visual unraveling that is common to mitered wood corners. There are no fragile wood points meeting at a knife edge, no sealant joints serving as structural insurance, and no attempt to force continuity where continuity does not naturally want to exist.
Instead, the siding boards remain independent of one another while the copper remains dimensionally stable. The gap line stays consistent, the corner stays crisp, and any aging that occurs tends to read as honest weathering rather than failure.
That distinction is significant. Homeowners generally accept materials aging. What they do not accept is materials appearing to come apart.
Like many custom details, this one is not intended for every project. It requires coordination, custom fabrication, and a willingness on the part of both builder and client to allow the corner condition to be expressed rather than hidden.
Where it makes the most sense is on projects where exterior material quality is already a priority. Modern homes are an obvious fit because the detail aligns naturally with clean lines and intentional transitions. That said, as the cedar shake fin variation has shown, the same logic can be adapted successfully to more traditional architecture as well.
In short, this approach works best where durability matters, craftsmanship is visible, and the exterior design benefits from a termination detail that looks deliberate rather
than compromised.
As builders, we often spend time trying to force materials to do things they do not want to do. Wood is asked not to move. Sealants are asked not to fail. Miters are asked not to open.
Sometimes the better answer is not to fight the material, but to acknowledge its behavior and design accordingly.
That was the real lesson in this project. By abandoning the idea that the wood corner had to wrap seamlessly, we ended up with a detail that performs better, installs more predictably, and, in my opinion, looks better too.
The best details are often born that way: not from decoration, but from solving a persistent problem honestly enough that the solution becomes part of the architecture.
Keep the conversation going—sign up to our newsletter for exclusive content and updates. Sign up for free