
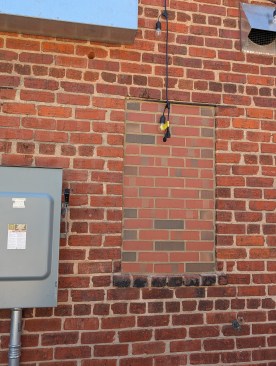
After nearly a half century of building things, I still get a sense of pride when people notice and comment on the craftsmanship of my work. When I’m trying to blend a repair into an existing surface, however, my hope is that they can’t see the work I’ve done and, thus, don’t have much to say about it. Installing brick in this space where there had been a window is a case in point.
Running Down Matching Bricks
The first step in making a brick repair disappear is finding materials that match. For this job, we were fortunate to have enough leftover bricks from the original construction of the house. There’s a lesson to be learned here: If you use bricks on a new house, save the leftover bricks. At the very least, keep records of the bricks used. This includes the name of the manufacturer as well as the name and product number of the brick.
On a lot of the repairs that my son and I do, however, there are no leftover bricks and no records of the manufacturer. This is a common circumstance on older structures. On these jobs, we take photos of the existing brickwork, then bring the pictures to our local brick supplier and compare the photos to the samples they have. In addition to 3×4-foot sample panels erected outside their showroom, they offer portable sample boards, which have actual ½-inch-thick slices of the faces of each style of brick glued to a Masonite panel about 14×14 inches. After narrowing down the selection to two or three candidates, we bring the portable panels to our jobsite where we can compare them directly with the existing brickwork. These physical samples are essential because, in addition to matching the color, we have to match the texture and finish of the existing bricks.
We also have to match the size of the existing bricks. Standard, modern bricks are 7 5/8 inches long by 2 ¼ inches high. Brickmakers also offer oversized bricks that are 2 ¾ inches high. In order to get the courses to line up, you have to match the height of the new bricks to that of the existing bricks.
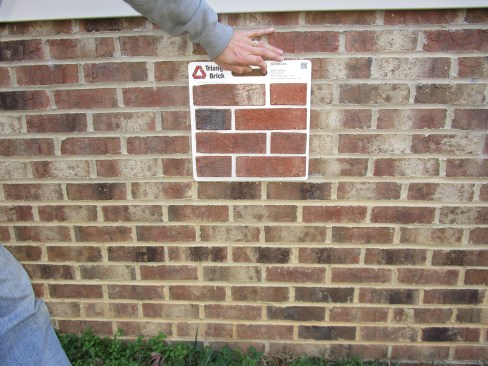


Matt Navey
Brick suppliers often have sample boards to help with selection.
Matching the Mortar
Surprisingly, over 20% of the visible surface of a brick wall laid up with standard bricks consists of the mortar joints. The joints have a big impact on the appearance of the wall, and, for any repair, it’s imperative to match the new mortar with the existing mortar.
The first challenge is to get the color of the mortar right. As with the bricks, it is very helpful to have a record of both the mortar manufacturer and the sand supplier used in the original construction.
If you don’t have records, getting the mortar color right can be a tricky business. People sometimes dismiss this issue by saying, “Isn’t all mortar just gray?” First of all, mortar is not always gray, and, secondly, there are numerous shades of gray (as any painter will attest).
Mortar can be dyed any color, but modern untinted mortar is usually some shade of gray. A lot of older mortars, on the other hand, tend toward a light tan hue. This hue has acquired the appellation “buff” and there are several manufacturers who offer buff mortars. Although my son and I usually use these buff mortars for repairs, they are sometimes specified for new houses by designers who like the soft tan hue.
My masonry supplier, Oldcastle APG of Durham, N.C., offers three different buff mortars which yield three different shades of light tan mortar. The shades of gray mortar also vary by manufacturer. A further refinement is that the manufacturers of masonry cement (the most common kind of mortar used), offer two types of mortar: Type S and Type N. Type S, which has twice as much Portland cement as Type N, makes mortar that is slightly darker than that made with Type N.
One of the difficult things about this process is the fact that you can’t tell if the mortar you’re using will match that in the wall until the mortar dries and cures. It takes several days for this to happen, and who has several days to wait for a mortar sample to cure? We don’t; so, we keep samples of cured mortar in our shop. These include several samples of both buff and gray mortars. We also have a sample of mortar we made using one-half buff and one-half gray masonry cement. To keep things simple, all our samples are made with the same light yellow masonry sand.
If you don’t have the time or inclination to generate mortar samples, at the very least look carefully at the existing mortar and determine whether it’s gray or buff, then buy accordingly. Gray versus buff is the great divide in mortar color. Get that choice right and you’ll usually get an acceptable, if not perfect, mortar match.
Beginning Work: Removing Bricks
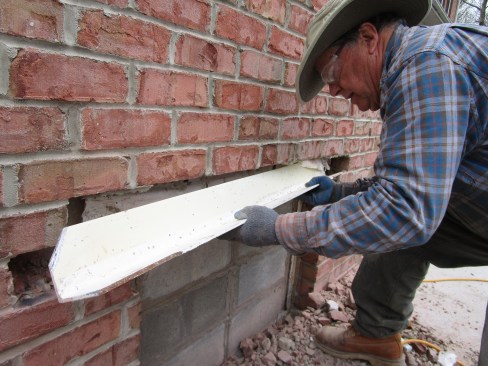
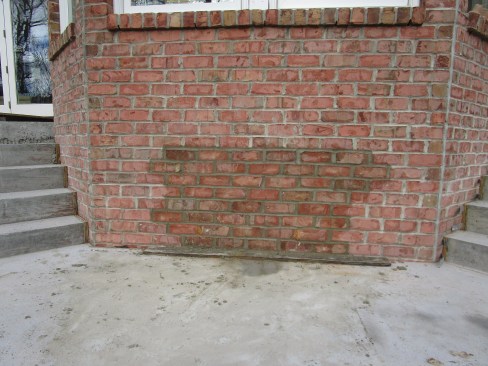
After running down the materials for this job, we needed to prep the area that we planned to repair. This required a surgical approach. We had to remove the lintel, then tooth out the brickwork on both sides of the opening. A wider opening might require shoring to support the brickwork above, but we knew from experience that no shoring would be needed for this 4-foot span.
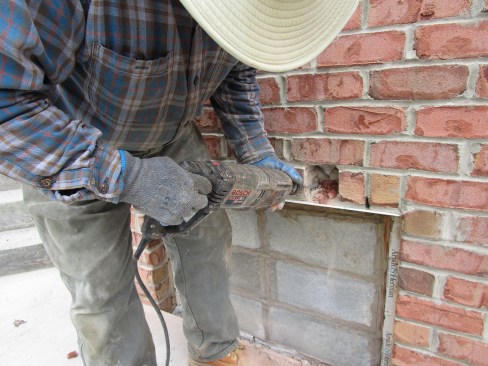
To get the lintel out, we removed the rollock course that rested on it, as well as a few bricks at each end. To avoid breaking neighboring bricks, we used a rotary hammer fitted with a ¼-inch bit. We drilled a series of holes to weaken the mortar joints and to break the bricks we wanted to remove. We’ve found that breaking the bricks into small chunks rather than trying to remove whole bricks reduces the chance of damaging adjacent bricks.
After removing the lintel, we toothed out the brickwork on both sides of the opening. Working from the top down, we continued to use the rotary hammer to honeycomb the joints and break the bricks we wanted to remove into smaller pieces. We used a handheld grinder and a cold chisel and a hammer to clean the final bits of mortar on both the underside of the horizontal course spanning the opening and in the toothed out areas.
Mixing Perfect Mud
For this job, we used Brixment Type S masonry cement mixed 3 parts sand to 1 part masonry cement. We had a cured sample of this mortar and it matched very well. We seldom mix a full bag of masonry cement because we rarely use that much within two hours, which is the time limit recommended by the masonry industry. To get the right proportion of ingredients for this job, we filled a one-gallon bucket with sand three times and dumped it into our mixing tub. We mixed a half gallon of water into the sand, then mixed a gallon of Brixment masonry cement into the damp sand. This concoction produced a stiff mortar, which is what we wanted. Next, we added water a little at a time until the mud was just right (i.e., wet and mushy but with enough body to hold up the bricks as we laid them).
By making small batches with measured ingredients, we get mortar with optimal workability that dries to a consistent and predictable hue. We mix even these small, 3-gallon batches with a handheld mechanical mixer, the Collomix Xo6.
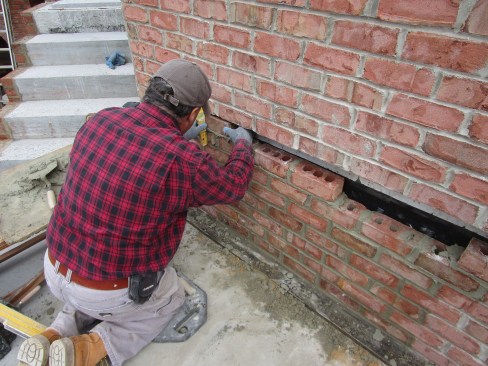
Matt Navey
The author starts the courses of brick from the bottom, checking…
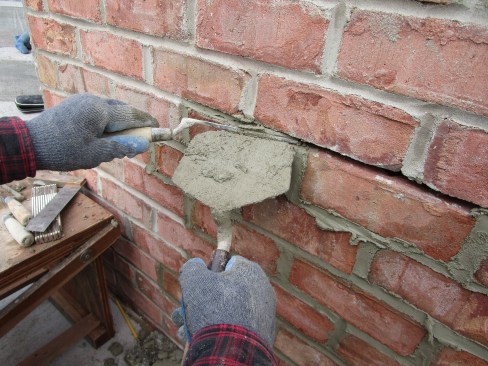
Laying the Bricks
After running down matching bricks and mortar, you have to install them correctly to make the repair disappear. Having mortar of the right consistency is essential, of course, but good troweling techniques are just as important. Because we have good habits of workmanship, my son and I don’t smear mortar on the face of the bricks and we don’t have to clean our brickwork after it dries. Rather than trying to use our trowels to fill joints where our brickwork meets the existing brickwork, we use tuck pointers. This way we can pack the joints full without slopping mortar on the face of the bricks.
After laying the bricks in straight, uniform courses that lined up with those on the wall and packing mud into the joints where necessary, we tooled the joints with a jointer that matched the joints on the rest of the wall. In this case, we used a concave jointer.
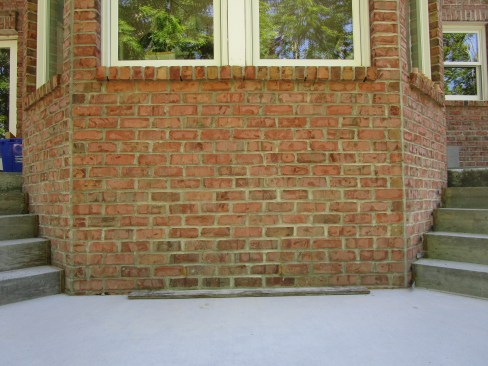
When we finished tooling the joints, we could see that our workmanship matched that on the wall. We had to wait several days, however, to see how well the cured mortar of our repair matched the rest of the wall. Fortunately, it turned out to be an excellent match. Our repair pretty much disappeared, which made us very proud.
Matt Navey
On this job the blending was invisible. Taking the time at the start of the job to select the brick, test the mortar and toothing out the area all pay off in the finish.
Keep the conversation going—sign up to our newsletter for exclusive content and updates. Sign up for free


