Bathroom Design
Designing a bathroom, particularly when working with existing spaces on a remodeling job, is often a matter of making the most from as little room as possible. A standard layout can be a good starting point (see Small Bathroom Layouts, below), but may need to be adapted to fit a particular space. For any layout, follow the guidelines in this section for eliminating obstacles and integrating fixtures for maximum usability and efficiency.
Entrances and walkways. Start with a clear walkway at least 32 in. wide at all entrances to the bathroom (Figure A).
On plans, draw the swing of all doors to ensure that none of them intersect with each other.
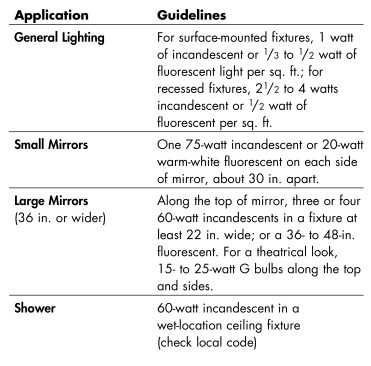
Lighting is critical in bathrooms — both general lighting and task lighting. General recommendations are presented in Figure B.
Electrical. Specify ground-fault circuit interrupters (GFCIs) on all receptacles. No switches should be within 60 in. of any water source. All light fixtures above tub/shower units should be special-purpose, moisture-proof fixtures.
Heating. Provide adequate heating in the bathroom. For comfort, this may require temperatures 3°F to 5°F warmer than the rest of the house. A quick-response auxiliary heat source may be helpful.
Ventilation. Provide mechanical ventilation in every bathroom, with a minimum of eight (8) air changes per hour when operating (more for jetted tubs, spas, etc.). Choose a fan with a noise rating of 3 sones or less at high speed.
Flooring. Specify all flooring with slip-resistant materials.
Paddle-type ceiling fans will not exhaust humid air, but they may be desirable in a high-ceilinged bathroom.
Fixtures. Basic bathroom clearances generally fall into two categories: fixture clearance (enough space for the fixture itself) and user clearance (enough space for the person using the fixture). Basic fixture and user clearances for individual fixtures are shown in Figure C. These serve as a good baseline for defining a bathroom layout (Figure D). When fixtures are ganged together in a bathroom, these basic clearances can sometimes be shared (Figure E), serving as the starting point for the small bathroom layouts shown in Figures G to J.
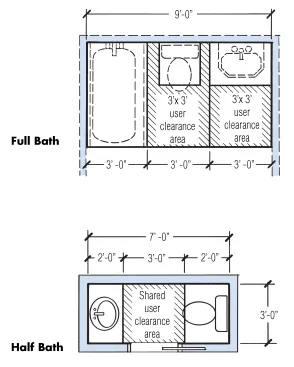
When fixtures are ganged together, the 2-3-5 rule results in basic layout for a full bath (top) and half bath (above). The space allowances shown here — all multiples of 2, 3, or 5 ft. — provide a good starting point for working out the layout of a bathroom floorplan.
Small Bathroom Layouts
When fitting a bathroom into a tight space, departures can be made from the 2-3-5 rule. The layouts shown below illustrate a few functional bathroom layouts that can be adapted when floor space is limited.
Classic 5×7 bath. This is a classic small-space layout dictated by the length of a standard tub (5 ft.) and the minimum distance between tub, toilet, and lavatory (7 ft.). Two versions of this minimum bath are shown in Figure F.
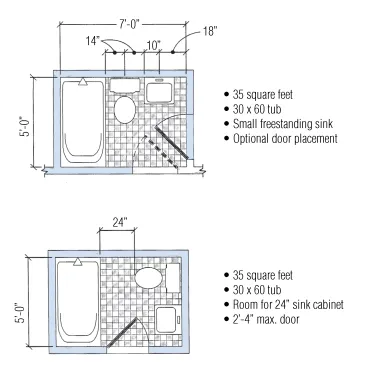
The rectangular shape of the room shown at top makes this bath easy to fit into many floor plans. The door is shown on the end of the rectangle, but it can just as easily be put on the side (shown by dotted line). The second 5×7 bath (above) offers a little more room for a sink or 24-in. vanity, but at the expense of space in front of the toilet and with a minimal door (2’-4”). The only place to locate storage space in these baths is over the toilet, using open shelves or a mirrored upper cabinet.
Small baths with utilities. To reduce plumbing costs and save space, the core plumbing and heating utilities, as well as the washer and dryer, often are included near the bathroom. Two layouts are shown in Figure G.
Duplex townhouses or other narrow lot designs often require a narrow room layout. Figure H shows one solution for incorporating two baths and a utility room, keeping all the plumbing tightly arranged.
Tight baths. In tight spots, a shower with a curtain makes it possible to trim off square footage to get the bathroom down to just 30 sq. ft. (Figure I).
In a Cape or attic apartment, where headroom might be limited, a bath is possible if there’s space along one side for a mirror as well as room for a shower head 6 ft. off the floor (Figure J).
Designing to Accommodate Fixtures
Lavatory. Provide a clear walkway of at least 21 in. (30 in. recommended) in front of a lavatory.
Lavatory clearance. Provide at least 12 in. (18 in. recommended) from the centerline of the lavatory to any side wall.
Double lavatory. Provide a minimum of 30 in. (36 in. recommended) between multiple lavatories, measured centerline to centerline. If space allows, a wider separation between lavs will be much more comfortable for users (Figure K).
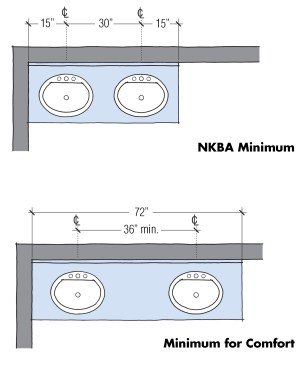
For baseline, minimum access, locate the centerline of a lav at least 15 in. from a side wall and space double lavs a minimum of 30 in. from center to center. For more comfortable use, allow at least 3 ft. of wall space per user and 42 in. for a single vanity width.
Toilets and bidets. Provide a clear walkway space of at least 21 in. (30 in. recommended) in front of a toilet or bidet.
Clearance. Provide at least 15 in. clearance (18 in. recommended) from the center of the toilet to any obstruction, fixture, or equipment on either side.
Where floor space allows, provide at least 6 in. of floor space between fixtures to allow for cleaning (Figure L).
Toilet paper holder. Install the toilet paper holder within reach of a seated user. The ideal location is slightly in front of the toilet bowl, and centered 26 in. above the finished floor (Figure M).
Storage near bidet. Install soap and towel storage within reach of a person seated on the bidet.
Tub/shower. Provide a clear walkway of at least 21 in. (30 in. recommended) in front of a tub/shower (Figure N).
Faucet. The bathtub faucet should be accessible to an adult standing outside the tub.
Grab bars. Install at least one grab bar in a bathtub or shower (Figure O). Some recommended locations include:
- Stall showers (one horizontal bar on the service wall to facilitate movement within the enclosure).
- Tub/shower units (one horizontal bar centered on the service wall and a vertical bar near the outside edge where bathers enter and exit).
Shower stalls. Make the interior of a shower stall at least 32×32 in. The preferred size for a typical adult is 36×42 in., which allows space for the user to step out of the stream of water. A fixed showerhead should be roughed in at 72 to 78 in. high.
Consider installing a bench or footrest within the shower enclosure. A 6x6x6-in. triangle in the corner can serve as a footrest. A built-in seat, 16 to 18 in. high by 12 to 20 in. deep, is ideal.
Jetted tubs. In homes with small children, raised tubs are generally safer than sunken tubs. However, no more than one step should lead to a tub platform (Figure P). The step must be at least 10 in. deep and no more than 71/4 in. high. With a raised tub, grab bars are essential to help people move into and out of the tub and to prevent slips.
Jetted tubs must be installed in such a way as to have access to the pump motor for maintenance and repair.
Accessible Bathrooms
In order for a bathroom to accommodate all users — both those with a full range of abilities and those with a limited range — it must include increased floor space and open space beneath lavs (Figure Q).
In addition, bathrooms should include a full range of grab bars at each fixture to improve access for all users (Figure R).


