
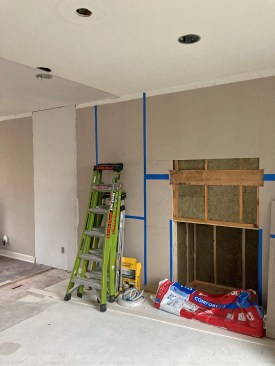
The see-through gas fireplace that separated the living room from the hearth room was a popular feature when this single-family home was completed in the 1990s. Since that time, the owners had grown increasingly frustrated that their growing family could no longer enjoy the holidays in the same room, as each of their three sons married and had children of their own. The solution was clear to them: Eliminate the 3-by-8-by-9-foot obstacle that split the rooms and relocate the fireplace feature to the exterior wall of the hearth room.
While the task of removing a large divider to create an open-concept living area is a familiar one, the challenge of maintaining the structural load path can never be taken lightly. Each wall removal must be treated with the same intensity of focus, lest the ceiling meet the floor. Our firm frequently removes bearing walls and replaces them with well-placed columns and flush-framed LVL or steel beams.
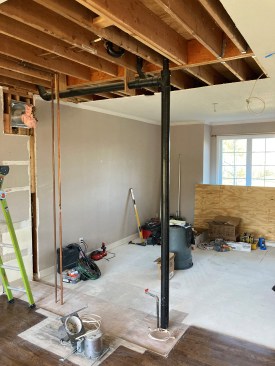
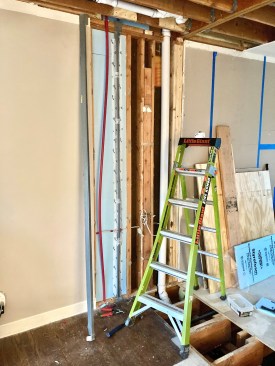
Demolition. The task of opening up living space typically begins with the selective demolition of interior finishes and construction of temporary walls to support the floor, ceiling, and roof during the removal of the existing support and installation of the new beam. After stripping back the drywall at the ceiling, we were pleasantly surprised to find that the original builder had already included an LVL beam to support the second-floor system and had not utilized the walls surrounding the fireplace for bearing at all. Short of adding a number of joist hangers and installing the proper nails in the existing hangers, we were able to start this project off with a quick leap ahead in schedule. This is notable, since it typically goes the other way, right?

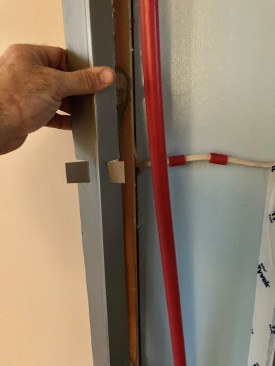

Relocating the drain lines to the exterior walls proved to be ch…
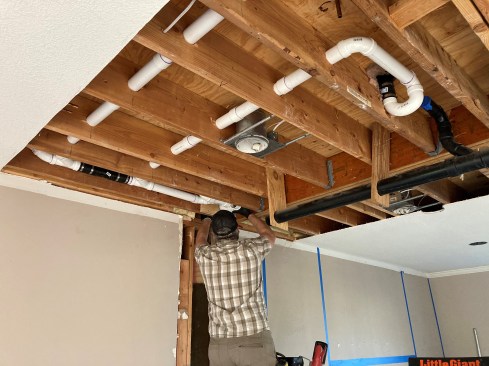
Rerouting drain lines. The next task was the relocation of the supply and drain plumbing that served the master bath and hall bathrooms on the second floor overhead. The main 3-inch ABS stack was located near the center of the room and had to find its way to the exterior wall and down into the basement. With the 2×10 floor system in great shape and the closet flange for the master-bath commode already located within 12 inches of the exterior wall, this relocation was possible, but not easy.
My partner, Joe, is a licensed Master Plumber and quickly devised a plan to reroute the 3-inch drains through the joists as they made their way across the ceiling. Because it’s important to keep penetrations through joists within the middle third where stresses are minimal, tolerances were tight. The top of the hole in the first joist near the new traps had to begin at the very top of the middle third so that the pipe would have adequate fall. Using his layout square, he scribed new marks for the center of the drain progressively lower by 3/16 inch on each successive joist to create the proper fall (1/8 inch per foot). But to keep the holes within the middle third of the joist, he had to drill the joists out to the exact outside diameter of pipe. This made for a tougher install because he had no play to work the PVC into position. This worked all the way to the last joist, which was only 4 1/2 inches away from the rim joist, where the hole had to drop below the middle third. Structurally, this was not a huge concern, because of the close spacing, but Joe still installed the required glued plywood reinforcement to the joist before drilling the hole and running the drain.
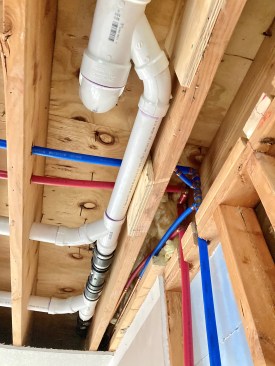
Vent connections. Local code allowed us to keep the existing ABS vent stacks in place but required PVC for all new drain work. Where the vent connections tie in, the code does not allow glued PVC to ABS connections for the same reason it doesn’t approve of ABS in the first place: The glued joint is more prone to failure than the solvent weld achieved with primed and cemented PVC connections. Instead, wherever ABS meets PVC, the code officials here want to see Fernco fittings with their rubber sleeves and hose clamps.
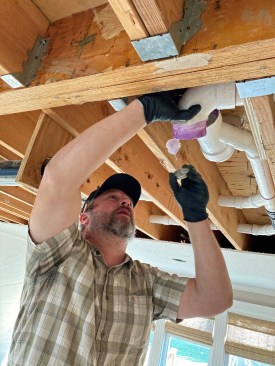
New supply lines. The planning of the drain piping included a provision for Joe to access the existing copper supply lines that share that last 4 1/2-inch bay. We use cross-linked polyethylene (PEX) for all our new work, but when we’re tying into existing copper, ProPress press fittings are indispensable for their speed and reliability. Also, not having to sweat copper fittings in the tight confines of narrow joist bays reduces risk. The one-handed operation of the slender press tool (we use a Milwaukee M12) worked well in that last slim joist bay, as well as below the floor system in the basement soffit area. Joe had to plan the connections and execute the installation of each fitting in order of access, and many of these had to be prebuilt and raised into position because only the final connection was reachable with the press tool.
One downside of running supply lines in exterior walls is the potential for freezing, which is always a concern here in climate zone 4. While we tend to prefer Rockwool insulation, we want to pack as much R-value as possible between the exterior and new supply lines, so we opted for the higher R-value of XPS rigid insulation, placing two 1-inch panels against the exterior sheathing. By air-sealing the perimeter of the rigid foam, we feel confident we have created an air space between the XPS and the drywall that will remain above freezing all winter.
Protecting pipes. We still had one more challenge to solve: Bringing the supply pipes near the interior leaves them vulnerable to puncture by a future picture hanger’s errant nail or hollow wall anchor. To protect the lines, we split a length of metal-framing track down its center to create two 90-degree metal angles. The angle is important, as we aren’t trying to stop a nail so much as redirect it to one side or the other. The track is of a heavy-enough gauge to keep a screw or nail from easily grabbing and piercing it, but light enough that it fits in the cavity and is easy to manipulate and fasten.
A 14-2 NM cable crossed behind the supply piping, so we clipped a couple of short sections of PEX to act as protective bushings where the metal might contact wire. To keep everything in place, we bent the flanges flat at the top and bottom and drove nails into the wall plates before grabbing a partial roll of old Tyvek tape (which sticks well to the plastic facer on the XPS) to keep the pipes and angles tight to the foam and clear of the drywall. This whole protection scheme cost only $5 but could potentially save thousands in water damage.
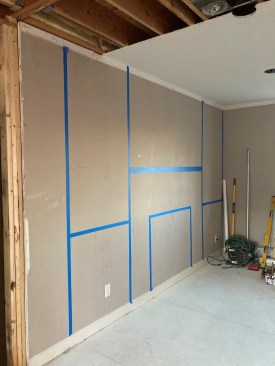
To help the clients visualize the new fireplace wall, the author…
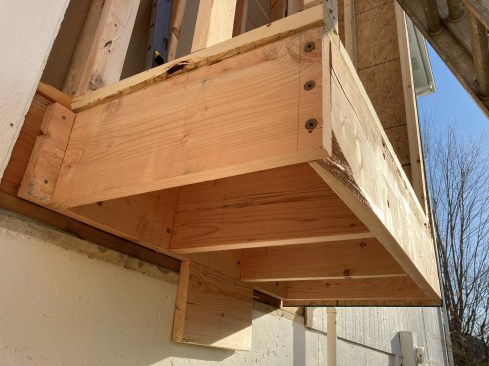
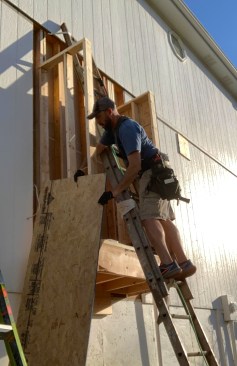
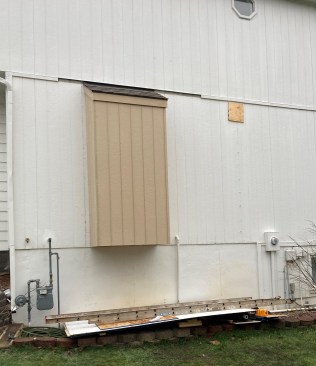
Fireplace bump-out. While Joe was busy with the plumbing, followed by the relocation of the gas piping, I turned my attention to framing a bump-out on the exterior wall to accommodate the new fireplace.
Before framing the tiny, 42-by-22-inch cavity needed for the fireplace, I had to first design and lay out the mantel and flanking built-in cabinetry, and that included getting approval from the clients. The specifications for the gas fireplace they had selected were clear and included a helpful table relating vertical clearance from top of unit to horizontal projection of the mantel. Like so many of our clients, this one struggled to visualize the finished product in place based on CAD drawings or 3D modeling, so I taped out the layout of the fireplace, mantel, stone, and cabinetry to scale on the wall. We talked through potential furniture placements and circulation patterns based on the locations and reached a decision. That cleared the way, and I was able to accurately position the bump-out.
I started by framing a simple platform secured with structural screws to the existing rim joist. This would be further supported on each side by OSB shear panels that acted as a sort of vertical ledger tied to the full height of the wall. Working alone, I built the floor system on sawhorses and screwed a couple of registration blocks to the existing rim and sill plate to make holding the assembly in place at the proper location as simple as possible. It was still too heavy to secure in a level position, so Joe helped me lift it into place and watched the level as I shimmed and screwed it plumb and level. I find FastenMaster HeadLok screws ideal for this application, as their larger, flat heads don’t pull through framing as easily as LedgerLok screws.
I stick-built the side panels, rather than preassemble them, so I wouldn’t have to interrupt Joe again. I began by building out secure columns on each side of the opening, in line with the platform, to tie the structural side panels to. (I used the Mark Hendrichson “NTSOOI” detail to complete this assembly.) Lapping the OSB continuously from the top of the wall to the bottom of the platform ensured that any wall and roof load pushing downward would have to overcome the shear nailing that secures that panel all the way up the wall in order to pull the panel away from the house or cause the platform to sag.
Benefits of self-performing work. With the framing complete, I just had to frame a simple shed roof and trim and side the walls before flashing and shingling the roof. We insulated the cavities, ran the gas and electrical, and were ready for the fireplace installation in a single day. This is one of myriad benefits we get from self-performing the mechanical trades. Joe carries our General Contractor license and Master Plumbing certificate, while I hold the Master Electrician and Master Mechanical (HVAC) licenses (see “Acquiring Licenses in the Mechanical Trades”).
We worked hard to earn each of those licenses and pay a lot in insurance, continuing education, and licensing fees to maintain them, but the payback on these smaller projects means a net benefit. Not only would the permitting and coordination of the multiple trades cost us time, but the site management over multiple days would be terribly inefficient. Instead, we were able to work in tandem: I laid out the can lights and installed them while Joe was planning the drain. He completed the supply lines while I finalized design and framed the exterior. We were able to efficiently move through the various disciplines of the project, shortening the project duration and maximizing our profit.
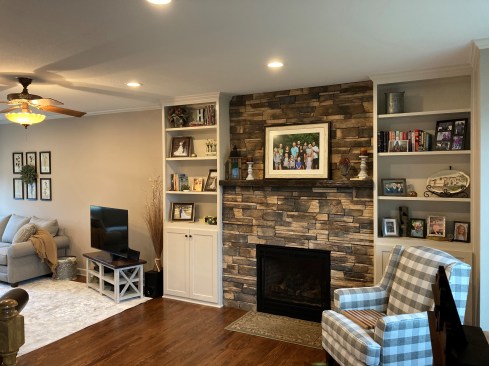
The author and his business partner, Joe Cook, built and installed the cabinets, while subcontractors installed the fireplace, stone, and hardwood flooring.
To finish out the project, we worked together on the trim and custom cabinetry. We did subcontract out the hardwood flooring, fireplace, and stone installation, as well as the paint, but this all fell at the end of the job, when the impact of a sub not showing up doesn’t create a bottleneck.


