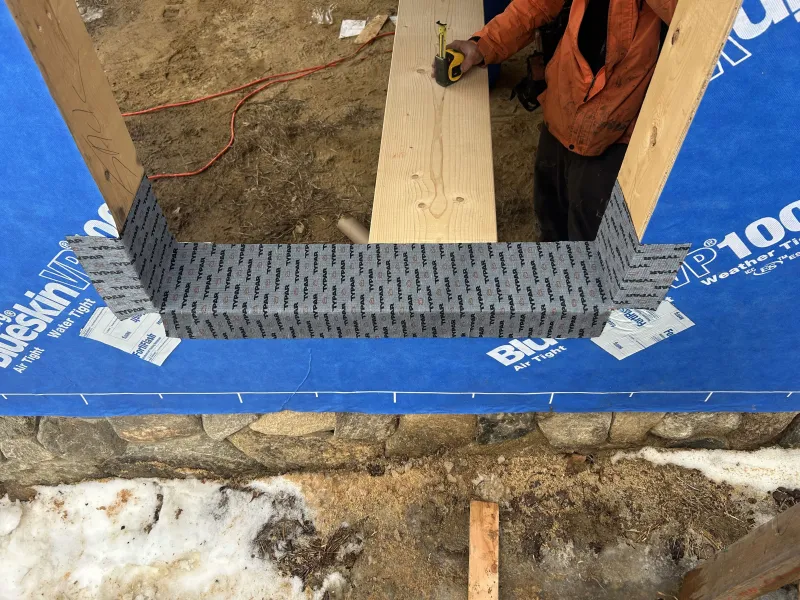
Today’s durable exterior trim materials can make a poorly flashed window look fine for years, even though moisture is damaging the wall behind it. That makes window flashing less about surface appearance and more about disciplined sequencing: Every layer needs to shed water onto the layer below it.
After more than 25 years as a carpenter, the best flashing advice I have received is still the simplest: Think like water. Water does not just follow gravity. It clings to surfaces, travels laterally, and finds small imperfections before you do.
This article focuses on window openings—intentional penetrations through the exterior wall assembly where flashing failures can be especially costly. When I started in the trade, typical window flashing often meant layered tar-paper splines, limited integration with the wall system, and too much reliance on exterior trim to manage water. Unsurprisingly, results varied widely.
Material choices have changed dramatically. Before PVC and composite trim became common, exterior casing was usually clear stock or primed pine. Those materials failed visibly, the result being that stains and paint failure often exposed flashing problems before damage spread too far.
Today’s exterior materials are more durable on the surface, but that durability can hide trouble. Composite and PVC products may conceal moisture intrusion for years, allowing damage to progress within the wall assembly before anything looks wrong at the trim. That reality makes proper window flashing more important than ever.
Years ago, my team decided to raise our standard and prioritize long-term water management over convenience. What follows is the approach that came out of that decision: a sequencing-first method for flashing new window installations.
Before You Start
Before starting, it helps to define a few conditions that shape the sequence: rough opening size, nailing flange design, casing width, and the type of water-resistive barrier.
Rough Opening Size and
Flashing Buildup
Proper window flashing starts with the rough opening. The opening must allow for overlapping flashings, shim space, and perimeter insulation. Because this method creates material buildup, plan for it before framing or ordering units. I find that adding 11/8 inches to the unit height and ¾ inch to the width works well.
Nailing Flange Variations
Trevor Kurz
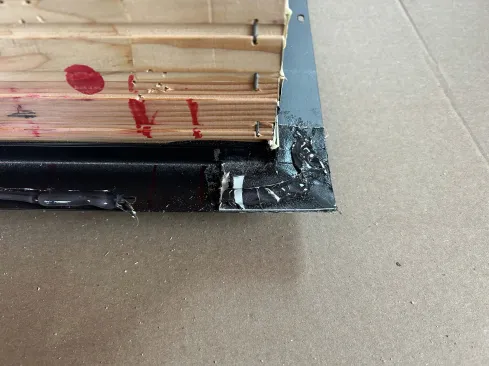
Nailing flanges vary widely by manufacturer. Some are continuous, molded flanges that wrap the entire perimeter. Others press-fit into kerfs in the window frame and overlap at the top and bottom. Some arrive folded and must be bent perpendicular to the frame prior to installation. Factory-applied foam corner fillers often fail to bridge exterior corner voids, especially when installed in cold weather. The worst, in my opinion, are flanges that terminate short of the corners.
When installing windows without a continuous molded flange, I make outside-corner L-pieces from butyl flashing tape. Bottom corners are installed on the inside of the flange and lapped onto the window frame. Top corners are installed similarly, but on the exterior. This extra step is quick and easy, and it adds a meaningful layer of insurance (see photo above).
Step-by-Step Window
Flashing Sequence
Cut and prepare the WRB. Trim the WRB flush to the rough opening perimeter. If using fully adhered membranes and Zip sheathing, you can move on to the next step. With mechanically fastened WRBs, additional preparation is required. At each top corner, make a 10-inch diagonal cut at a 45-degree angle to create a flap. Preserve this flap to lap over the head flashing later. At the jambs only, remove a 1 1/2-inch vertical strip of WRB to expose the sheathing.
Trevor Kurz
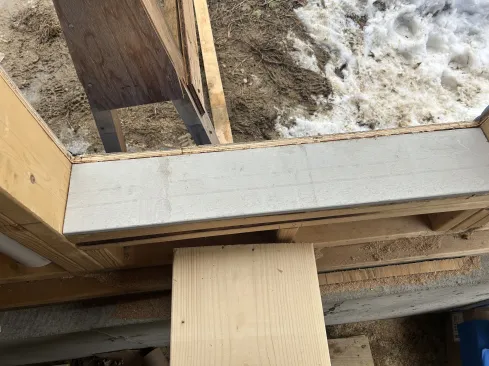
Flash the sill (pan flashing). Before flashing the sill, confirm the rough opening height. With an opening about ¾ inch taller than the unit, use 3/8-inch starter shims to center the window vertically. Because much of my work happens in cooler temperatures, I avoid one-piece peel-and-stick sill pans; adhesion can look fine at installation and the fail overnight.
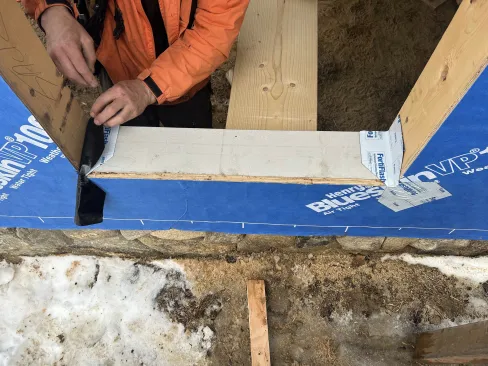
First, I install a piece of cedar clapboard cut to the rough opening width, fastened flush to the exterior edge of the sill with the thick edge facing inward. This creates a positive slope to the exterior (see photo at left).
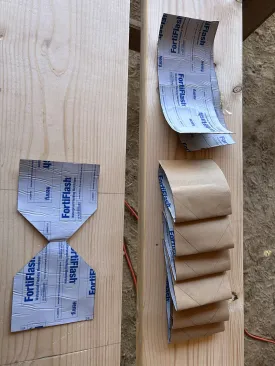
The clapboard thickness also aligns well with 2×6 wall framing. Next, at the bottom corners, I install bowties cut from 6×12-inch pieces of self-adhered flashing tape (Photos below). These bridge the corner, protect the framing, and eliminate the need to fold flashing into tight corners.
Trevor Kurz
Trevor Kurz
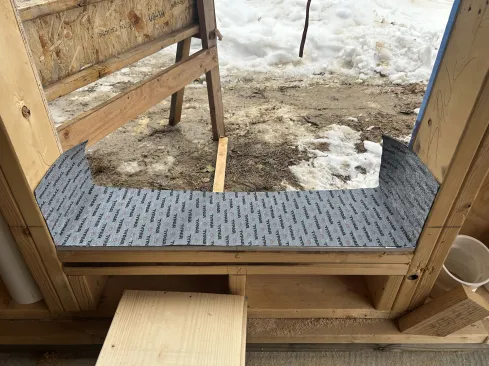
I then cut pan flashing 12 inches longer than the rough opening. I prefer Typar flexible flashing tape for its ease of use. For 2×6 walls, 9-inch flashing works well. Leaving a 2-inch exterior projection provides enough material to fold and adhere the flashing to the WRB, while the interior portion can be turned up to create a back dam. Horizontal relief cuts at the exterior corners allow the flashing to fold cleanly, creating a pan that will shed water if needed (see photos below).
Trevor Kurz

Trevor Kurz
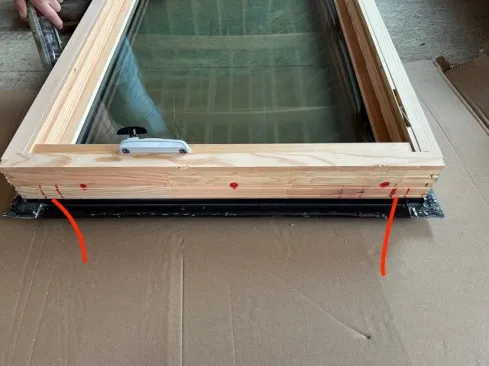
Prepare the window. Confirm the rough opening size or dry-fit the unit. From each bottom corner of the window, mark 2 inches and 4 inches inward along the flange. These marks (see photo below) define where sealant will stop. Apply a 3/8-inch bead of sealant to the back side of the nailing flange around the perimeter, leaving two 2-inch gaps at the sill to allow any water that reaches the pan to drain out. Install and fasten the window per manufacturer instructions, taking care not to compromise sill drainage.
Trevor Kurz
Flash the jambs. With the window installed, flash the jambs and head with self-adhered flashing tape. Do not flash the bottom of the window. Precut jamb pieces 10 inches longer than the window and head pieces when using 9-inch tape and 12 inches longer when using 6-inch tape. Install the side-jamb flashing first, extending it at least 5 inches above the window head, and use a roller as needed for full adhesion. Confirm that drip cap is installed before flashing the head.
Common Mistakes to Avoid
Cutting the WRB in an X pattern and stapling it into the opening.
Trapping the WRB behind the head flashing.
Relying on sealant as the primary water defense.
Skipping the sill pan concept.
Blocking drainage paths at the bottom nailing flange.
Reverse-lapping flashing tape
Close the WRB. Fold the preserved WRB flap down over the head flashing and tape the diagonal cuts so water sheds outward. With fully adhered WRBs or Zip sheathing, lap a secondary WRB layer over the head flashing to maintain shingle-style layering. I use a piece twice the window width and at least 2 feet tall.
Additional layers may be required once casing and additional drip caps are installed.
Interior air sealing. Interior air sealing typically occurs later, during insulation. This step is often overlooked or poorly executed, particularly when left to others. For that reason, I prefer to handle it in-house using low-expansion foam per manufacturer specifications.
Casing Width and Flashing Tape
Most, if not all, of our window installations receive exterior casing. Because self-adhered flashing tape will be used at the perimeter, casing width helps determine tape width. Six-inch tape works well with 3 1/2-inch casing, but wider trim may require wider tape. My preference is for flashing tape, rather than WRB, to bridge the transition between siding and trim.
Water-Resistive Barrier (WRB)
The WRB also affects the first steps. I typically encounter three conditions: mechanically fastened wraps such as Tyvek or Typar, fully adhered membranes such as Henry Blueskin VP100, and Huber Zip System sheathing. This is not a WRB installation lesson, but the basics matter: Follow manufacturer instructions, keep courses straight and level, and orient the material correctly. Sloppy WRB work tends to signal larger problems elsewhere, so setting the bar higher starts here.
Real-World Considerations
Cold weather directly impacts adhesion and cure times. Product selection matters. Some sealants, such as Lexel, perform well in a wide temperature range. In freezing conditions, I have used a battery-powered heat gun to help butyl tape adhere.
In extreme exposures, I may choose to fully seal the bottom flange and eliminate sill weeps (such as on oceanfront homes, in hurricane-prone regions, or on buildings subjected to prolonged wind-driven rain). The greater risk may not be incidental water reaching the sill pan, but wind-driven water being forced through the intentional weep gaps left at the bottom flange. In those rare situations, I may choose to treat the bottom flange as a fully sealed barrier because the likelihood of water entering through those openings appears to outweigh the likelihood of water needing to drain from behind the flange. This is purely a judgment call on the installer’s part and should be considered an exception rather than the rule. As always, verify that doing so will not conflict with the window manufacturer’s installation instructions or warranty requirements.
The method described herein can easily be adapted for exterior doors. Lead pans were once common but they introduce thermal bridging, condensation risk, and excessive buildup of material at folded corners. This approach avoids those issues.
While product quality matters, flashing is about sequencing. Poor installation of good materials produces poor results. Think like water. Assume it will get in and plan for where it goes next—which beats hoping for the best and discovering the worst months after the work is complete.
Keep the conversation going—sign up to our newsletter for exclusive content and updates. Sign up for free