[Ed. Note: Changes have been made to this article since it originally appeared in the pages of the February 2014 issue of the magazine. The changes reflect updated code information, new information about open-cell foam and EPS insulation, and a clarification of the term “air-impermeable insulation.”]
Questions about building cathedral ceilings have troubled energy-conscious builders for decades. Common questions include: With only the depth of the rafter to work with, how do we get enough insulation R-value to meet the energy code, much less meet high-performance building standards? How do we even come close to having room for ventilation? If we leave out the roof ventilation to maximize insulation depth, how can we avoid ice dams? How do we prevent condensation from “raining” down from skylights and recessed lights?
There are answers to all these questions, which is fortunate because the risks of water damage and a likely drop in thermal performance don’t seem to make cathedral ceilings any less popular with clients. This article will sort through the options and summarize the answers provided by the energy code and the building-science community.

James Morshead
Closed-cell foam is denser than open-cell material and dries sti…
Chapter 11 of the International Residential Code (IRC) allows for two cathedral ceiling options—one with roof ventilation and one without. For the vented assembly, insulation requirements are straightforward. Under the 2009 IRC, minimum ceiling R-values range from R-30 (climate zones 1-3) to R-49 (climate zones 6-8), with at least R-38 required in climate zones 4 and 5. Under the 2012 IRC, these values have increased to R-38 in climate zones 2 and 3, and R-49 in zones 4 and 5 (with the requirements remaining the same for climate zone 1, at R-30, and climate zones 6-8, at R-49).
For small areas (“limited to 500 square feet or 20% of the total insulated ceiling area, whichever is less”), both code versions allow for a minimum R-30 in all climate zones if you don’t have enough joist depth to accommodate more insulation. This exception might get you past the insulation inspection on a small project, but it’s not going to do a lot for the building’s energy performance.
The code’s ceiling R-values assume a vented assembly. If you opt for an unvented “hot roof,” insulation requirements are a bit more involved: You still have to meet the overall insulation values described above, but you also have to pay attention to how much “air-impermeable” insulation you place either directly above or directly below the roof sheathing. The aim here is to keep the temperature of the sheathing from falling below the dew point, which would allow condensation to form and rot out the sheathing. Table R806.5 provides the minimum insulation values required for condensation control.
“Air-impermeable” insulation can be either rigid foam board or spray foam, and it must be placed without an air space between it and the roof sheathing. Of course, you can still add air-permeable insulation, such as blown cellulose or fiberglass batts to boost the R-value of the whole assembly. But the impermeable stuff has to be next to the roof sheathing.
These code requirements boil down to three practical options:
- A vented assembly with any type of insulation that meets the R-value requirements for the whole assembly.
- An unvented roof with enough spray foam insulation below the sheathing to control condensation, plus enough insulation (of the same or other type) to satisfy the R-value for the whole assembly.
- An unvented roof with enough rigid foam insulation above the sheathing to control condensation, plus enough other insulation to satisfy the R-value for the whole assembly
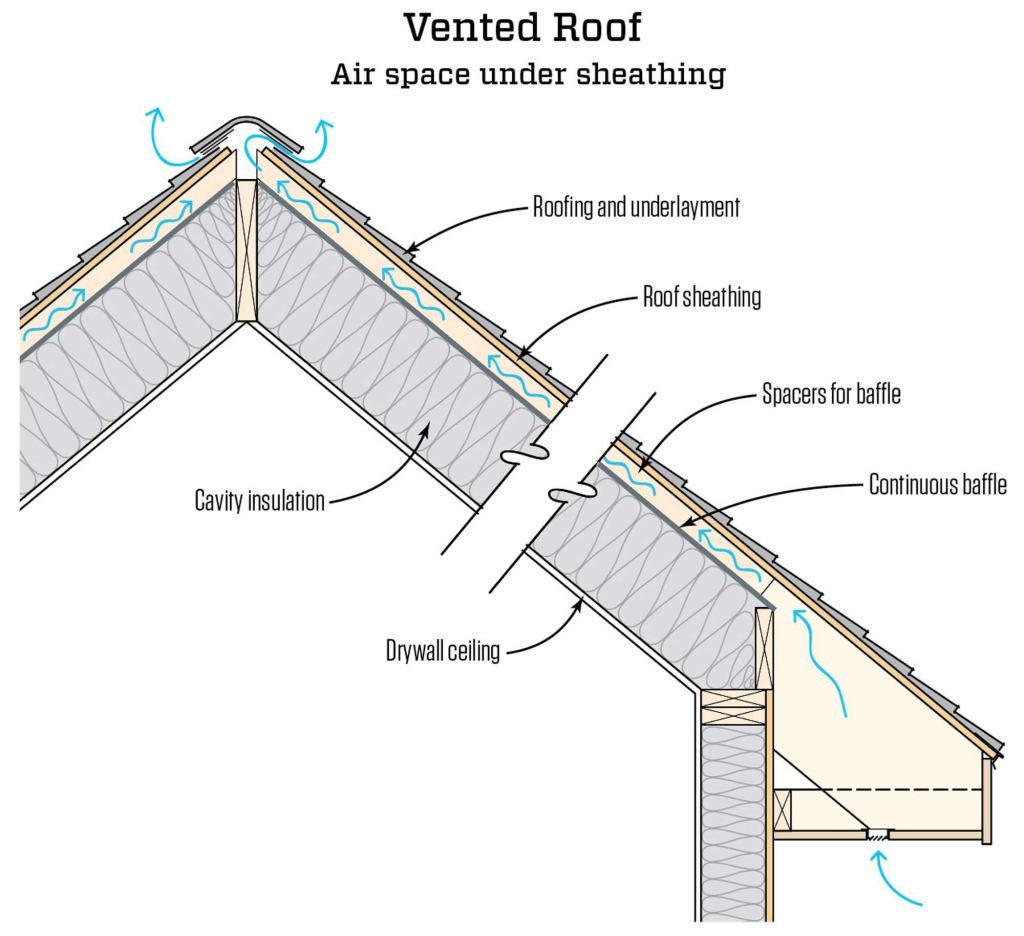
In a vented cathedral ceiling, a vent channel runs from soffit to ridge under the roof sheathing and above the insulation. This venting is supposed to deal with several problems caused by excess heat or moisture: Heat escaping through an under-insulated assembly can melt snow on the roof, causing ice dams. Venting above the insulation helps keep the roof deck cool. And if humid indoor air leaks though the ceiling, roof vents are supposed to whisk it away before it can condense on a cold surface.
However, ventilating above fibrous insulation comes with an energy penalty. Fibrous insulation is designed to be enclosed in an airtight cavity. When air flows over and through it, the insulation suffers a substantial loss of thermal performance. Best practice calls for installing a continuous insulation baffle from soffit to ridge to isolate fibrous insulation from the vent channel.
Warm climates are a bit more forgiving to cathedral ceilings. The venting can introduce humid air into the assembly, which could be drawn toward cool interior surfaces and then condense. Throughout the southeast, there are plenty of examples of “sweating ceilings” and the resulting mold growth to show the inadequacies of a vented assembly. But these sorts of problems are more common to attic assemblies where the humid outdoor air often encounters cooling ducts and air handlers located in the attic.
In theory, a vented assembly can work in any climate, but it has real limitations for a cathedral ceiling. For starters, high-density 10 1/4-inch batts will give you R-38 in a 2×12 assembly, so they’ll work up to climate zone 5 under the 2009 IRC, and up to climate zone 3 under the 2012 IRC. In colder climate zones, however, you’ll have to bump up to deeper rafters, using blown-in insulation with I-joist rafters (see “Framing a Roof With I-Joists,” Jun/13) or parallel chord trusses. Or you can add a layer of rigid foam to the underside of the ceiling joists and strap the ceiling drywall. This latter option works well to reduce thermal bridging through the rafters, which takes care of a variety of misfortunes, including condensation on rafters due to thermal bridging, particularly for an imperfect batt insulation job.
Perfect air barrier. Assuming that you have enough insulation in the ceiling, the next hurdle to overcome with a vented assembly is installing a near-perfect air barrier. This can be at the ceiling plane or at the insulation baffle. If air sealing at the baffle, use rigid insulation as the baffle. Mount the panels between the rafters on strips of rigid foam glued with adhesive to the sheathing, tape between panel sections, and foam seal at the edges, paying particular attention to the seal at the eaves blocking and at the ridge. Without an effective air barrier, the air flow in the vent channel from soffit to ridge will create negative pressure, drawing moist indoor air through any leak in the ceiling and pulling that air through the fibrous insulation where it can condense on the underside of the sheathing
Forget can lights. If you make the ceiling the air barrier, you can’t have recessed lights in the ceiling. Recessed lights are not recommended in any cathedral ceiling because they will create an insulation weak spot at best, and an egregious air leak most of the time. Even so-called “air-tight” cans will leak air with pressure pulling on them. However, builders don’t always have the option to say no. So if you can’t avoid recessed fixtures, opt for using the baffle as the air barrier or build an unvented roof assembly.
Framing obstructions. Perhaps the biggest limitation of a vented assembly is that it works well only on a simple roof configuration. Any interruption in the framing, such as a hip or a valley, or a skylight opening penetrating the roof, will add significant complexity that is of questionable value. A roof that intersects a wall is perhaps the most difficult of all to ventilate. Clever builders have come up with some workarounds over the years, as shown in the illustrations (“Venting Around Framing”). But while these look possible on paper, they’re difficult to install well and are hard to justify as a “best practice.”
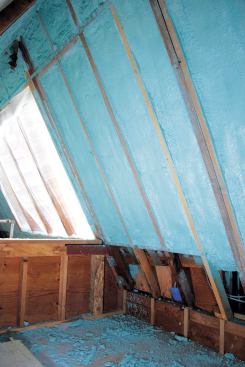
For the two types of unvented assemblies allowed by code, spray foam is typically used to insulate below the roof sheathing, and rigid foam board is used to insulate above the sheathing.
Types of spray foam. There are two basic kinds of spray foam: open-cell foam and closed-cell foam.
Open-cell spray foam is a good air barrier, but it’s not a vapor retarder. In cold-climate homes with high indoor humidity, problems with the use of open-cell foam have been well documented (see “Repairing a Rotting Roof,” Jun/10). Open-cell foam can be used for an unvented roof assembly in cold climates, but you’ll need to install a secondary vapor retarder to meet code in climate zone 5 or higher. In addition, every effort should be made to lower indoor humidity using mechanical ventilation. Some builders also suggest installing the roofing on battens to help dry the sheathing if it does get wet. But the least risky and least labor-intensive option for cold climates is to stick with closed-cell spray foam.
Closed-cell foam is denser than open-cell material and often dries stiff, making it difficult to clean off the face of the framing when it has to be sprayed to full depth in a framing bay.
Closed-cell spray polyurethane foam (also known as “two-pound foam”) has an R-value ranging from R-5.8 to about R-6.8 per inch. The variation largely depends on how the foam is mixed on site, and there can be problems if the installer is inexperienced. (For more information about SPF variations, see: “Troubleshooting Spray Foam Insulation,” Sep/10.)
Open-cell foam (or “half-pound foam”) has an R-value of 3.5 to 3.8 per inch. Advocates of open-cell foam (mostly in moderate climates) like the fact that it has a drying potential that is much like wood’s, making for an assembly that will dry faster if it becomes wet from a leak. Open-cell foam expands much more than closed-cell foam, which makes it quicker to install to full cavity depth.
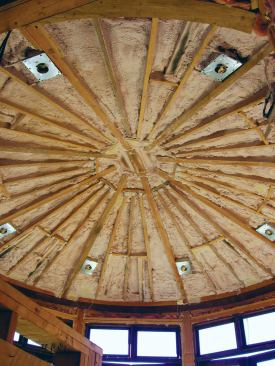
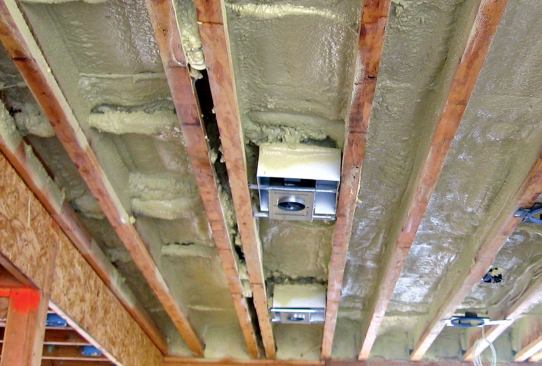
Closed-cell foam only expands from 30 to 50 times its liquid volume, making it easy to control when installing in shallow or oddly shaped cavities—for example, in a complex vaulted ceiling that couldn’t be insulated with anything but spray foam. The low expansion also makes it easy to install without completely filling the framing bay. With an installed cost upward of $1 per board foot, this is increasingly how it’s done: Fill the cavity enough to satisfy the minimum requirements of Table R806.5, then blow the remainder of the cavity with cellulose or fiberglass, or install batt insulation to reach the overall insulation requirement. In an unvented assembly, the insulation must be placed against the bottom of the sheathing (no air space).
In cold climates, pay attention to thermal bridging. Do not partially fill the cavity with spray foam and leave an air space between the foam and the back of the finish ceiling. Thermal bridging through the joists creates a cold surface at the edges of the joist bay. A thermal cycle between these cold surfaces and the warmer space between the joists can reportedly siphon away heat. If you can satisfy the entire insulation requirement with just a partially filled cavity and don’t have the budget to fill the rest of the void with insulation, be sure to hit the side of the joists with spray foam so that the cold rafter is isolated from the air space behind the ceiling.
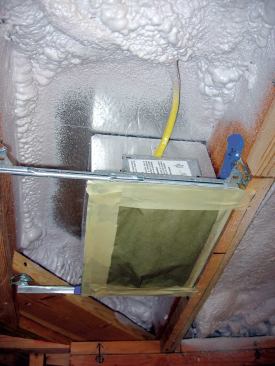
Dealing with can lights. If you have the option, avoid recessed lighting in a cathedral ceiling insulated with spray foam. Even without the ventilation air flow to exacerbate air leaks, you’ll end up with an insulation dead space. The other issue is clearance. Even if the fixture is IC-rated (for insulation contact), you can’t embed it in foam. You need to provide enough clearance from the insulation so that the fixture doesn’t overheat and pop the thermocouple.
When recessed lighting is unavoidable, best practice calls for installing a piece of foil-faced rigid foam above the fixture, or isolating the fixture from the insulation by installing it in a metal box. Before spraying foam, mask the fixture to keep it clean and lap the spray foam onto the rigid board to create an airtight seal. If the rigid foam butts framing, caulk that joint using a polyurethane sealant. (It will also help to advise the homeowner to use only CFL or LED lights, to avoid heat build-up.)
Filling the void. Below the foam, the cavity can be filled with blown fiberglass or cellulose, or with any batt insulation. The shortcoming with batts is the frequency of installation error. Voids and compressions are more common than most of us want to admit. In new construction, blowing the cavity is more commonly done through netting or reinforced poly, mostly because the insulation will need to be inspected before drywall. Installing the netting or poly usually takes twice as long as actually blowing the cavities.
To control condensation, you can also insulate from above using rigid foam board. The advantage of this method is that you reduce thermal bridging by isolating the roof structure from the exterior. As when insulating below the deck, an adequate amount of insulation must be next to the sheathing. This means no air space; a layer of roofing underlayment can still be installed over the sheathing before the insulation to protect the building from rain until the roof gets dried in.
As described in “Best Practices: Continuous Exterior Insulation” (Nov/13) rigid foam options include faced polyisocyanurate at about R-6.5 per inch, extruded polystyrene (XPS) at about R-5 per inch, or expanded polystyrene (bead board) at about R-4 per inch.
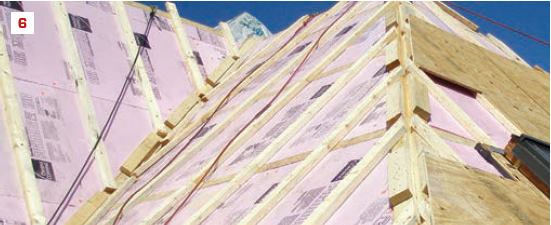
The foam boards must be installed at a thickness to meet the minimum R-value of Table R805.6. (For example, to meet the R-25 requirement for climate zone 6, install 4 inches of foil-faced polyiso.) This, of course, is a minimum and much more insulation can be installed. Building Science Corp. (BSC), for example, regularly describes an R-40 roof assembly using 6 inches of polyiso board—installed in two 3-inch layers or three 2-inch layers—with the vertical and horizontal joints between panels staggered. David Joyce, of Synergy Companies Construction, in Lancaster, Mass., has installed this assembly a number of times for BSC (see one example in “Retrofitting Exterior Insulation,” Nov/09). His crew tapes the seams between insulation panels, then secures the panels through a layer of 5/8-inch plywood sheathing with 10-inch FastenMaster HeadLok screws driven into the rafters.
Roofing and ventilation. Ventilating above the foam is optional, but many people like the idea because it helps reduce the chance of ice dams and promotes drying of the roofing. But ventilation isn’t necessary for all roofing types.
Testing begun by Bill Rose at the University of Illinois, and corroborated by the Florida Solar Energy Center, has shown that roof ventilation has little effect on roof surface temperatures, and most shingle manufacturers seem to have dropped this requirement from the instructions printed on shingle wrappers. However, code still requires that wood shingle or shake roofs be installed over battens to provide back venting. This is not to reduce temperatures, but to promote drying and stave off rot. Battens may also be required for some metal roofing (often metal tiles and “shakes”), and may be used for standing seam and other metal roofing panels to help reduce heat that can increase thermal expansion. You need to pay attention to the manufacturer requirements. In most cases, if it’s required by the manufacturer, it’s required by code.
The roof built by David Joyce and designed by BSC’s Betsy Pettit (see “Air-Sealing and Insulating a High-Performance Shell,” Jun/10) is a sort of über-assembly designed to cover all possible roofing contingencies (see illustration, above). It’s a vented assembly, which uses a layer of 2-inch (R-13) faced polyiso foam board as the baffle. Below this, the cavity is completely filled with closed-cell spray foam, then an additional layer of 2-inch faced polyiso. It’s an expensive assembly, but at a total of about R-70, and as near to call-back proof as possible, there’s no questioning its value.
Cathedral Ceiling Insulation Resources
In addition to the code references cited in this article, here are a number of information resources for those wishing to delve deeper into the issues of building durable and energy-efficient cathedral ceilings.
Which Spray Foam Is Right For You? (Consortium for Advanced Residential Buildings; Steven Winter Associates)
Controlling Cold-Weather Condensation Using Insulation (Building Science Corporation)
Will Open-Cell Spray Foam Insulation Really Rot Your Roof? by Allison Bailles (Energy Vanguard blog)
From The JLC Archive:
Insulating Unvented Attics With Spray Foam, by James Morshead (Mar 2007)
Insulation Code Change: How Spray Foam Meets 2012 IECC Code, by Matt Risinger
Troubleshooting Spray-Foam Insulation, by Mason Knowles (Sep 2010)
Retrofitting an Insulated Cold Roof, by Dan Perkins (Nov 2008)
Thermal Break for a Cathedral Ceiling, by Henri Fennell (Jun 2012)
.


