Exterior rainscreens provide a small (roughly 3/4 inch) air gap between siding finish material and the home’s weather resistant barrier. This gap allows any inadvertent water infiltration to drain away via gravity, while also creating space for stack effect air flow that promotes drying of the exterior wall system. JLC has published numerous articles on the benefits and components of rainscreens, including Steve Baczek’s classic, Rainscreen Basics, and veteran builder Doug Horgan’s recent article providing criteria for when rainscreens are most essential.
In this article, I share rainscreen flashing and trim details for our Queen of Zero project, a new high-performance single-family home in Maryland (zone 4A). Our exterior finish material is horizontal HardiePlank lap siding, and our exterior wall insulation is continuous R-26 expanded polystyrene (EPS) via structurally insulated panels. Thus, based on climate and material selections, as well as the homeowner’s interest in “future proofing” the house for resilience in an increasingly stormy, hot and humid climate zone, the upgrade to a full rainscreen-type install promised a strong return on investment.
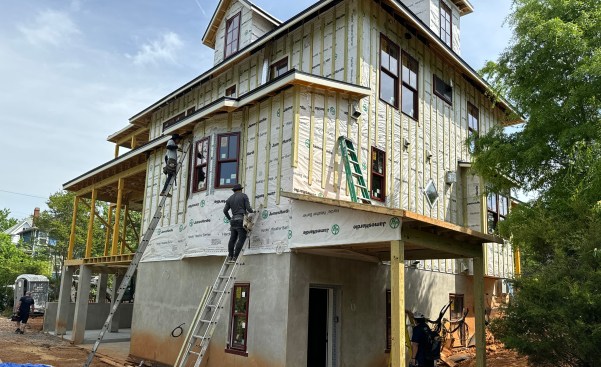
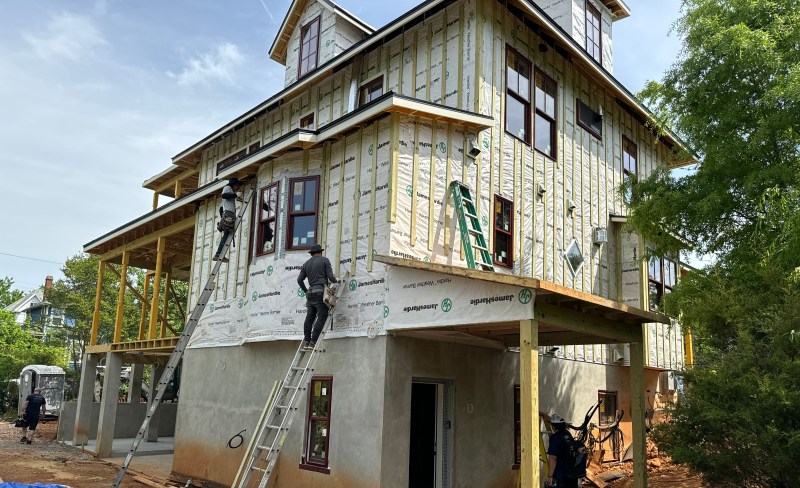
Rear elevation of the Queen of Zero rainscreen. The rainscreen material is made from 1×4 pressure-treated wood furring strips installed 16-in. o.c. with 10- to 12-in. fastener spacing.
The Queen’s Rainscreen Specifications
To determine the exact specifications for our rainscreen at Queen of Zero, we consulted James Hardie, manufacturer of our fiber cement siding and trim. Hardie provided recommendations on furring spacing, fastener size, and fastener spacing based on cladding design pressure (see table below).
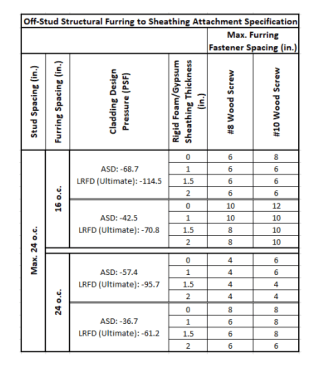
Excerpt from James Hardie 3/31/23 design advice letter regarding structural furring attachment to min 7/16-inch wood structural panel for lap siding, vertical siding or architectural panels.
With an exterior sheathing of continuous OSB-skinned structural insulated panels, furring strips could be installed every 16 to 24- nches. Based on our building height (31 feet) and maximum wind requirement (115 mph), Hardie suggested 1×4 pressure-treated wood furring strips installed 16-inch o.c. with 10- to 12-inch fastener spacing.
Window and Door Trim
The Queen’s Sierra Pacific double-hung aluminum clad windows were installed per manufacturer instructions, flanges nailed to the OSB exterior sheathing. Vertical rainscreen furring strips were installed on top of the Hardie Weather Barrier housewrap, flanking the window openings. Window trims were installed on top of the rainscreen furring strips, which provides more depth to the window sashes, a nice architectural detail for a home aspiring to Victorian design.
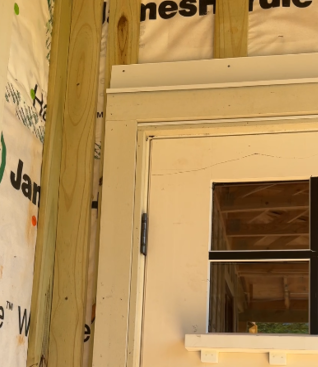
Close up of the trim and flashing details for doors at the Queen of Zero project. Note the 1x trim that extended the door jambs and two-step head flashing.
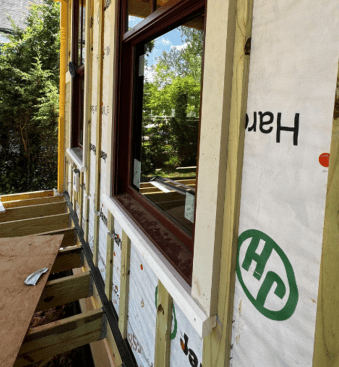
Window trims were installed on top of the rainscreen furring strips, which gave the window sashes a recessed look, a nice architectural detail for a home aspiring to Victorian design.
Prior to door trim installation, our carpenters prepped the openings with a 1x trim that extended the door jambs to the proper depth for the rainscreen. Flashing above the doors was installed in a two-step process: 1) typical metal flashing at the top of the door header was tucked under the WRB, and 2) an additional piece of flashing above the trim was attached to the rainscreen furring strips.
Bug Screen
To prevent small creatures from venturing into the rainscreen cavity, we installed ridge vent pest screen behind the first course of the Hardie lap siding. Other options for bug screens include ridge-vent mesh or corrugated plastic vents.
The Bottom Line
The installation of our rainscreen material took two guys about one week to complete. Total cost for labor and materials was roughly $5,000 on a 4600-sf house (about $1/sf of lap-sided surface area). Plus, we had the added bonus of creating an aesthetically pleasing recessed look for the Queen’s large double hung windows.
Building high-performance often means going above and beyond typical code requirements to ensure the longevity and resilience of the home for generations to come. Yet, each decision must be considered within the context of budget, aesthetics, climate, and other factors. When it comes to the option of installing a rainscreen at Queen of Zero, this decision was a no-brainer.
Keep the conversation going—sign up to our newsletter for exclusive content and updates. Sign up for free.


