Will your decks rot long before they ought to? To ensure a longer life for the decks I put so much into, I use a number of techniques to prevent rot from taking hold. My methods don’t take a lot of extra time or cost much — and they make great selling points when I’m talking to potential customers, setting me apart from fly-by-night competition. Here are the basics.
Elements of Rot
Wood rot is caused by a fungus, a living organism whose spores are nearly everywhere. Rot fungi all require warmth, food, and moisture to thrive; therefore, you want to eliminate these factors as much as possible to minimize the potential for rot to grow. You can’t control the outdoor temperature, but you can reduce available food and moisture.
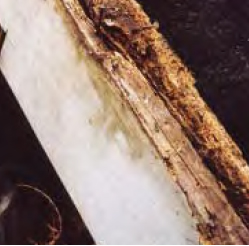
Pressure-treated hem-fir lumber is incised to increase penetration, but often the colored preservative barely soaks in at all, as is evident on this piece of blocking. The end cut should have been coated with preservative; the brown staining visible on the end grain is a sign of rot.
Fungus feeds on wood, which presents an obvious obstacle to eliminating fungus food from a wood deck. A partial solution is to use lumber that’s less palatable to fungi: pressure-treated wood or rot-resistant species like cedar, redwood, or ipe. But even pressure-treated wood isn’t entirely immune, because the chemicals don’t penetrate completely, leaving the interior of the lumber unprotected. This is particularly true of the hem-fir material we use in the West, but can also be a problem with southern yellow pine though it accepts pressure-treatment more readily. Less susceptible woods like cedar and redwood, which are often used for railings and surfaces, can still eventually rot (the sapwood of almost every species is especially vulnerable, so be sure to use heartwood grades).
Other fungus food is delivered by rain and wind. Poor deck design and even some common building practices create what I call “collection zones” — places organic matter and moisture can accumulate — usually where two pieces of material meet. And not only does this organic matter itself provide a friendly environment for fungi, it also traps moisture, which encourages rot in the surrounding lumber.
Starting at 16 percent moisture content, wood is susceptible to rot. At 21 percent or higher, rot thrives, and in wet seasons this threshold is easily reached. We put a lot of faith in pressure-treated lumber, but when it gets wet, it swells; when it dries out, it shrinks. This process creates checking. All it takes is a check (which can be microscopic) that bypasses the treatment for rot to invade the delicious wood beyond. Maximizing the drying potential of decks is the key to longevity.
Eliminating Collection Zones
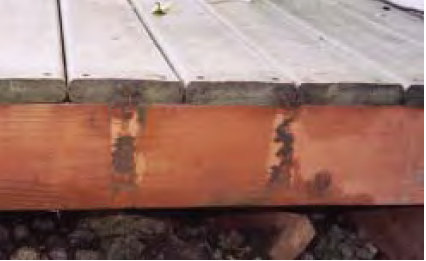
On this deck, water got between the fascia and rim, partially rotting the fascia and completely destroying the rim.

When the fascia was removed, the rim collapsed. Here, on a pressure-treated frame, the author installs composite decking that will completely cover the fascia and rim, avoiding this potential collection zone. The lattice separating the fascia and rim joist will also help to drain away water.
Fascia Detail
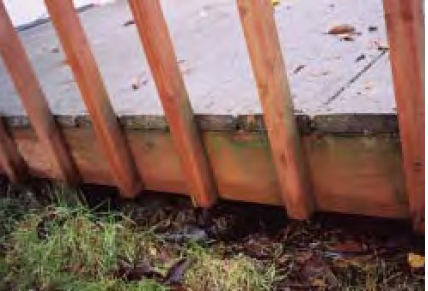
A perfect collection zone is where the fascia board rims the deck. There’s no airflow between the fascia and the framing, so the 21 percent moisture content required for rot can be maintained over long periods of time, and there’s no way for debris to escape. But if you simply cantilever the deck boards one inch over the fascia you reduce the number of places dirt and moisture can get in. Compare these construction details by looking at how many linear feet of collection zone each design creates. On a 12-foot-by-16-foot deck with 6-inch deck- ing, a fascia that is flush to the top will create 40 linear feet (12 + 16 + 12) of collection zone (the entire perimeter). But if the decking laps over the fascia, the collection zones are limited to the 1/4-inch gaps between the deck boards, a cumulative 121/2 inches. Using a belt and suspenders approach, you can also seal the top of the rim and fascia with peel-and-stick mastic, like Grace’s Vycor Deck Protector, or with a liquid membrane by Whale Glue.
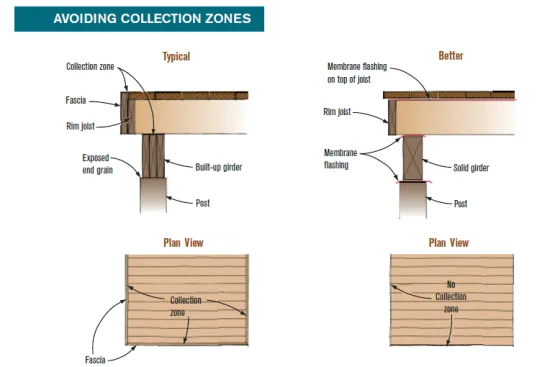
Wrapping a 12-foot-by-16-foot deck with fascia (left) creates 40 linear feet of potential collection zones, where rot-encouraging debris gathers at the rim joist. Running the deck boards parallel to the house and overhanging the fascia (right) will reduce the collection zones to a cumulative 121/2 inches (1/4 inch per gap x 50 gaps). While some water and debris will get in, the greatly reduced amount will be much less likely to cause rot.
Built-up Beams
It’s common practice to double- or triple-up 2-by material to form beams. Unfortunately, the space between the pieces creates a collection zone. A better practice is to use solid 4-by or 6-by beams to carry loads. Still better is to cap the beam, whether it’s solid or built-up, with copper or a membrane such as Vycor.
Attaching Ledgers
Another common building practice (and IRC requirement) is to use flashing to keep moisture from getting between the house and the ledger. Many contractors will install an L-shaped piece of metal here; the horizontal leg covers the top of the ledger, and the vertical leg goes up the wall and is lapped by the building paper above.
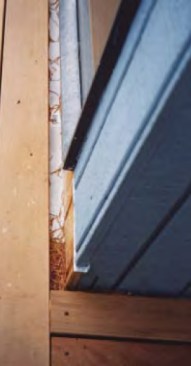
It’s common practice to bring an L-shaped flashing down the wall and kick it out over the ledger, the resulting pocket can collect debris.
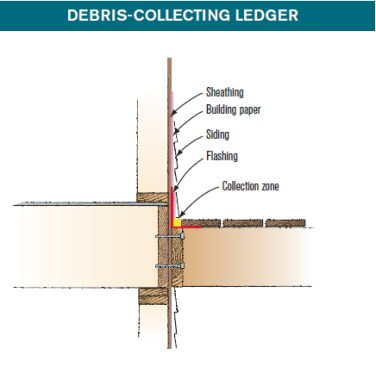
The problem is that rot can invade the deck board or the bottom of the siding when organic matter builds up in the space between the deck and the side of the house — especially on the wind-driven side of the house. The rain hits the siding and runs down into this collection zone, where organic matter creates a kind of dam, preventing drainage. If the siding is not up off the deck, the water will soak into the backside of the siding, and from there can enter the house via capillary action.
One way to overcome this problem is to use a ledger that is larger than the joists. If you’re using 2×8 joists, you need a 2×10 ledger. Bevel the top of the ledger and install it 11/2 inch higher than the joists. Install the first deck board 3/8 inch to 1/2 inch away from the ledger to allow the organic matter and water to drop through to the ground.
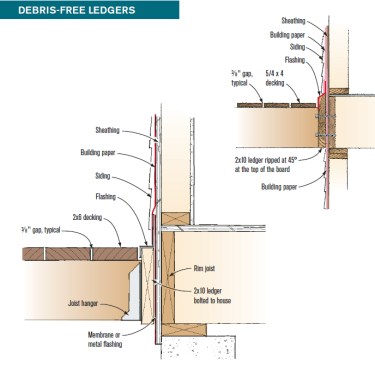
Keeping debris from collecting against the house is key to a long-lasting ledger connection. A sloped and flashed ledger (above) sheds water and debris. A properly flashed flat ledger that’s flush with the decking (left) is another easily cleaned connection. Keep siding 2 inches above the ledger with this design.
Deck Boards
Many carpenters use 16-penny nails to space deck boards. This creates a 1/8-inch-wide gap that forms a collection zone between boards and on top of every joist. It’s nearly impossible to remove leaf litter from such a narrow gap. And once the organic matter is in there, it can induce rot in the deck boards and in the joists below.
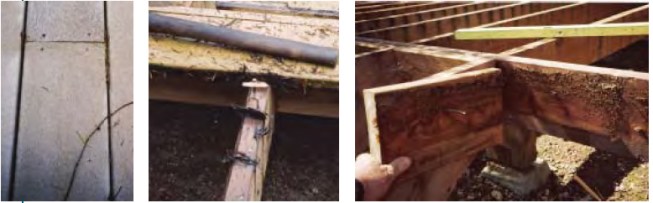
Most carpenters space deck boards too tightly (left), leaving enough room for debris to get in but no way to clean it out. On this deck, organic matter collected at every gap and joint (center), as well as between a rim joist and blocking that landed under a gap in the deck boards (right).
My way around this problem is to install decking with a wider, 3/8-inch gap. Organic matter won’t collect in this larger space, but will simply fall through. (Some customers express concerns that such a wide gap will catch a woman’s high heel. I’ve found that once I explain the benefit — extending the longevity of the deck — they readily accept the gap. And how many women wear stilettos to a barbecue?) The larger space also allows air to circulate and dry out the decking and joists. And on top of joists, where debris still collects, the space is wide enough to be raked clean with a screwdriver. The same rules apply to composite decking; even though captured organic matter may not affect the composites, it can still rot the framing below.
Screws or nails fastened from above should be driven flush with the deck surface, not recessed where they will hold water. This is especially critical for wood decks, as is sealing the wood deck boards after they’re fastened.
Railings
Many carpenters nail 2×2 balusters to the fascia or rim joist, a poor practice because there are so many nails in the rim that it ends up looking like a pincushion. The large number of fasteners can also split the rim and allow water to get inside. Any railing system that attaches to the top of the deck, on the other hand, is less likely to create a collection zone, especially if the bottom is caulked.
Nailing balusters to the rim joist creates pockets.
These pockets trap moisture and debris, which can cause rot.
Some railing systems need to be attached through to the deck framing. If this is done inside the rim you create collection zones on two sides, if not all four sides, of the posts. If you attach your post to the outside of the rim, you cut your collection zone by as much as 75 percent.
Choosing and Using Lumber Correctly
Pressure-Treated Lumber
The substructure of a deck is expected to survive the harshest conditions, so in most cases it should be made from pressure-treated lumber. But not all pressure-treated lumber is the same: It’s graded based on how much preservative, measured in pounds per cubic foot (pcf), is retained in the lumber after treatment. The greater the pcf, the longer the lumber will last. When using lumber treated with ACQ (alkaline copper quaternary), currently the most common pressure-treating chemical, it is standard practice to use .25-pcf material above ground, .40-pcf material for ground contact, and .60-pcf material for pilings and marine applications. To build the most durable deck, you should frame substructures with .40-pcf lumber.

It’s a good idea to coat pressure-treated yellow pine end cuts with extra preservative. With hem-fir, which doesn’t accept pressure treatment well, it’s an absolute necessity to do so.
Even then, there’s no guarantee that the structural members won’t rot. Whenever pressure-treated lumber is drilled or cut, the inner untreated wood becomes exposed and should be protected using a liquid preservative that contains 9 percent copper naphthenate. There are a large number of these products on the market; two of the more widely available are Jasco’s Copper-Brown Wood Preservative (888/345-2726, www.jasco-help.com) and Wolman’s Woodlife CopperCoat (800/556-7737, www.wolman.com). To apply, brush the solution onto all end-cuts and inside all holes drilled in the wood.
Untreated Lumber
To improve the penetration of preservative into hem-fir lumber, its sides are slashed, or incised. Incised pressure treated lumber is not very attractive, so there are places, such as upper-level decks, where untreated lumber is used for beams and posts. Because the IRC specifies that decks be made from “approved rot-resistant material,” using untreated lumber usually requires an engineer’s stamp.
To keep this deck — which is framed with untreated lumber — from rotting, the author coated it with a borate preservative and covered the upper surfaces with torch-down roofing membrane.
Untreated lumber should be used only if it can be kept dry enough to discourage the growth of rot. Airflow is a big part of this, but there are a couple of other precautions to take. First, contaminate the food source by treating the wood with a borate product such as Tim-bor (800/264-0870, www.nisuscorp.com). Frequent wetting may leach the borate out of the wood, so it is necessary to coat borate-treated lumber with a water-repelling sealant.
A good way to create a moisture barrier is by sealing the top edges of beams with strips of torch-down roofing membrane, which is designed to stand up to UV and selfseal where nails penetrate it. Cut the torch-down 3 inches wider than the beam, so you have an overhang. To make the membrane stick, heat it with a torch and apply it to the top of the beam only. Do not bend and affix it to the sides of the beam, but simply trim the excess membrane to leave a 1/2-inch overhang to ensure that water will not drip down the sides of the beam.
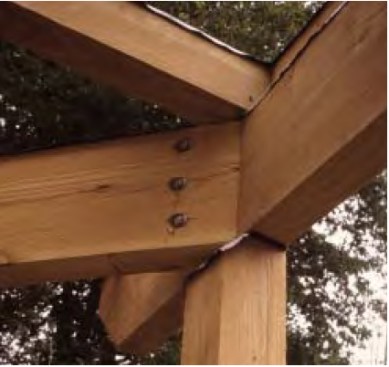
Post-to-Beam Connection
There are a couple of commonly used, yet unwise methods for connecting posts to beams. One is the practice of notching the posts for beams, which creates a collection zone. Another is scabbing on a piece of scrap decking board — this is like setting the table and inviting fungi to dine! The solution is to use one of the numerous Simpson post-to-beam connectors, such as the BC4 or the 1212HT.
Post-to-Base Connection
Many builders bury posts in the ground to gain lateral support, but there are other ways to get a similar result. For example, nail 2x4s to the bottom of the joists diagonally out from the house. If the deck is freestanding, use cross bracing. Even with pressure treatment, it is nearly impossible to protect the posts well enough to prevent the in-ground (or in-concrete) ends from rotting. You should keep the posts out of the ground by installing them on concrete piers formed with Sonotubes, extended 6 inches above grade. I imbed a Simpson CBSQ saddle to sit 1 inch above the pier. This saddle provides a capillary break to prevent moisture from wicking up the post.
Airflow Below
It’s important to create opportunities for airflow beneath low-level decks. If the design calls for skirting, enclose the area below with open lattice, or use vertical boards with at least 3/4-inch gaps between them. Space the deck boards a minimum of 3/8 inch apart. When the deck is low and air circulation is limited, frame the substructure with .60 pcf treated lumber.
Stairs
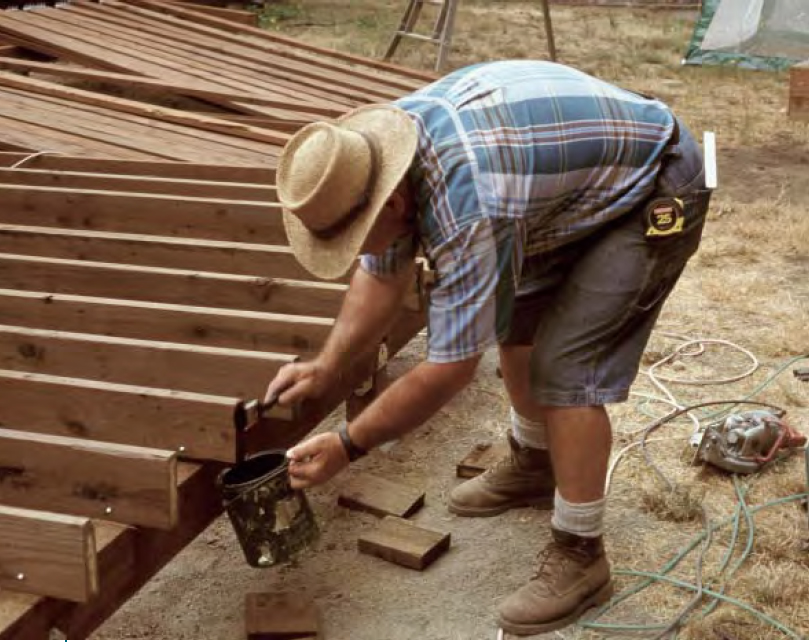
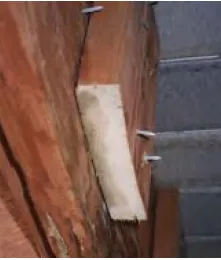
The bottoms of stair stringers are very susceptible to rot where they touch the concrete. One way to minimize the risk is to treat the stair stringers with Jasco’s Termin-8 (888/345-2726, www.jasco-help.com), an oil-based sealer that has 25 percent copper naphthenate. Another thing you can do is shim the bottom of each stringer off the concrete using small pieces of composite decking.
As a serious professional, you’re not only building decks, you’re also building a name for yourself. If you plan on still being around in 20 years, wouldn’t it be nice to have your works of art still standing as a testament to your fine craftsmanship? And don’t be shy about advertising the fact that your decks are built to last!


