One of the classic tests that distinguish a skilled carpenter from a wannabe is the ability to hang a door the old-fashioned way: assemble a jamb set, fit the door blank, mortise the hinges, and put all the pieces together.
Hanging a door from scratch is way more time-consuming than installing a prehung, but it's an extremely flexible process. If I need to hang a door in a hurry and can't wait for the lumberyard to order a particular prehung, it's a safe bet that the jamb material and door blank I need are in stock.
More often, if I'm remodeling an older home and need to fit a door to a nonstandard rough opening — or if I want to recycle a salvaged door panel — the solution is to build a custom-sized jamb set and trim the door to fit.
Assembling a Jamb Set
Years ago, before prehung doors became as popular as they are now, you could buy ready-to-assemble jamb packages for popular door sizes that simply needed to be nailed together. These days, the suppliers in my area keep only 7-foot lengths in stock, so even a standard door frame has to be cut to size.
If I'm fitting the jamb to an existing door blank, I measure the door and add 3/16 inch to the width and about 1/2 inch to the height. These measurements represent the inside dimensions of the jamb.
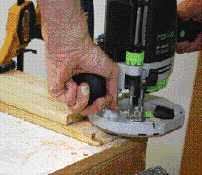
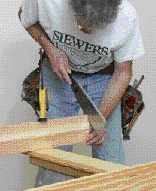
For strength — as well as appearance — I rabbet the tops of the side jambs to receive the head jamb. It's possible to use a trim saw and a chisel to plow out the rabbets, but a router does the job faster and better.


Before cutting the head to length, remember to add 1/2 inch to account for the 1/4-inch depth of each rabbet.
Routing the rabbet. After scribing the thickness of the head jamb on the end of each side jamb, I make another pencil mark that represents the width of the router's base plate (measured from the inside edge of the bit) and clamp a straightedge at that point.
I make a test cut on a piece of scrap to verify that my measurements are accurate and that the router's depth setting is spot-on, then I rabbet all of the side jambs one after another.
I fasten the parts together with carpenter's glue and 2-inch drywall screws.
If the door stops are on the job at this time, I'll tack them in place using a method shown on the last page of this story.
Setting the Jambs
A solid-core door panel can weigh 100 pounds or more. To support this much weight, the jambs have to be securely fastened — but they must also rest solidly on the floor. Otherwise, over time, gravity and centrifugal force will take their toll.
I always check the floor with a level to determine whether one side of the rough opening is higher than the other. If the jambs will rest directly on a subfloor, I simply place a shim underneath the low side. If the jambs are set directly on top of a finished floor, as they were on the job shown in the photos, I scribe the high-side jamb and cut it to fit.


I roughly center the jamb in the opening, using a homemade spreader to keep the width at the bottom the same as at the top. I then slip a pair of shims behind the bottom hinge and pin the jamb by driving a pair of 2 1/2-inch nails underneath them.


I plumb the face of the jamb with a 6-foot level, then shim and pin the top hinge following the same procedure. I don't secure the latch-side jamb until after the door is completely hung.


