
After four decades of carpentry, I’m a little vague on when I first used a table saw, a tool most builders now regard as indispensable on the jobsite. Portable, or jobsite, table saws weren't around when I started out; back in the late 70s, I recall hauling a Craftsman radial arm saw to the job where we used it to make all kinds of life-threatening cuts. Later, I adapted a Rockwell contractors' table saw, breaking it into several components that I could reassemble on site, making it somewhat portable. Since then, I've owned a half-dozen truly portable saws, of varying make and design.

I currently use a six-year-old Makita suspended in a Rousseau stand, which provides a smooth-acting T-fence with a 26-inch rip capacity. The saw and stand were given to me, and I’ve made some tweaks to the setup, including a power switch convenient to my left hand, and a support at the far end of the fence that makes it glide effortlessly on the rails. Ease of use is vital to safe use, which is where I want to start this discussion.
Safety first. A portable saw is by definition lightweight, typically around 60 to 70 pounds. Unlike a heavier shop saw, it doesn’t have the mass to remain stationary during use. Some portable saws come with integral, pop-up stands that provide the necessary stability. Other models require, at minimum, clamping or screwing to a solid, level, and immobile surface. Setup should be in a spot with ample room in front of and behind the saw for the longest pieces you’ll be cutting. Keep the area around the saw free of cutoffs and other debris. Keep shirtsleeves, long hair, jewelry, and any other loose items away from the tool’s reach. And, despite its name, try not to use the saw as a table for other tools, stock, cutoffs, and other items. The only thing that should remain in easy reach is a push stick, used to guide the material past the blade.

Manufacturers provide standard safety features with their saws, including lockout power switches and paddle cutoffs, electronic blade brakes, blade guards, splitters or riving knives, and anti-kickback pawls. These are all good, sensible features. However, not all survive experienced users, me included, who clear the deck of blade guards and splitters, considering them obstacles, rather than aids, in use. There is a serious trade-off in safety versus functionality, while there are valid reasons for removing some of these features. However, there’s no truly safe substitute; exercising constant caution and respect for this flesh-eater is the only safe mode of operating it.

Kickback. If you’ve used a circular saw, you’ve undoubtedly had it kick in your hand during a cut. In essence, a table saw is a circular saw turned upside down, and instead of feeding the blade into wood, you feed wood into the blade. Wet or crooked lumber, poor technique, or a dull blade can all contribute to kicking your workpiece back at you with dangerous force. Poor technique includes performing “freehand” cuts, where you dispense with the control provided by a fence or miter gauge.
A riving knife consists of a metal “shark fin” positioned in the saw kerf, its top edge slightly lower than the teeth. This feature helps prevent the cut from closing up and pinching the blade. When ripping, never pull the workpiece backward (a pawl prevents this); always push the piece completely past the blade and switch the saw off.

Setup. A correctly set-up saw is going to provide the best performance and margin of safety. If you have to muscle stock through the blade, you and the material will suffer. Reduce friction and exposure by setting blade height no more than 1/8 inch greater than the material you’re cutting. Always use a sharp blade and one specific to the task. For most cutting, I use a combination blade, which gives reasonably good results whether ripping or crosscutting. If I’m going to rip more than a board or two, I’ll swap out the combo blade for a dedicated ripping blade. It provides noticeably easier cutting action and a better glue edge. Finish plywoods call for a blade designed to crosscut grain with minimal tear-out. These blades typically have 60 or more teeth, configured for extra-clean cutting. Note that if the wood comes out of the cut with burn marks, if smoke is pouring out of the cut, or if you find yourself pushing harder than when the blade was new, swap it out for a sharp one.
A fence that isn’t perfectly parallel to the saw blade will either force the stock against the face of the blade, binding and burning it, or pull it away from the fence, ruining accuracy. Usually, the fix is a simple matter of adjusting the fence to lock down dead parallel with the miter grooves. Occasionally, the saw arbor itself is out of alignment with the table. In either case, consult your owner’s manual for how to correct it.
Feather boards. Using a feather board, simple to make and use, improves precision when you’re ripping. Feather boards hold the stock firmly against the fence while preventing kickback.


Crosscuts. I typically use a miter saw for crosscuts. On the table saw, use the miter gauge to guide the stock through the blade, letting the cutoff fall free on the far side of the blade. Because of the high risk of kickback, never crosscut material directly against the fence. However, the fence can still be used as a stop for repeat crosscuts to a fixed dimension. First clamp or screw a straight piece of 1-by lumber to your fence, with its far end at the start of the cut. Measure your crosscut dimension between this board and the blade and lock the fence down. Use your miter gauge to push the material through the cut, held against the auxiliary board. The workpiece will fall free of the fence once cut. Attaching an auxiliary fence to the miter gauge allows you to make a reference kerf to align your cut against, useful for precise cuts at any angle.


Push stick. When pushing near the fence, I keep a couple of fingers hooked over the fence and push with my thumb, forefinger, and middle finger. For this reason, I don’t like fences that are more than 3 inches high. When cutting long stock, use a stable outfeed support to prevent the piece from dropping out of control. To complete the cut, grab your push stick and move the material beyond the blade. Push sticks come in all kinds of shapes, based somewhat on preference but also application. For larger stock and wider cuts, a simple stick with a notched end to engage the workpiece fits the bill.


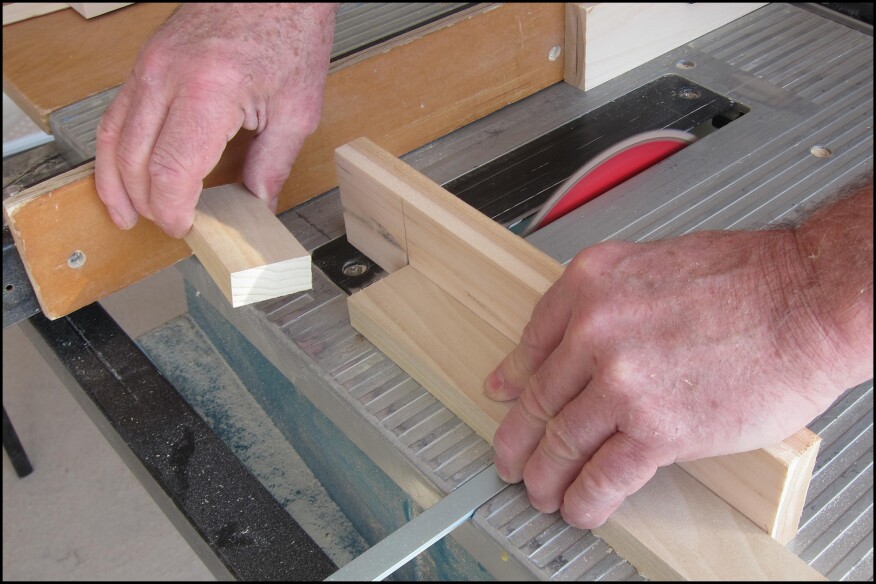
When you’re cutting small pieces, several considerations come into play. First, there’s a tendency for the piece to ride up on the blade at the start, rather than parting around it, and to chatter once entered. In this case, I use a pusher made from 1/4-inch plywood. Its long edge holds the piece down against riding and chatter, with a shallow leg at the rear to hook the piece. Keeping it thin helps keep the pusher out of the blade.

Another issue when cutting small or narrow pieces is the lack of support under the piece because of the gap between the throat plate and the blade. On my saw, the gap is wide, and the design doesn’t allow readily swapping in a custom zero-clearance plate. One option is to make narrow cuts in material that’s longer, then crosscut the piece free using the miter gauge. Alternatively, you can feed the piece partway through its length, then flip it end for end to complete the cut. This provides constant support at the infeed end.

Bevel rips. Every portable saw I’ve owned has tilted to the left, away from the fence. Bevel cuts aren’t much different from square cuts to make. First, raise and set the blade angle. To set the fence to dimension, place the material to be cut alongside the blade and measure from the fence to a sawtooth nearest the surface. Set the blade slightly higher than the material. Bevel cutting can tend to pull the stock away from the fence, so use a feather board to hold the line. Start the cut feeding by hand and finish with a push stick.

To bevel an edge, fully lower the blade and move the fence close to its left side. Attach a sacrificial face to the fence. Power on and raise the tilted blade into the face. Run a test piece into the blade to check the desired exposure. Since you can’t overcut the bevel, this method gives a uniform result and doesn’t require a feather board.

A future article will discuss more of the countless jigs, attachments and methods that wring the most out of a jobsite table saw.
Photos by Eve Aspinwall and Dave Holbrook


