
All drywall seams need to have tape embedded in joint compound. The tape strengthens the joint, and the joint compound, or mud, is the adhesive that holds the tape in place. But there’s a lot more to hand-taping beveled drywall seams than slapping a bunch of mud on the wall and running tape. In this article, I’ll focus on the methods I use for taping beveled (or tapered) seams with the most common types of tape—paper, fiberglass-mat, and fiberglass-mesh.
Paper tape is the tape used most often by professionals. Fiberglass-mesh tape is self-adhesive and is more popular with people who tape only occasionally, because it has a light adhesive on it and you can run it out over the seams and then cover it with compound. This saves you from the juggling act of applying mud and tape simultaneously. Fiberglass-mat tape is at least as strong as paper tape and gets embedded in a similar manner but, like fiberglass mesh, is made from an inorganic material.
Critical First Coat
In my opinion, the first coat (when you embed the tape) is the most important part of the drywall finishing process. Some folks think that it’s the sanding or the finish coats that are most important. But if you get the tape embedded properly in joint compound to begin with, you create a strong foundation. This is critical to a good finish. The joints must be as strong as the drywall itself, otherwise normal movement of the wall and ceiling framing can cause cracks to appear at the seams. If you get the first coat right, the other two coats are relatively simple.
Mud matters. I prefer to use an all-purpose, heavyweight, drying-type joint compound for embedding paper and fiberglass-mat tapes. The heavyweight, all-purpose material (the original type of all-purpose compound) is stronger than lightweight or mid-weight compounds.
By a “drying-type “compound, I am referring to a compound has to air dry before subsequent coats can be applied. Drying compounds shrink slightly when they dry, but this shrinkage is not a problem if you use a paper or fiberglass-mat tape, as I will explain further on. A setting compound (sometimes called “hot mud”), on the other hand, cures by a chemical reaction. They still need to air dry before the drywall can be painted or otherwise decorated, but it only needs to set before coating with the next layer of compound. Setting compounds are stronger than drying compounds, but if you’re using a paper or fiberglass-mat tape, added strength is not the reason to use hot mud, it’s speed. Setting compounds will cure faster than drying compounds will dry, so you can apply the finish two coats sooner.
Drying compounds are purchased in premixed form, and most of the time, the premixed drying compounds are the proper consistency for embedding tape right out of the bucket or box, but mixing the compound is still recommended. Mixing loosens up the compound; for minimal effort, the mud becomes easier to apply. Older mud may be stiff and you can add a little water to it. But use caution: Over-thinning can also reduce the strength and adhesion qualities of the compound. Whether added water is needed is a judgment call. Too thick of a compound means working harder physically and working slower. But if it’s too thin, the mud won’t stay on the tools. This slows you down, too, and the jobsite soon becomes messy.
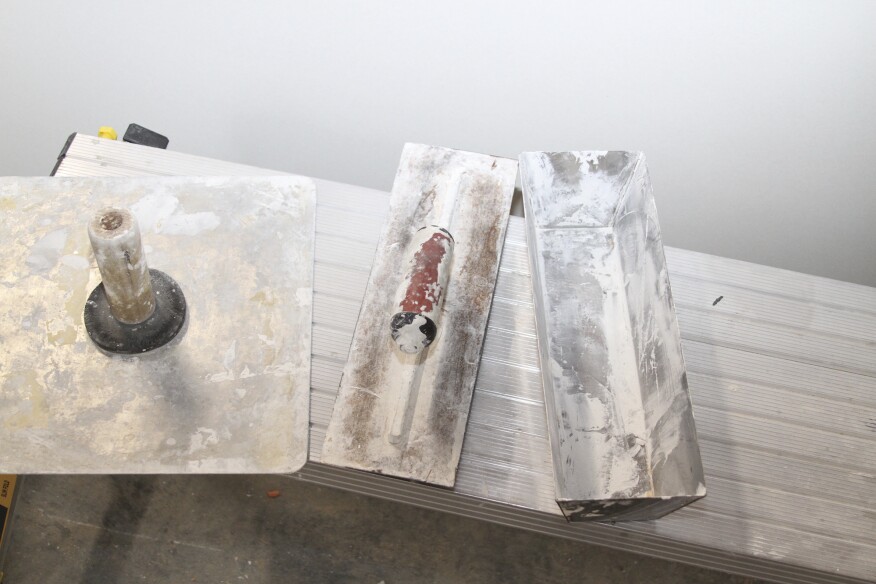
Taping tools. There are basically two tools needed to embed the tape—one to hold the compound and the other to apply the compound on the wall and embed the tape.
There are three options for holding the compound. A mud pan can hold quite a bit of compound, and its edges work well for removing compound from a taping knife. Because it is shaped like a bread pan, even thin compound won’t end up on the floor; a pan is a must when you’re working with thinner compounds.
A hawk can also hold a lot of compound, even more than the average pan, but it takes experience to hold a hawk so the compound doesn’t run off. The compound can’t be too thin or it will. The edges are used for removing compound from the taping knife.
A large, 12- or 14-inch drywall trowel can also be used to hold the compound, but of the three options, it holds the least amount of mud, and thin compound will run off the edges. Because the trowel holds less compound, a person using a trowel generally makes sure the compound bucket is always close at hand. The one benefit that a trowel has is that it can be used to smooth out compound that is applied with the taping knife, if the need arises.
Taping knives come in different widths, typically from 3 or 4 inches to 10 or 12 inches wide. For the first coat, I use a 5- or a 6-inch taping knife to apply compound over the seams.
Getting mud on the seam. The basic technique I’ll describe is for beveled seams—the long edges of a sheet of drywall. The drywall sheets should lightly butt each other. Any gaps that are wider than 3/16 inch between two sheets of drywall should be prefilled with a setting compound and allowed to dry before you begin to tape out the seams.

When I’m ready to tape, I grab a taping knife and remove some compound from my container by pushing the knife under the compound, and then twisting the knife over, cutting the compound off against the side of the pan or the surface of the hawk or trowel.
On the first pass, I spread the compound over the seam. With the knife blade centered on the seam, I guide the knife along the seam at about a 20-degree angle from the drywall surface. Grabbing more compound, I make the next pass. My goal is to leave an even layer about 1/8 inch thick over the seam. This is thicker than compound manufacturers say you need, but at this initial stage, you want plenty of mud on the wall so you don’t end up with dry areas under the tape. The excess mud at this stage will get forced out from under the tape later, as I will explain.
I apply the compound over the entire length of the seam, up to about 20 feet long. I work multiple seams in my immediate area, applying mud on the entire length of each seam before I begin to embed the tape.
Embedding paper tape. Once the compound has been applied, center the tape over the seam. For efficiency, I keep a tape reel on my belt and roll it out from there. This saves me from bending down to grab the roll off the floor and from hunting around for it.

I press the end of the paper tape into the compound with my hand at one end of the seam, and as the tape is pulled off the reel and centered over the seam, I press it lightly into the compound every 18 inches or so to hold it in place. The tape has to be kept tightly pulled as it is centered over the joint. Once the end of the seam is reached, the tape can be cut. I do this by pushing the edge of the blade tight into the compound with my taping knife, then pulling the tape across the blade, tearing it crisply.
All paper tape is pre-creased so it can be used in corners as well as over seams. It works well for flat seams, too, but you want to place the tape so the crease creates a valley, so to speak, rather than a peak. (If the end of the roll of paper tape sticks out of the bottom of a reel, the tape will be pulled off the reel with the correct side—the back—facing down into the compound.) If the tape gets embedded backwards, the center of the tape could ridge out slightly after embedding, which may be difficult to conceal later when you’re applying the finish coats.


Once the paper tape is positioned over the seam correctly, it has to be embedded into the compound. Start at the center, regardless of the length of the seam, and draw the knife along the tape towards one end, holding the blade and handle at about a 60-degree angle to the wall. This steep angle makes it easier to apply the necessary pressure to properly embed the tape. But even so, it requires a lot of pressure to pull a knife along the tape and force excess compound out from behind the tape. To avoid pulling the tape along, I hold it in place with the corner of whatever tool I’m using to hold compound (in photos 4 and 5, I’m using a trowel, but the corner of a hawk or pan also works).

One way to test whether the tape is embedded properly is to tap on the embedded tape with a finger or the edge of a trowel. The surface should not dimple enough to wrinkle the paper or cause a visible indentation. If I’m concerned about removing too much compound, I’ll lift the end of the tape to inspect the amount of compound left behind. I want an even layer no more than about 1/16 inch thick. Leaving too much compound behind can make seams difficult to conceal later because the tape may form a slight ridge.
Fiberglass-mat tape. When finishing tapered seams, I prefer mat tape because it is so easy to embed and I am confident in its strength. It gets embedded into seams in the exact same manner as paper tape, using the same heavyweight all-purpose joint compound. However, fiberglass-mat tape is easier to embed because the mat is porous, making it easier to force excess compound out from behind the tape. You can freely apply plenty of compound over the seam and not worry about working too hard to smooth it out, eliminating the likelihood of dry areas behind the tape. The only precaution is that mat tape cuts a lot easier than paper tape, and you need to be careful not to apply too much pressure with a taping knife, otherwise you can damage the tape.
Fiberglass mesh tape. There is a wide variety of fiberglass mesh tapes on the market. Some have very close fiberglass strands, while others have strands that are quite wide apart; there are even different weaves available. As far as I know, all varieties are self-adhesive.


Drying-type joint compounds are not recommended for most fiberglass tape. With drying type compounds fiberglass tape has been known to split along the center of seams. You should use a setting compound. The setting compound is mixed to the same consistency as the drying-type compound. There is no need for a fast setting time; the main goal of a setting compound is to strengthen the seams. But, of course, if the taper wants to apply the first finish coat earlier, there is no detriment to using a faster setting compound.

With mesh tape, you just roll out the self-adhesive tape, pressing it into place over the seam by hand or with a taping knife. At the end of each seam, the tape can be cut, either with the taping knife or with a utility knife. The mesh tape gets embedded when it gets covered with joint compound. I typically apply this compound with the same 5- or 6-inch-wide taping knife, firmly pressing the compound through the tape. A trowel or knife can then be used to remove the excess and smooth out the remaining compound. Because the tape just has to be coated, the same tools you use to apply the tape are kept in hand, speeding up the process.

Mesh tape offers several advantages over paper and fiberglass-mat tape. The main advantage is speed. Using mesh tape as I just described is typically faster (at least for hand-taping) than embedding paper or fiberglass-mat tape. You can tape over all the seams in an entire room before applying any compound. Taping and mudding become two separate steps, and you eliminate the step of pressing the tape into the compound to force out the excess mud, which saves a lot of time and effort.
Using fiberglass mesh tape also greatly reduces the likelihood of any blisters under the tape. A tape blister is a small dry area under paper tape that may not be noticeable until a finish coat is applied over the tape. The area will then show as a blister-like spot.
All photos by Myron Ferguson


