Q: What’s the best way to install exterior flat-stock trim around a flanged window?
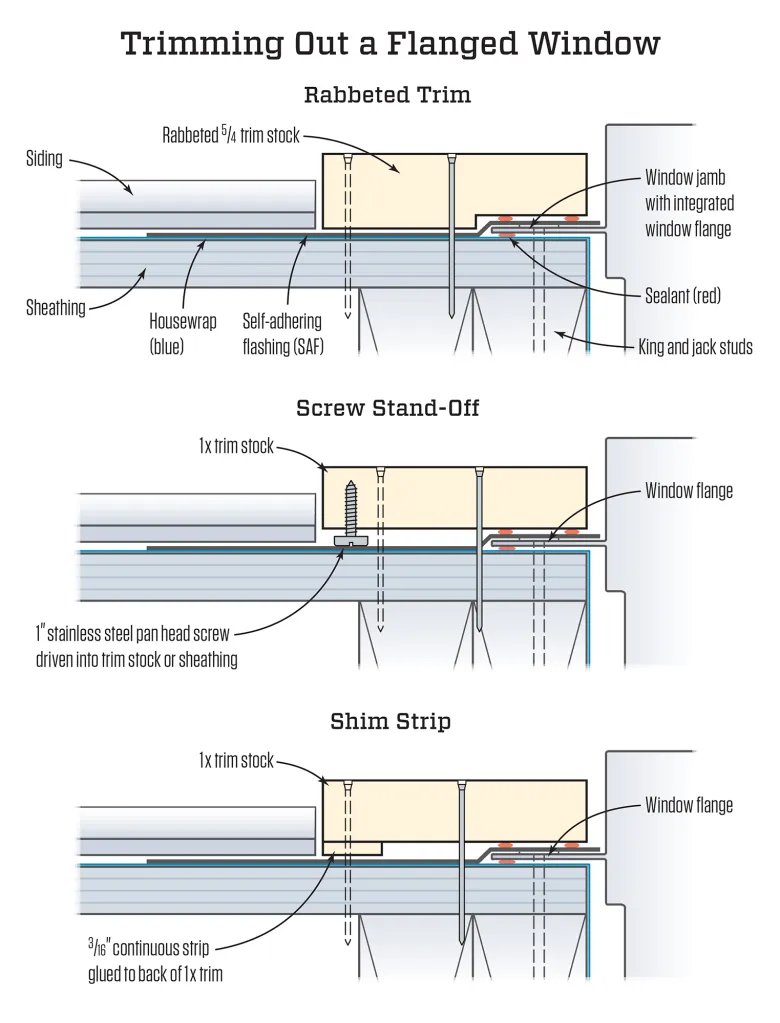
A: JLC Staff responds: The trick to installing exterior flat-stock trim around a flanged window is having the trim sit flat (in plane with the wall) while the trim’s outer face is proud of the siding for aesthetic reasons. If you just use 1-by stock (3/4 inch thick) and rabbet the back inside edge to go over the flange, the edge thickness won’t completely cover up most lapped siding (such as side-wall shingles that are 3/4 inch where the layers overlap).
The first and most obvious solution is to rabbet 5/4 stock (with a nominal thickness of 1 inch) for the trim. The first drawback to that method is cost: 5/4 stock is more expensive than 1-by stock. The second problem is the added weight of 5/4 stock. It might not seem like much until you have to carry a bunch of large preassembled trim kits up the ladder for second-floor windows. In addition, there is the time and energy of rabbeting the stock, which typically requires two passes on a table saw—easy enough, but the extra time adds up.
An alternative to using thicker stock is installing some kind of backer or shim behind the 1-by trim to keep it in plane while it rests against the window flange. One type of backer is a thin strip of material attached to the back outside edge of the trim stock. While this method can work well, it still requires ripping material—most likely on a table saw—and then attaching the strip to the trim stock with either glue or tacks or both.
Manny Silva, a frequent contributor to JLC, drives stainless steel pan-head screws either into the back of 1-by trim stock or into the wall just inside the outer edge of the trim. He leaves the screws proud of the trim or the wall about the same amount as the thickness of the flange. The large, flat surface of the screw heads lets them function as adjustable stand-offs, keeping the trim in plane with the wall. If you try this method, drive the screws every 8 to 12 inches, depending on the flexibility of the trim stock, and use a straightedge to make sure the trim stays flat.
The easiest and most effective way to trim a window is to build a “picture frame” on the ground, assembling the pieces with pocket screws. Bed the trim frame to the flange with a good-quality adhesive caulk before fastening it in place with stainless steel nails or screws. If you’ve used Silva’s stand-off screw method, mark where the screws are located and drive fasteners near those locations to keep from distorting the trim while driving the fasteners.


