This past spring, I took over the site supervision and project management of a custom-home build while working for a construction management firm in upstate New York. The project had undergone a series of fits and starts, thanks in part to the weather.
Construction had broken ground in late December, on the eve of one of the worst winters in recorded history. Despite the rough weather, the workmanship was some of the best I’d ever seen. When I arrived on site, the house hadn’t been completely dried in on account of a scheduling conflict with the company contracted to build the cold-roof assembly—which would lay over the SIP roof panels and incorporate the eaves. So not surprisingly, as the spring rains poured down, water leaked inside.
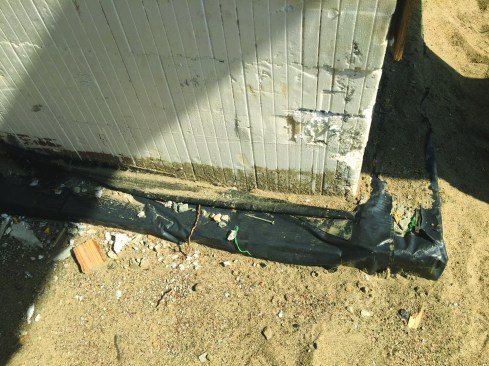
The framers had already gone above and beyond their scope by flashing the SIPs with Grip-Rite ShingleLayment. But where the Zip System wall sheathing met the SIP panels (an area that would eventually be covered by the roof overhang) proved to be a weak spot at this stage of the construction. A good part of my first days on the job was spent chasing leaks in order to keep the subcontractors working inside. Before long, I was able to seal up the house so that construction could continue while we waited for the overbuild and roofing crews to arrive.
Wet basement woes
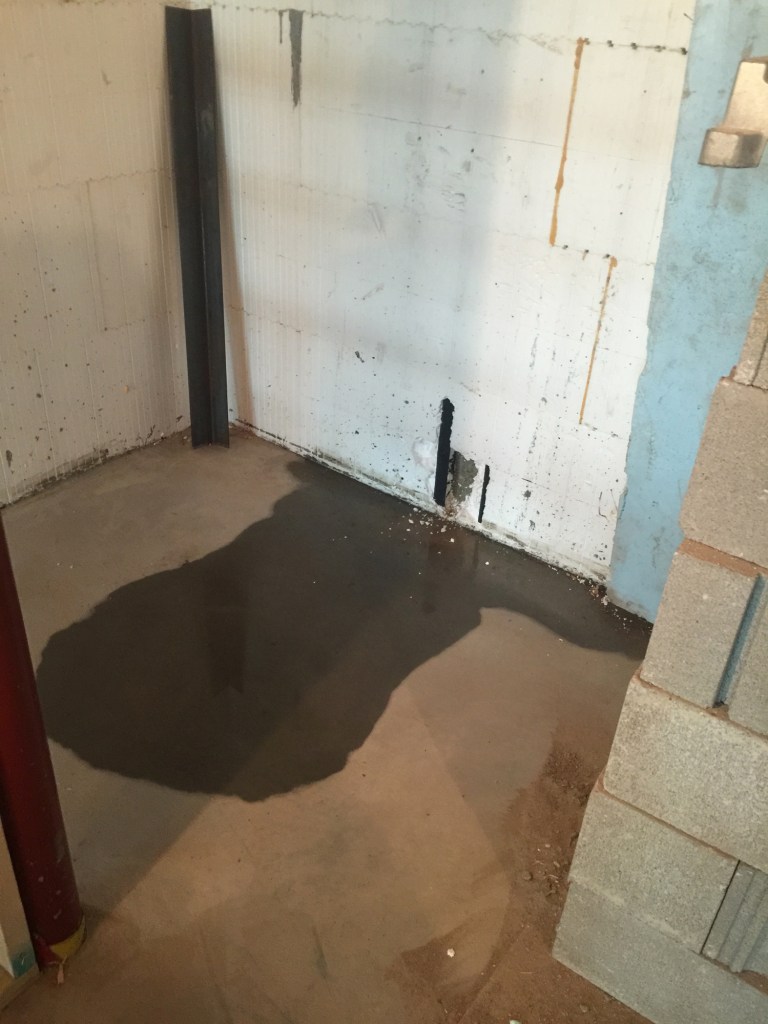
Days of heavy rain came with the spring thaw, and because the house sits at the bottom of a steeply-pitched site, a good deal of water was pushing against the foundation. While I was temporarily spot flashing, I discovered an area in the basement that had puddled. The architect and I at first assumed water had migrated inside through the leaks between the Zip System wall and the SIPs. But we grew puzzled when we couldn’t trace its path. Hopefully, once the roof assembly overbuild was in place and the exterior fully flashed, we surmised, the water we saw in the basement would disappear. Unfortunately, that did not happen. Even after days of sun and warmer temperatures, water continued to appear in the basement.
There was still a lot of elevation work left to be done to the site. The footing drains, which were day-lit, all ran consistently and it was obvious they weren’t causing any problems. The only possibility left, the architect and I agreed, was a failure somewhere in the foundation membrane. And so, on his firm’s direction, we excavated the front of the house where the problem was occurring.
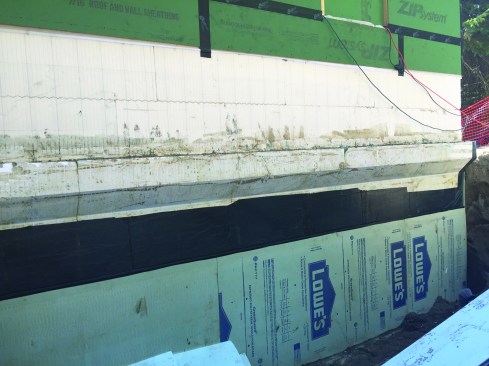
The foundation was formed out of ICFs , with an 8-inch ledge to support a full-depth veneer of stone siding/
The foundation was formed out of ICFs and consisted of an 8-inch ledge, which was to support a full-depth veneer of stone siding. Because ICFs react adversely to solvent-based products (think about what happens to a Styrofoam cup when you put gasoline in it), the original design drawings called for Rub-R-Wall Aqua, which is a water-based spray-applied waterproofing membrane. But because the foundation was poured in the winter, this spec had to be abandoned in favor of a system that could be applied in cold temperatures. So the spray-applied-membrane approach was replaced with Miradri 860.
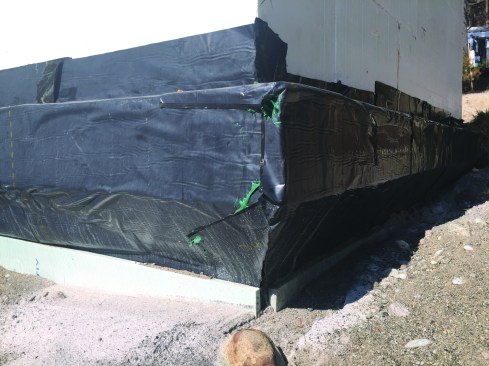
We observed large air bubbles under the membrane, as well as areas missing counterflashing.
Even before we excavated the foundation, we had observed areas where the membrane was falling off the ICFs. There were large air bubbles under the membrane where it had begun peeling away below the stone ledge, as well as areas missing counterflashing — all troubling observations. I noticed areas where the membrane had been lapped in the wrong order. Given the small channels in the ICF, water could easily trickle down and behind the membrane—especially in areas where dirt prevented proper adhesion. Excavation revealed even more troubling issues, however.
There were areas where the membrane had been lapped in the wrong order.
Miradri 860 requires a water-based primer to be applied to ICFs before the membrane is set. The primer is light-blue in color and leaves behind a blueish tint that’s visible up close. According to the primer specs, it was suitable for the temperatures the foundation crew was working in. And the flashing membrane is nearly impossible to peel off in areas where it is applied properly with this primer—think about trying to pull ice-and-water membrane off roof sheathing on a hot day. So when it is installed correctly, the Miradri works beautifully. But this proved to be far from an ideal, technically sound installation.
Behind the membrane where dirt had prevented proper adhesion, water could easily trickle down.
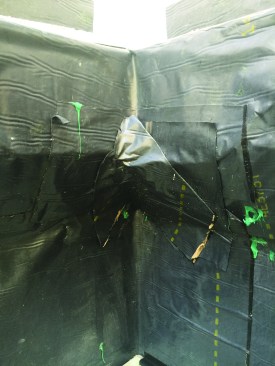
It was apparent that not only was primer missing from a large portion of the installation, but a green sealant, which I later learned was meant only for seams, had been used in its place. Gooey and sticky as this sealant is, it’s also thick, so when applied to large areas, it prevents the sheet membrane from fully adhering to the ICF. This explained the bubbling we found.
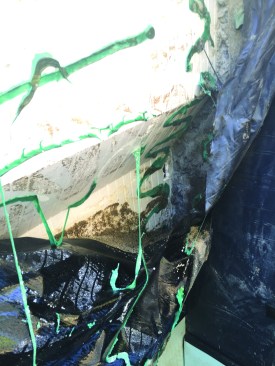
After more excavation, we discovered the major issue. A thick green membrane sealant meant for seams had been used on large areas instead of the recommended primer. The thickness of the sealant had prevented the sheet membrane from fully adhering to the ICF.
After removing all of the Miradri, we closely inspected the ICFs, and in particular, the joint between the ledge and the side wall. There were some areas where the pour clearly hadn’t been ideal, as evidenced by small air pockets and sloughed concrete. We presumed some honeycombing was present, though it was impossible to source; the architect and I believed that the water was trickling down behind the sheet membrane via grooves in the ICFs, pooling in these defective areas, and then finding its way down to where there likely existed similar areas.
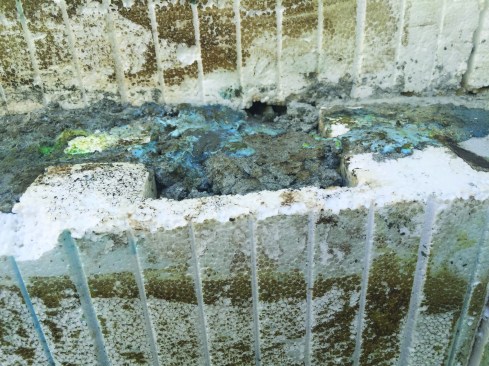
In addition, small air pockets and sloughed concrete was evidence that the pour had not been ideal.
By now, of course, warmer weather had arrived, and we considered revisiting the Rub-R-Wall Aqua spec, especially since the garage was scheduled for the same treatment. But we concluded that at this stage of construction, the expense would be too great to take this route. Our remediation plan was simple: Remove all of the previously applied sheet membrane and seam sealant, clean the ICFs thoroughly, and allow them to dry. The next steps included priming the foundation with the primer specified by Miradri and then reapplying the sheet membrane properly in shingle-style with close attention to inside corners.
After cleaning and drying the ICFs we applied the correct primer specified by Miradri. The sheet membrane was installed in shingle-style with close attention to inside corners.
This methodology proved successful, as the basement is now bone-dry. While the process was not enjoyable, I was grateful to be sweating it out in sunny, 75°F days instead of working amidst gray skies and sub-zero temperatures.


