My company specializes in repairing and waterproofing failed balconies, stairs, and roof decks, so I see on a near-daily basis the results of water intrusion into wood framing, especially in mass-produced housing. The costs can be astronomical: For example, recently a simple $3,800 deck repair turned into a $120,000 project, thanks to dry-rot damage to the framing, shear walls, and decks.
That’s unfortunate because building a reliable, long-lasting waterproof deck over living space is relatively straightforward when the best practices and materials are used.
There are a number of ICC-ES–listed manufacturers of Class A walking deck systems (see Class A Fire-Resistant Walking and Roof Deck Systems, sidebar). We’ve installed most of them, and while installation details vary slightly from product to product, none of them will last over the long term if the deck covering isn’t applied over a sturdy substrate.
Design
The key to a successful installation is to get involved as early in the project as possible so you have a say in the design and construction of the deck framing and sheathing. Before any framing is done, I ask critical questions about the deck: Will there be a hot tub? How and where will water escape—through a drain, or off the edge? Will there be gutters on the edge? Is the deck over living space or cantilevered out on joists? What are the proposed joist sizes? What kind of slope is designed into the framing?
Finally, never design or build a deck that is level with or higher than the interior floor. This applies to any deck, but it’s essential for a waterproof deck over living space. Always check the plans before building; decks should be a minimum of 1 1/2 inches below the level of the interior floor.
Above-Code Framing
Framing needs to be as beefy as possible. Plans may call for 2×8 joists 16 inches on-center, but I’d rather see 2x10s—2x12s would be even better—installed 12 inches on-center. If 2x10s won’t work for some reason, I’ll settle for 2x8s as long as they’re installed 10 inches on-center. Upsizing the joists and using more of them in the layout adds only about $100 to the cost of a typical deck, relatively cheap insurance compared with the costs of a decking membrane failure.
My goal is to eliminate deflection. Expansion and contraction can’t be avoided, but minimal movement is required to prevent the waterproofing membrane from cracking and splitting. Most deck-covering manufacturers specify a deflection limit of L/360. For example, joists for a 10-foot-span should be sized so that they deflect no more than 1/3 inch (120 inches ÷ 360 = 1/3 inch) under a normal 40-psf live load and 10-psf dead load. To prevent tile from cracking, an even stiffer substrate—with deflection of less than L/720—is required. Of course, the span tables that most deck builders refer to for joist sizing are already based on L/360, but I like to see the framing sized for larger design loads or a smaller amount of deflection.
Cantilevered joists have to be carefully sized to prevent the deck’s outside edge from being bouncy. Deflection is often a problem on cantilevers because typical span tables based on L/360 deflection limits allow an L/180 deflection for cantilevers. Another problem is that when framing is ripped to create the required 1/4-inch-per-foot slope, the nominal dimension used for any tables and calculations should be reduced—which would in turn reduce the allowable cantilever—but it often isn’t.
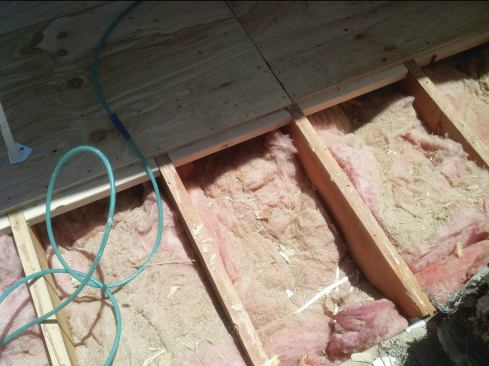
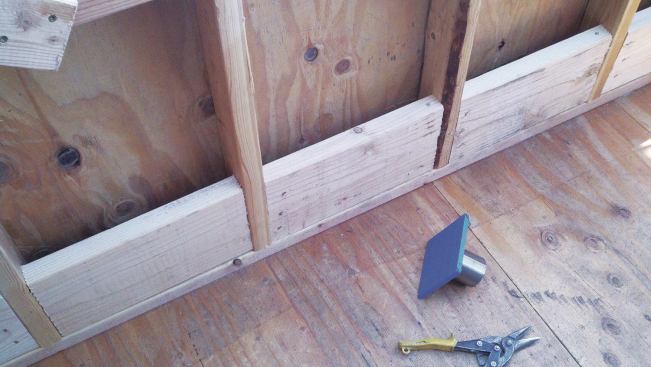
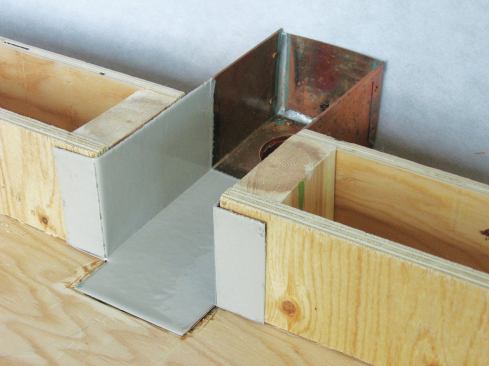
Blocking. Because the framing will be sheathed rather than covered with decking, blocking needs to be installed to support all plywood edges. This includes not only where panels meet in the field, but also at the deck-to-wall edges. Blocking can be 2x4s or 2x6s turned on their sides to provide plenty of room for the panel to be nailed or screwed to.
Blocking is also required in the wall stud bays around the deck’s perimeter to provide solid backing for L-flashing. Some builders nail off the flashing into the studs every 16 inches on-center, but adding blocking is a best practice that allows the flashing to be nailed as needed to eliminate deflection of the metal-flashing termination points. When there is a sheathed shear wall to provide a nail base, additional blocking is unnecessary.
Slope. To provide the required 1/4-inch-per-foot slope for drainage, joists can be ripped prior to installation, or tapered rip strips can be glued and nailed onto the tops of flat joists. I prefer to see rip strips, because that means that the strength of the joists hasn’t been compromised. On the other hand, sawn tapered joists may be necessary to preserve height differences between interior and exterior floor levels, in which case I again recommend installing the joists 10 inches or 12 inches, rather than 16 inches, on-center.
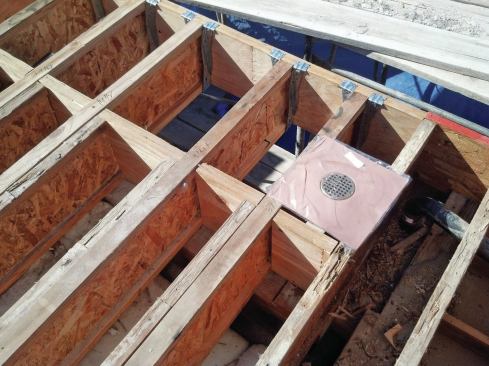
When a roof deck has a center drain, the framing layout and sheathing installation become more complicated. Some deck builders simply frame these decks flat and leave it to me to solve the problem by sloping the base coat of my cementitious coating, like a giant shower pan. But this potentially adds a significant load to the deck, since the average 1/4-inch-thick coating weighs about 2 1/2 pounds per square foot. A tapered coating that is 3 inches thick around the edges weighs almost 30 pounds per square foot. That’s why I recommend sloping the framing rather than the coating on larger decks when possible.
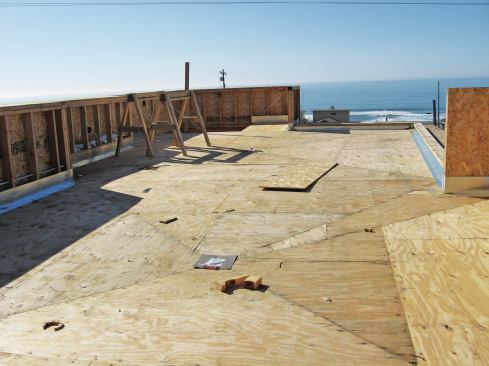
Substrate
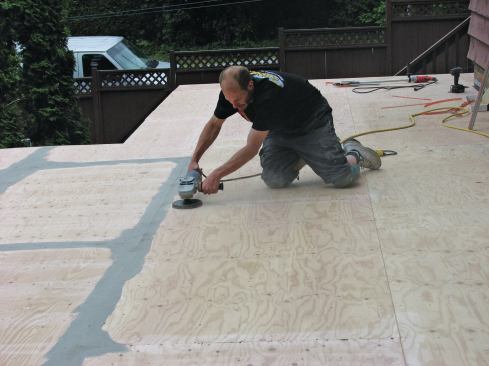
As far as I know, OSB is not approved by any manufacturer as a suitable substrate for deck waterproofing systems. To meet Class A and one-hour fire-resistant-construction requirements, APA-rated plywood must be used. The coating to be applied will dictate the specific type of plywood. For example, vinyl and urethane coverings require smooth sanded panels devoid of defects, while Exterior Grade Exposure 1 panels can be used for the cementitious coatings that are popular in California, where I live.
The minimum substrate thickness allowed by most manufacturers is 5/8 inch, but I find that to be insufficient. I weigh 200 pounds, and I can feel 5/8-inch plywood deflect when I stand between joists installed 16 inches on-center.
Since there’s less deflection with thicker plywood, I prefer to use 1 1/8-inch-thick plywood sheathing, but I’ll settle for a minimum of 3/4-inch plywood if necessary. In my area, 3/4-inch-thick Exterior Grade Exposure 1 panels cost about $29, while 1 1/8-inch panels cost about $44. Plugged and sanded panels for vinyl and urethane coatings cost a bit more.
How the plywood is installed is important. Panels must be gapped 1/8 inch so they can expand and contract without damaging the coating. They should always be glued down with a full bead of construction adhesive on every joist prior to being fastened to the framing with screws or ring-shank nails. Fasteners should be spaced as recommended by the APA, typically every 3 to 4 inches apart at the edges and 6 to 8 inches apart in the field (for more on plywood installation, handling, and storage, see apawood.org).
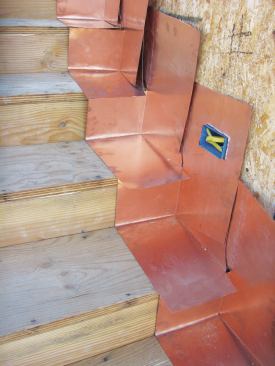
Stair treads. When we walk up and down stairs, our body weight is concentrated on one leg at a time. Since treads are subject to these concentrated loads, I provide blocking between the stringers before installing the plywood, to prevent deflection. Another way to provide more support to the treads and reduce deflection is to install additional stringers.
Fascia and deck edges. Where decks terminate at an open edge (rather than at a parapet wall), a fascia board or siding is typically involved. Too often on old decks I see the flashing at the edge set tight against this fascia or siding, allowing water to run straight down the vertical surface. A better way is to find out beforehand what is going to be used for the siding, and install a nailer of appropriate width to accommodate the final thickness of the siding. Then when the drip flashing is installed, it will extend out past the plane of the fascia or siding and allow water to run out and away.
Railings
Most water intrusion damage I see occurs around rail posts. Anything that penetrates a deck coating is a leak waiting to happen, so it’s best to mount rail posts to the outside edge of a deck through the fascia or siding and support them inside the framing.
If that’s not possible, then the goal is to prevent leaks. Some builders simply kerf-cut their 4×4 posts to accommodate let-in flashing, but wood posts will check and split as they weather and almost inevitably leak. So whenever wood posts penetrate any deck we’re working on, we flash them with metal L-flashing that can be waterproofed with the deck coating. Later, the posts can be wrapped in weather-resistant Tyvek or 60-minute building paper, then boxed in with wood or plastic post sleeves.
Unfortunately, there’s no practical way to lap materials up a deck-mounted metal rail post. All posts move a bit, and lapped coatings aren’t flexible enough to allow that movement without cracking, which eventually will lead to leakage. So when customers want a deck-mounted metal railing, the only option is to set the metal post bases on top of the coating after it’s been installed. First, though, I have the customers sign our waiver acknowledging that we offer no guarantee against leaking.
We fill the drilled lag bolt holes for the railing posts with a polyurethane sealant such as Sikaflex 1A (usa.sika.com). Prior to setting each post, I also squirt a fat bead of the same sealant around the bolt holes, so that the post bases are bedded in sealant when the rails are installed. After tightening the lag bolts, I wipe off the sealant that squeezes out of the bolt holes and from under the post bases. I use the same procedure for wall connections.
It’s critical to inspect the metal rail annually, tightening fasteners as necessary and caulking and painting as needed. With good maintenance and a bit of luck, there won’t be any leaks.
Flashing the Deck
At this point, the deck is almost ready for its waterproof coating. Since most coatings extend up the vertical legs of the flashing, the flashing and waterproofing needs to be applied before walls are wrapped with a water-resistive barrier (WRB), and doors and siding are installed. In retrofit construction, we specify the removal of some doors and siding prior to coating installation.
Drains. Where drains are required, we install Thunderbird Products deck drains (thunderbirdproducts.com), which are top-quality and specifically designed for walking decks. They’re available with bonderized steel (galvanized steel that has been phosphate-cleaned to remove oils and improve coating adhesion), copper, or stainless steel flanges, so they can be used with a number of different systems and in a variety of environments. Some jurisdictions require secondary overflows when a deck is enclosed by walls.
Scuppers. If the deck has a parapet wall, scuppers can be used to drain the deck. When we set them in a wall, we also include an exterior-side counterflashing sleeve that slides over the tube to prevent water from running back into the wall. Like drains, scuppers must be properly sized and located, as well as isolated from dissimilar metals (stainless steel nails can be safely used with copper, but not with galvanized steel).
Crickets should always be installed between scuppers to help water drain to the openings rather than pool along the wall. Crickets can be framed, but are more often formed with polymer concrete from the roof-coating manufacturer. In some cases, crickets can be formed while the waterproof coating is applied.
Flashing. Our drains and scuppers come from a specialty sheet-metal shop, which also supplies our copper or galvanized steel flashing. They all have to be compatible with the specific waterproof covering that we’re installing.
Most of the time, we install 26-gauge bonderized steel L-flashing with a 4-inch horizontal leg and a 6-inch vertical leg. We lap pieces 3 to 4 inches, embedding the joints in polyurethane sealant. When we’re working with copper, we use 16-ounce (minimum) material and usually solder the joints.
Door pans are a must, since door leaks are often misdiagnosed as “deck leaks.” We require metal pans that have a lip on the back edge of the horizontal leg to prevent water intrusion under the threshold.
Waterproofing
Some deck waterproofing systems are sold over the counter to the general public, but most are available only from factory-trained applicators. My philosophy is simple: You can hire a contractor who is well-versed in deck waterproofing, or you can assume all the risk of choosing a system, figuring out the details, and installing it yourself.
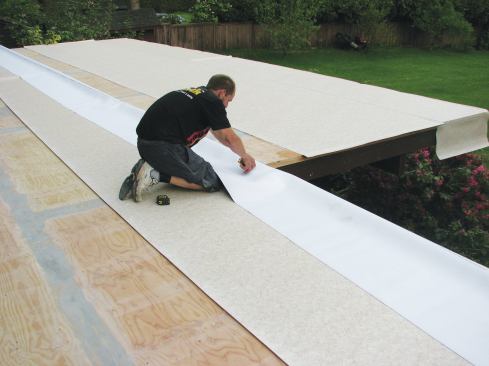
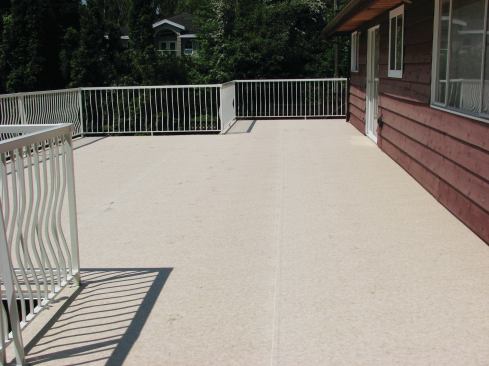
Vinyl coverings. Many deck builders are already familiar with vinyl coverings such as Duradek (see “Waterproofing a Rooftop Deck,” JLC, September 2008, jlconline.com). These systems have specific edge-finishing and flashing details and require that voids and seams in the plywood be treated with a patching compound.
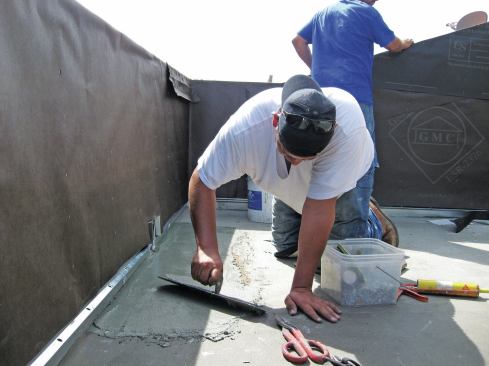
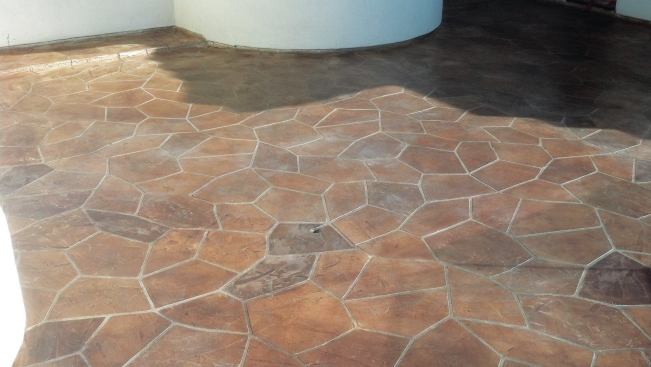
Cementitious coatings. Our preferred waterproofing system is Desert Crete, a multilayer cementitious coating applied over metal lath. [You can read more about a Desert Crete installation in “Dry Deck Over Living Space,” JLC, March 2010, jlconline.com.] Over the past 12 years, we’ve successfully installed hundreds of thousands of square feet of it. One of the advantages of this coating is that it can be finished with a spray-on texture or with various stamped concrete patterns, which can then be stained to mimic stone or tile.
The cement-based Desert Crete system is nearly impervious to UV light and requires little maintenance. I instruct my clients to inspect their decks every six months or so for possible problems and repaint as needed every three to five years, though some decks that I’ve installed have never been repainted.
Bill Leys owns Central Coast Waterproofing in Arroyo Grande, Calif. He will be presenting a 90-minute session titled “How to Build and Waterproof Decks to Last 30+ Years” at JLC Live/Northwest in Portland, Ore. December 4–5, 2014. For more info on the show, go to nw.jlclive.com.