Most of the single-story bump-out additions we build have pitched roofs, though under the right circumstances it’s not hard to add a flat rooftop deck to the design. That was the case with the job shown here — a 6-foot-by-20-foot kitchen expansion with a master bedroom roof terrace above. In the past we’d used asphalt-based or single-ply rubber roofing membranes for flat-roof jobs, then covered the roofing with deck boards. But for this project, the architect specified Duradek, a PVC thermoplastic waterproof deck membrane (800/338-3568, duradek.com).
What Is Duradek?
Originally developed in the 1960s as a slip-resistant flooring for small boats, Duradek was later introduced as a roofing material, first in Canada and then in the United States. In the manufacturing process, PVC is pressed through rollers into a thin film that is then laminated to a woven polyester fabric for stability and multidirectional strength. Because the membrane serves as both a walking surface and a roof covering, it’s textured for slip resistance, and the vinyl formulation includes mildew and ultraviolet inhibitors and heat stabilizers for better long-term performance. Duradek comes with a 10-year manufacturer’s warranty.
The 60-mil-thick vinyl traffic membrane — called Duradek Ultra — that was installed on this project is Class C fire-rated (Class A when installed over 5/16-inch HardieBacker or concrete) and approved for use over conditioned living space. (The membrane is also sold in 40-and 45-mil thicknesses for decking applications with no living space below.) Test results show that Duradek exceeds IBC requirements for resistance to wind uplift, even in special wind regions.
Our membrane was delivered in a 72-inch-wide roll (slightly narrower than our roof deck); 54-inch rolls are also available. According to Duradek, the product comes in two textures and 18 colors and patterns. While colors can vary slightly, production orders are tagged so that all the rolls for larger projects are shipped from the same production run.
Like other sheet goods, Duradek is subject to wear and tear. But punctures, cuts, and burn marks are relatively easy to repair with glued and welded patches, and won’t compromise the membrane’s watertightness.
For cost information and a list of authorized installers, I went to the company’s Web site, where I found the names of three local contractors. Two returned my calls and provided bids for the project. For 130 square feet of deck area with 22 linear feet of drip-edge flashing, 25 feet of wall flashing, and four rail posts, the bids were $1,350 and $1,458. Although we’d never worked with Duradek before, the installation — which was done by factory-trained installers — was straightforward and quick. The installed cost of about $12 per square foot was less than that of a conventional roof with protective deck boards, and we were able to start working on the railing immediately after the membrane was glued in place.
Flat Roof Framing
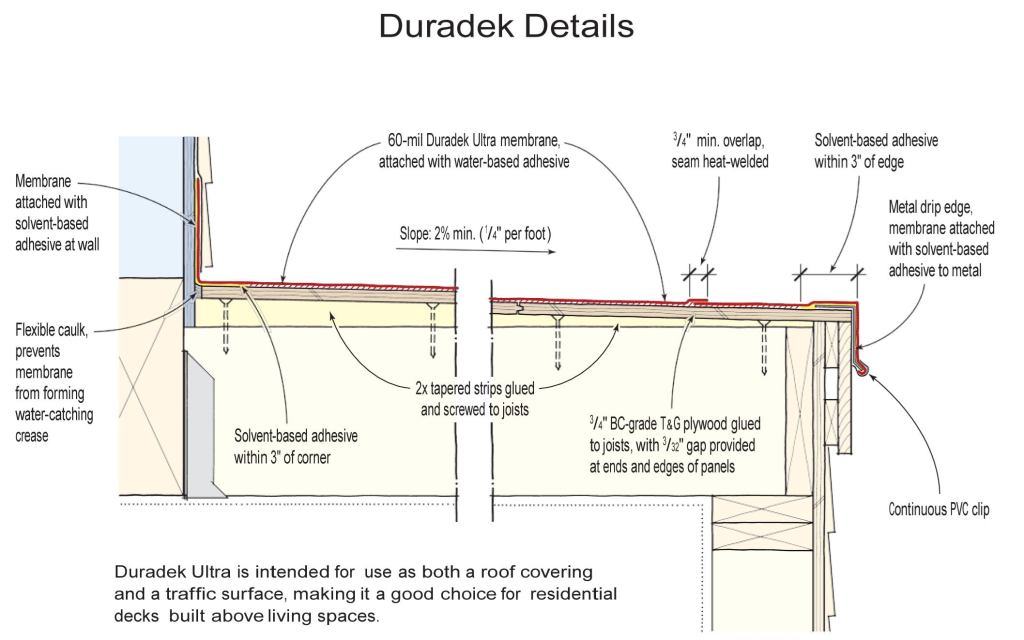
Although the PVC membrane itself can be installed only by an authorized Duradek dealer, we needed to construct the deck properly to receive it. For proper drainage, the manufacturer requires a deck slope of 2 percent, or 1/4 inch every 12 inches. For our 6-foot-wide deck, we pitched the roof 11/2 inches by ripping tapered wedges from framing lumber and gluing and nailing the wedges to the ceiling joists.
After bolting the 4×4 rail posts in place, we installed 3/4-inch T&G plywood, per the manufacturer’s recommendations, gluing the plywood to the joists and leaving the proper gap at the ends and edges of panels. Because of compatibility problems between the PVC membrane and the compounds used with treated plywood and polymer-enhanced OSB underlayments like AdvanTech, those sheet goods aren’t recommended.
We next installed the fascia boards, then covered the deck with 15-pound felt paper and installed temporary flashing at the deck-wall intersection to keep the plywood dry until the Duradek sub arrived approximately three weeks later. The manufacturer recommends that the decking be at no more than 12 percent to 14 percent moisture content at the time of installation. In hindsight, getting estimates earlier in the process would have tightened the schedule.
On the day of installation, we removed the felt and flashing and swept and vacuumed the deck. When the installers arrived, we made ourselves available, but stayed out of their way.
Prepping the Deck
The two installers started by nailing a galvanized metal drip edge around the outside perimeter. Duradek offers several edge-finishing options; the one used here is designed so that the membrane laps over the metal and is secured with continuous PVC clips that slip over the metal’s flared edge.
Next, the installers filled the plywood joints, voids, knots, and low areas with a patching compound they mixed up on site. Duradek — like vinyl — will telegraph even small imperfections in the deck sheathing, so they inspected carefully as they smoothed the compound with their sanders. After filling the joint where the terrace plywood deck meets the second floor walls with a flexible caulk, they carefully swept and vacuumed again.
Cutting the Membrane
To cut the membrane, the installers rolled it out on the ground and measured its length so that it would fold up the walls surrounding the deck by at least 6 inches.
Planning for seams. Because the deck was slightly wider than the membrane, there would have to be one seam; it fell under the railing where it was barely visible. The 9-inch-wide strip of membrane that finishes the deck is overlapped by the first piece and folds down over the drip edge.
Duradek seams are heat-welded rather than glued together, and require a minimum 3/4-inch overlap. Making these seams properly is the most critical part of the installation: The weld will fail if any of the adhesive used to fasten the membrane to the deck contaminates the seam.
Installing the Membrane
After dry-fitting the full-width piece, the installers pulled the material back away from the wall and folded it in half lengthwise onto itself. They then spread the water-based Duradek adhesive on the exposed plywood and folded the first half of the membrane back into place, taking care to eliminate air pockets as they smoothed out the material and pressed it into the adhesive.
Once the first half of the Duradek was glued down, the installers carefully cut openings for the four railing posts, marked the position of the outside edge of the unglued half of the membrane, and then folded this half back over the glued section. Next, they glued down the narrow outside strip of membrane, then glued down the second half of the large piece. They used heat guns to heat the overlap, blowing hot air into the seam and then pressing the two halves together with a roller. Every few feet, they checked the seam strength.
Around the base of each post, the installers wrapped a 6-inch-wide PVC collar; L-shaped flaps cut at the bottom of the collar overlap the deck membrane and were heat-welded in place. To create a watertight joint, small corner patches were slipped behind each slit in the membrane before it was welded together. When the railing was assembled, boxed newels that slide down over each post would cover the PVC collars, making the joint completely waterproof.
At the parapet walls, the outside corners were treated in a similar way. At inside corners, the installers used a folded “pig’s ear” detail to create a watertight joint.
At the new doorway into the master bedroom, the membrane wraps up and over the rough sill. To make this critical area watertight, all of the joints were welded. After the membrane was in place, we installed the new door, which sits on top of this waterproof pan.
In other areas where the membrane folds up onto a wall, the installers used Duradek’s solvent-based adhesive, which is applied like contact cement to both surfaces. Later, we patched in the housewrap and shingles, lapping them over the membrane.
Around the perimeter of the deck, the membrane folds down over the drip edge. The installers heat-welded the corner seams and fused the overlapping membrane to the metal. After trimming the edge of the membrane flush with the bottom of the metal, they finished the bottom edge with continuous PVC clips.
Railing
As soon as the membrane was installed, we were able to get to work on the railing. This is when we really began to appreciate Duradek: Working on top of an asphalt-based membrane in the summer heat typically means scuffing and uncomfortable conditions, even if we plan our work around the hottest parts of the day. But the light-colored Duradek surface doesn’t radiate heat to nearly the same extent as asphalt roofing, and we were able to finish the project comfortably and without damaging the roof.
We first wrapped the 4×4 posts with boxed newels, treating the ends with a penetrating sealer and holding the newels up off the roofing membrane. At the inside corners, we lag-bolted short 4×4 PT posts to the wall, then wrapped these posts with three-sided newels.
We used stock cedar handrail and balusters and ripped the rail inserts — which hide the upper baluster fasteners — from clear 2×4 cedar. We gave the lower balustrade rail a water-shedding beveled profile and put a corresponding V-shaped notch cut into the bottom of each baluster.
At the sides of the deck, the railing follows the profile of the sloped roof. We gave the rail a paint finish and topped the posts with copper caps.
Rob Corbo is a building contractor in Elizabeth, N.J.


