
Tim Uhler
There are a couple of ways to lay out a hip roof at the ridge: w…
As a framer, I enjoy cutting and stacking a hip roof more than any other roof design. It’s very satisfying to precut all the different pieces—commons, hips, and jacks—and have them fit perfectly when they are all put together. In this article I will outline the basic principles for framing a regular (equal-pitch) hip roof, including how to lay out the hip and precut the jacks. The methods I use are derived from production techniques. I like to save time by figuring out and cutting as much as possible on the ground before climbing up on the plates to stack the roof. This means the order of calculating and cutting may not be the same order as stacking, but it saves time overall. I also keep an eye on how all the pieces will go together as I cut. The jack layout, for example, will affect the sheathing layout, and I try to think that through at the outset so I’m not left with a lot of extra sheathing cuts.
Basic Hip Layout
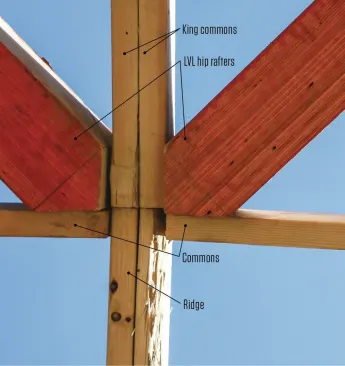
There are a couple of ways to lay out a hip roof at the ridge: with single cheek cuts or double cheek cuts. I prefer to run king commons off the end of the ridge and cut double cheek cuts on the hips, as shown in the photo at left. Especially when we set 4-by or 6-by LVL hips using a forklift, it is easier to drop the hip into a nice pocket created by the king commons and the last commons running perpendicular to each other.
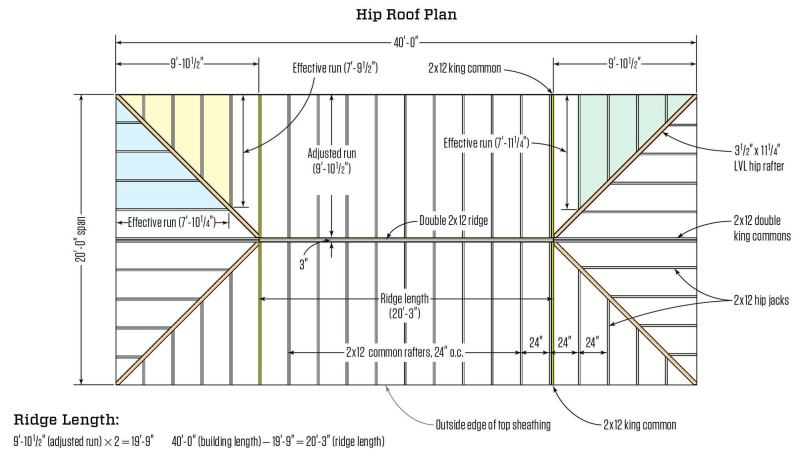
To figure a hip roof, we need to know the span of the roof (measured from the outside of the sheathing), the pitch, and the thickness of the ridge. From that information, we make all our calculations.
I use a Construction Master Pro Trig calculator (calculated.com). I also have the BuildCalc app (buildcalc.com) on my smartphone because it is more versatile and will generate the compound miters I need for bird blocks and also the backing bevels for hips and valleys. I have recently started using Rafter Tools for Android (raftertools.com), as well. This app is full of features and is worth the few dollars it costs. But in this article, I will demonstrate the calculations using the Construction Master because not everyone has a smartphone.
Rafter Calculations
I always start by calculating the length of the commons and the ridge height. Let’s say the house is 40 feet by 20 feet and we have a double 2×12 ridge. The rafter pitch is 6:12.
The common rafter calculation using a Construction Master is shown in the illustration (Calculating Rafter Lengths and Ridge Height). This gives me a common rafter length of 11 feet 1/2 inch. To find the hip rafter length I hit Hip/V, then write down the result, 14 feet 9 3/4 inches, and store it for later.
By subtracting the ridge thickness early in our calculations, we avoid having to make any other adjustments, and because we are subtracting the ridge thickness from the span, all our framing members (commons, king commons and hips) will touch the ridge. The hip touches the ridge where the sharpened end (tip of the double cheek cut) hits the corner of the ridge. Drawing this out in plan view (see Hip Roof Plan above) lets us scale off the drawing if we need to have a hanger welded to tie the hips and commons to the ridge.
Ridge Height
With a common rafter length of 11 feet 1/2 inch, I can get the theoretical height of the ridge: 4 feet 11 1/4 inches (see illustration below). Because I am using 2x12s for all the rafters, I need to know the depth of my rafter, or Height Above Plate (HAP), at the outside edge of the walls. I like to use even numbers for calculation purposes and also to maximize the height at the wall for insulation. An 11-inch HAP gives me about a 3-inch seat cut. (I can figure the seat cut on the Construction Master by entering the depth of my rafter, 11 1/4 inches, and clicking Run; entering 6 and clicking Pitch, then Diag. This gives me 12 9/16 inches. Subtract the 11-inch HAP from this, and use that as the Rise, then click Run. The result is 3 1/8 inches. Or you can draw it out on a 2×12 and measure the seat cut, which is what I often do.)
The exact ridge height is then calculated: We start with 4 feet 11 1/4 inches, the theoretical height that the calculator gave us, and add the 11-inch HAP to get 5 feet 10 1/4 inches to the top of the ridge, as shown in the ridge height calculation.
Anytime I have a ridge thicker than a single-ply LVL, I lower the ridge 1 inch to allow for plenty of airflow to the ridge vent. So this makes our actual ridge height 5 feet 9 1/4 inches.
Last, we have to figure out the height of the post needed to support the ridge: We subtract the depth of the ridge (11 1/4 inches) from the actual ridge height to get 4 feet 10 inches. The post itself is the wall height plus this number. Because I have done this wrong so many times, I story-pole the layout. This is much faster than setting a heavy ridge beam and then having to take it down and cut the posts down. Trust me on this. It’s worth the extra time.
Ridge Length
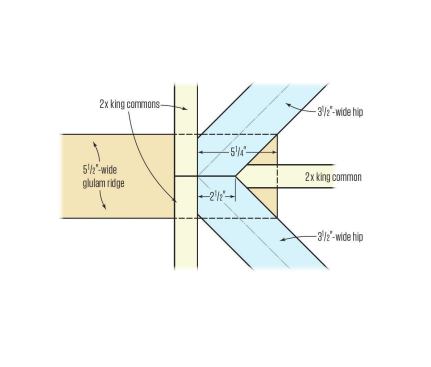
Because we have a 3-inch ridge, I put two king commons on the end of the ridge. This means two extra rafters for this design, but it allows me to double-cheek the hip and set it in the intersection of the kings, and it keeps all the commons the same. It also reduces the amount of calculating and offsetting that would need to happen otherwise.
To figure out the length of our ridge, we start with the run of all our common rafters, including the kings parallel with the ridge. Because the main commons butt the ridge, I want the kings to butt the end of the ridge, too. This makes the run of all the commons the same, and of course, all are the same height and slope. We calculated 9 feet 10 1/2 inches as the adjusted run of the common rafters. This means that we measure in from each end of the building 9 feet 10 1/2 inches to establish both ends of the ridge.
We can measure between these marks on the plates to get the ridge length, or we can calculate it using the building length: If our building is 40 feet long, we simply subtract 9 feet 10 1/2 inches from this length twice (because we are losing this in length on each end of the house), giving us a ridge length of 20 feet 3 inches. (The calculation is shown on the plan.)
Calculating Hip Jacks
There are two approaches to calculating hip jacks: We can start at the corner of the building and work to the middle (ridge), thus making all the jacks exactly the same length (even for hipped sections of the same house that may have a different span). This way, we cut equal pairs for every hip section, but we end up with an odd spacing near the king commons that makes sheathing a pain. This is what truss companies often do with hip sets. Or, we can start from the center and work out to the corner. This means that if we have more than one hipped section on the roof with a different span, we can’t have all the jacks be equal, but it does mean sheathing will be faster. This is the situation on the roof shown in the plan view on page 58. After I run through the basic hip-jack calculation, I’ll explain how the three different sets of jacks on this roof vary.
To calculate jacks, we need to know the run of the longest jack. From there the calculator will step them down and adjust for rounding errors. Here’s how I find the length of the longest jack: I want to cut all my jacks to the long point of the cheek cut, so I take 9 feet 10 1/2 inches and subtract 22 1/2 inches (rafter spacing less jack thickness) to get to the long side of my first jack. Then I adjust for the thickness of the hip: Since half of the LVL hip (1 3/4 inches) crosses the plate at a 45-degree angle, I can enter 1 3/4 Rise, and 1 3/4 Run. This gives me 2 1/2 inches, the required adjustment for the hip thickness.
Now let’s put that altogether and calculate the whole set of hip jacks: Take 9 feet 10 1/2 inches (the common length) – 22 1/2 inches – 2 1/2 inches to get 7 feet 9 1/2 inches as the effective run of the longest jack (see Calculating Hip Jacks). Enter that as the Run in the calculator, and then 6, Inch, Pitch, and hit Diag to get the length of the longest jack (8 feet 8 9/16 inches). From there keep hitting the Jack key to get each shorter jack (6 feet 5 11/16 inches, 4 feet 2 7/8 inches, 2 feet 1/16 inch). Note: The Construction Master defaults to a 16-inch rafter spacing. The button sequence at the bottom of page 60 shows how to store 24-inch rafter spacing.
This is the basic hip jack calculation. On our roof, however, we will have three different sets of jacks. That’s because on the ends we have that doubled king. To get the sheathing layout right, we pretend we have a single king centered on the end wall instead. This keeps the jacks on 2-foot centers. To figure this we use half the span minus the thickness of the king: 20 feet – 1 1/2 inches ÷ 2 gives us 9 feet 11 1/4 inches. We use this as a theoretical run for the centered king and calculate the run of our longest jack on a 2-foot center layout: 9 feet 11 1/4 inches – 22 1/2 inches – 2 1/2 inches = 7 feet 10 1/4 inches. Using the Jack key on the Construction Master I will then calculate my second set of hips.
And I do the same thing at the opposite end of the roof (see plan), where I have an extra common in the layout. I need to add 3 inches to the effective run to get to the other side of the doubled-up king common, so my sheathing falls on 2-foot centers. Calculate: 10 feet 1/2 inch – 22 1/2 inches – 2 1/2 inches = 7 feet 11 1/4 inches to get the run of the longest jack in my third set of hips.
It takes a little more math and a little more organization to keep track of three different-length sets of hip jacks, but it allows me to have most of the roof on 2-foot centers. If I didn’t do this, almost all of the sheathing would have to be cut.
When I order framing material for the rafters, I calculate what length will work for the commons and add 2 feet. Then I order one stick for each jack on one side of each hip. When I’m cutting I can get the longest and shortest jacks out of each stick and work through my list. This means less handling and less scrap.
Laying Out the Hip
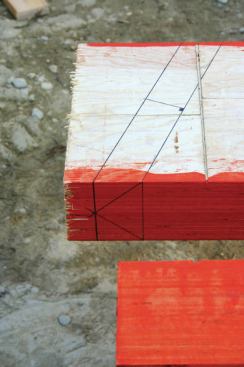
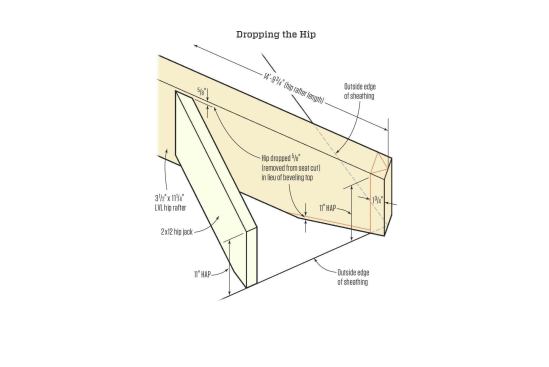
Laying out an equal-pitch hip is simple, but often there is confusion in accounting for the thickness of the hip. Here is a simple way (at least for me) to visualize it: Think of common rafters butting a ridge. Because the commons don’t butt each other, we shorten them to allow for the ridge. Unless we bevel both edges of the top of the ridge, we need to lower the ridge to account for its thickness. We do the exact same thing for the hip: We have to lower it or bevel it. It is much faster to lower it than bevel it. This is commonly called “dropping the hip.” I never calculate this number, I just lay it out and measure it off the hip as shown at left.
Ridge Cut
When I cut a hip, I first make the ridge cut with double cheek cuts. To make this cut I draw two plumb lines with the hip slope (6:17). These lines are parallel to each other by the thickness of the hip (see Cutting a Double Cheek). I cut the first one to the long point (the “sharp”) of a 45-degree angle, and the second one on the line “downhill.” This way I don’t have to flip the material over when I cut.
Eaves Cut
I hook my tape on the sharp tip and measure out the hip length along the top of the stock. The length we have calculated is the center of the hip, so we need to transfer the layout to the side of the hip. I square the mark across and draw my hip/val plumb line (see Eaves Cheek Layout). Then I take half the thickness of the hip (1 3/4 inch) and draw a parallel hip/val plumb line that represents the length at the center of the hip. This second mark is where I measure the 11-inch HAP. All that is a lot of words to describe something very simple: All we have done is draw on the side of the hip where the hip crosses the plates.
When Hips & Ridges Are Beams
Sometimes on big roofs we have 3 1/2-inch glulam hips and a 5 1/2-inch glulam for the ridge. In this situation, we set everything on the ridge. I run the ridge long to be even with the inside edges of the glulam hips (see Ridge Beam-Hip Beam Intersection) and cut birdsmouths on the hips and commons. In this case, we use a “special” king with a double cheek cut to fit in the corner between the hips, and butt all the commons at the ridge. This way there is no deduction in rafter length for the ridge itself. To draw the seat cut I draw a line parallel to the plumb cut at the end that is 5 5/8 inches away to allow room to fit. I then measure down my HAP to find the seat cut. I layout and cut the birdsmouth after I cut all my commons.
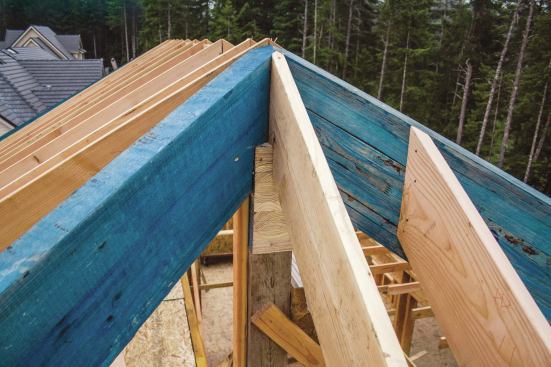
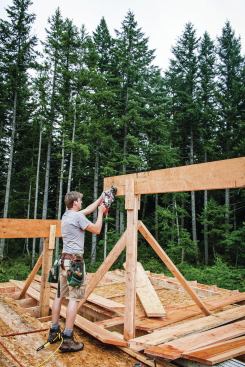
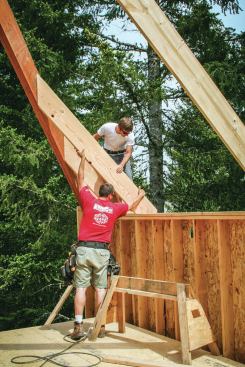
Stacking the Roof
I like to leave the ridge a few inches long, and set one pair of kings and hips on one end of the building to lock in the ridge. Then, on the other end of the ridge, I use the plumb cut at the end of a king common to mark the length of the ridge, and cut it off in the air, as shown in the bottom-right photo on the facing page. This makes things fit better.
The order of stacking goes like this:
1. Set the ridge, with one end long.
2. Set the king commons on one end of the ridge.
3. Set the hips on the same end of the ridge.
4. Move to the other end of the ridge, hold the king in place and mark the ridge and cut it to length.
5. Set all the kings on this end.
6. Set the hips on this end.
7. Work from one hip to the other setting jacks. We start with the smallest jacks (both sides of the hip) to keep it square to the plates, and then run a string down the hip, as shown below.
8. We set the jacks in any order on a hip to push it straight to the string. We first nail it to the layout on the wall with the end of the seat cut exactly even with the outside of the wall plate. We don’t lay out the hip. The jack is already cut to length, and as long as we keep the hip straight, our jacks will be within 1/4 inch of layout.


