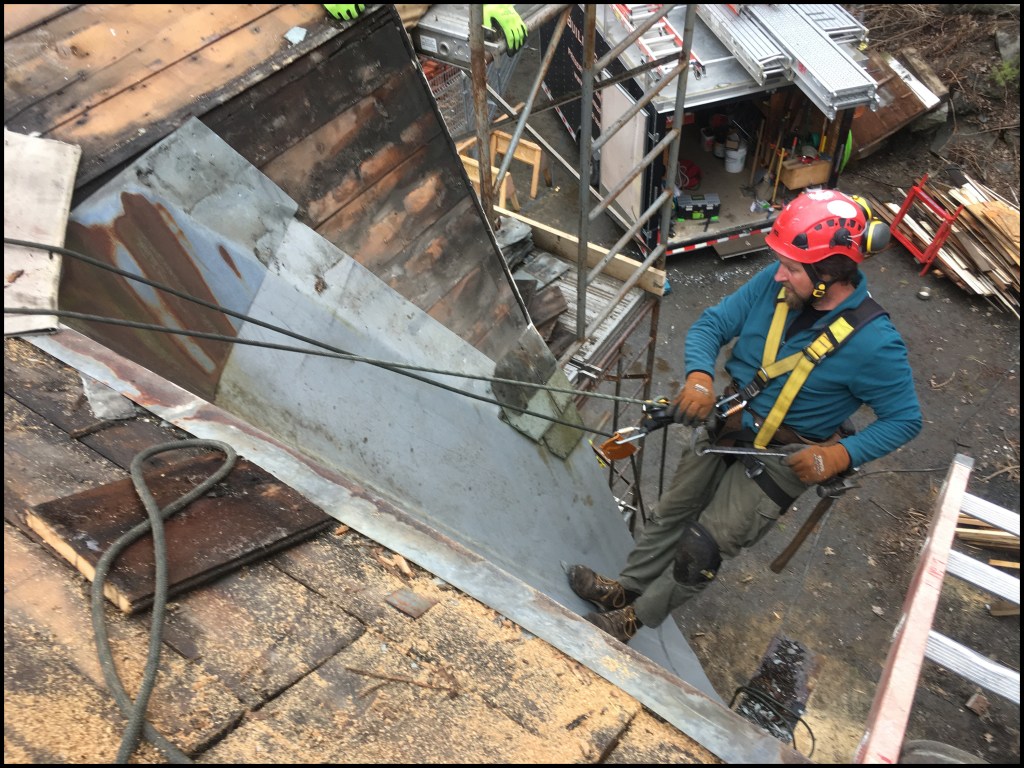
While restoring old timber-framed buildings, my crew and I regularly work up high—at times, upwards of 75 feet off the ground—on tasks such as stripping existing roofs, replacing roof framing, and installing new decking. Over the years, our techniques for work in this environment have evolved. My goal for this article is to give a quick overview of the equipment we currently use to work vertically and on roofs. Having grown wary of using “compliance-in-a-can” solutions for fall protection, we turned to using nontraditional equipment (gleaned from arborists and rock climbers) to work safely and comfortably at heights. In the photo above, crew member Chuck Wolanin uses a two-rope positioning system to repair the valley of a gambrel roof.
Rock-Climbing-Style Hard Hats
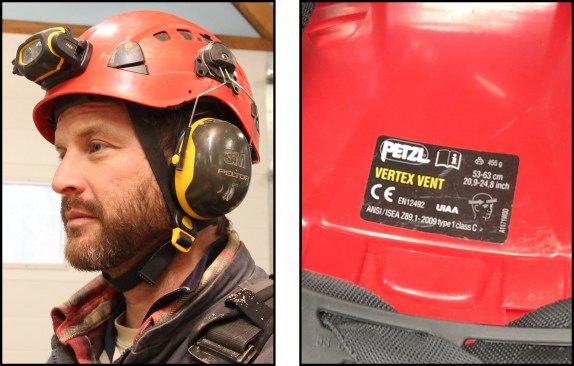
Starting with our hard hats, we switched to using helmets made by Petzl, about 10 years ago. On our jobsites, we require that hard hats be worn at all times. Working at heights, we can’t afford to use uncomfortable hard hats that constantly fall off. The Petzl hard hat is comfortable to wear and comes with a chinstrap that keeps it securely on your head (above left). They’ve become indispensable to us and have earned their keep several times over, preventing severe head injuries that might have occurred had the hard hats not been worn.
My crew and I use the Vertex Vent, Type 1, Class C model, which is ANSI certified (above right). The Type 1 designation refers to its impact resistance to the top of the head, while the Class C denotes that it’s not insulated for electrical shock (Petzl does make a model rated Class Efor electrical shock). It has slots to insert clip-on ear muffs, so your hearing protection is always right with you, and holes on the sides for mounting a flip-down visor. There is also a slot on the front to insert a headlamp; we use Petzl’s PIXA headlamps. The Vertex Vent helmets cost around $120 to $135, while PIXA headlamps go from around $70 to $90 (helmet and headlamp package deals are available for about $180).
Full-Body Harnesses
We next upgraded our harnesses. Before we bought our own 65-foot Genie lift, the company we rented aerial lifts from would always leave cheap full-body harnesses in the work platform cages. We gradually we ended up with several of these less-expensive versions.
They were ill-fitting and uncomfortable, however. Another drawback was their lanyard attachment points were only on the back of the harnesses. These cheaper harnesses were good only for fall-arrest protection and not for work positioning, which we found ourselves often trying to do (I’ll review the two-rope system we use to allow for work positioning later on).
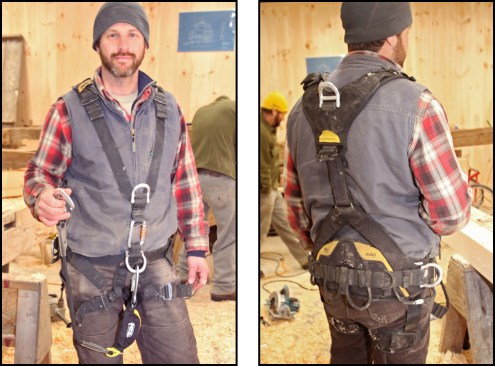
To safely work on a roof slope or other location with poor footing where you might lean against your rope, the attachment point needs to be in front of you. Also, the harness’s fit should be comfortable and padded against the legs. We prefer to use full-body harnesses by Petzl (though there are other construction-focused harnesses from companies like DBI Sala that are comfortable and may interface with tool pouches better).
I use Petzl’s AVAO BOD fall-arrest, work-positioning, and suspension harness, which is CSA, ANSI, and NFPA certified. The AVAO harness has both a front (above left) and rear (dorsal) attachment point (above right). It’s designed to reduce pressure points during prolonged suspension and allows its user to hang from the dorsal attachment point for a longer time in case of a fall. The AVAO harness costs around $400.
We use our harnesses on a regular basis, so we inspect them often and replace them as soon as they start to show any signs of wear and tear.
Interactive – Hover over the yellow letters in the image below:
;(function ($, window, document, undefined) {
$(document).ready(function() {
$(‘#image-map-pro-container’).imageMapPro({“id”:2889,”editor”:{“previewMode”:1,”selected_shape”:”oval-8190″,”tool”:”zoom-out”},”general”:{“name”:”Fall Protection Tools”,”width”:3000,”height”:3000,”naturalWidth”:3000,”naturalHeight”:3000},”image”:{“url”:”https://cdnassets.hw.net/2b/d5/d317b9be4d5ab758f7fa2bffd44a/0318jlcbackfill-web-04-4.jpg”},”spots”:[{“id”:”oval-7803″,”title”:”oval-b”,”type”:”oval”,”x”:30.402,”y”:18.82,”width”:5.106,”height”:4.732,”default_style”:{“opacity”:0},”mouseover_style”:{“opacity”:0.5451127819548872,”background_opacity”:1},”tooltip_style”:{“position”:”bottom”},”tooltip_content”:{“content_type”:”content-builder”,”squares_settings”:{“containers”:[{“id”:”sq-container-818191″,”settings”:{“elements”:[{“settings”:{“name”:”Heading”,”iconClass”:”fa fa-header”},”options”:{“heading”:{“text”:”Reusable Hinged Roof Anchor”,”heading”:”h1″},”font”:{“font_size”:”18″,”font_weight”:”bold”}}},{“settings”:{“name”:”Paragraph”,”iconClass”:”fa fa-paragraph”},”options”:{“text”:{“text”:”DBI-Sala reusable hinged roof anchor used for flat or sloped wood roofs with D-ring and fasteners. Cost: about $40″}}},{“settings”:{“name”:”Image”,”iconClass”:”fa fa-camera”},”options”:{“image”:{“url”:”https://cdnassets.hw.net/b6/39/ba32363f4f4fab309d830fc6a171/0318jlcbackfill-web-rollover-b.jpg”}}},{“settings”:{“name”:”Button”,”iconClass”:”fa fa-link”},”options”:{“button”:{“text”:”Website”,”link_to”:”https://www.safetycompany.com/brands/3M.html”,”new_tab”:1,”height”:35}}}]}}]}}},{“id”:”oval-8190″,”title”:”oval-h”,”type”:”oval”,”x”:79.732,”y”:76.619,”width”:5.106,”height”:4.732,”default_style”:{“opacity”:0},”mouseover_style”:{“opacity”:0.5451127819548872,”background_opacity”:1},”tooltip_content”:{“content_type”:”content-builder”,”squares_settings”:{“containers”:[{“id”:”sq-container-975731″,”settings”:{“elements”:[{“settings”:{“name”:”Heading”,”iconClass”:”fa fa-header”},”options”:{“heading”:{“text”:”Absorbica-I Single Lanyard”,”heading”:”h1″},”font”:{“font_size”:”18″,”font_weight”:”bold”}}},{“settings”:{“name”:”Paragraph”,”iconClass”:”fa fa-paragraph”},”options”:{“text”:{“text”:”Petzl’s Absorbica-I single lanyard comes with a compact, integrated energy absorber; it’s available in three lengths. Cost: about $100″}}},{“settings”:{“name”:”Image”,”iconClass”:”fa fa-camera”},”options”:{“image”:{“url”:”https://cdnassets.hw.net/6c/ad/5b7a8ed841dc99781001e804c3c9/0318jlcbackfill-web-rollover-h.jpg”}}},{“settings”:{“name”:”Button”,”iconClass”:”fa fa-link”},”options”:{“button”:{“text”:”Website”,”link_to”:”https://www.petzl.com/US/en/Professional/Lanyards-and-energy-absorbers”,”new_tab”:1,”height”:35}}}]}}]}}},{“id”:”oval-9620″,”title”:”oval-a”,”type”:”oval”,”x”:7.752,”y”:28.331,”width”:5.106,”height”:4.732,”default_style”:{“opacity”:0},”mouseover_style”:{“opacity”:0.5451127819548872,”background_opacity”:1},”tooltip_style”:{“position”:”bottom”},”tooltip_content”:{“content_type”:”content-builder”,”squares_settings”:{“containers”:[{“id”:”sq-container-65291″,”settings”:{“elements”:[{“settings”:{“name”:”Heading”,”iconClass”:”fa fa-header”},”options”:{“heading”:{“text”:”Arborist Rope”,”heading”:”h1″},”font”:{“font_size”:”18″,”font_weight”:”bold”}}},{“settings”:{“name”:”Paragraph”,”iconClass”:”fa fa-paragraph”},”options”:{“text”:{“text”:”Arborist ropes are abrasion resistant, strong, and lightweight. These low-stretch kernmantel rope are excellent for work at heights. “}}},{“settings”:{“name”:”Image”,”iconClass”:”fa fa-camera”},”options”:{“image”:{“url”:”https://cdnassets.hw.net/1a/0a/f5bdc7c04344b10065fe36d67c62/0318jlcbackfill-web-rollover-a.jpg”}}},{“settings”:{“name”:”Button”,”iconClass”:”fa fa-link”},”options”:{“button”:{“text”:”Website”,”link_to”:”https://www.petzl.com/INT/en/Professional/Ropes/AXIS-11-mm”,”new_tab”:1,”height”:35}}}]}}]}}},{“id”:”oval-5172″,”title”:”oval-c”,”type”:”oval”,”x”:28.767,”y”:83.624,”width”:5.106,”height”:4.732,”default_style”:{“opacity”:0},”mouseover_style”:{“opacity”:0.5451127819548872,”background_opacity”:1},”tooltip_content”:{“content_type”:”content-builder”,”squares_settings”:{“containers”:[{“id”:”sq-container-700651″,”settings”:{“elements”:[{“settings”:{“name”:”Heading”,”iconClass”:”fa fa-header”},”options”:{“heading”:{“text”:”Web Tie-Off Adapter”,”heading”:”h1″},”font”:{“font_size”:”18″,”font_weight”:”bold”}}},{“settings”:{“name”:”Paragraph”,”iconClass”:”fa fa-paragraph”},”options”:{“text”:{“text”:”This robust strap anchor by DBI Sala supports a weight of 5000 lbs. in case the anchor point is shock loaded. Cost: from $50 to $60″}}},{“settings”:{“name”:”Image”,”iconClass”:”fa fa-camera”},”options”:{“image”:{“url”:”https://cdnassets.hw.net/16/28/c7c3316946eabc98372f0276e2ec/0318jlcbackfill-web-rollover-c.jpg”}}},{“settings”:{“name”:”Button”,”iconClass”:”fa fa-link”},”options”:{“button”:{“text”:”Website”,”link_to”:”https://www.safetycompany.com/brands/3M.html”,”new_tab”:1,”height”:35}}}]}}]}}},{“id”:”oval-7648″,”title”:”oval-d”,”type”:”oval”,”x”:47.665,”y”:66.641,”width”:5.106,”height”:4.732,”default_style”:{“opacity”:0},”mouseover_style”:{“opacity”:0.5451127819548872,”background_opacity”:1},”tooltip_content”:{“content_type”:”content-builder”,”squares_settings”:{“containers”:[{“id”:”sq-container-497741″,”settings”:{“elements”:[{“settings”:{“name”:”Heading”,”iconClass”:”fa fa-header”},”options”:{“heading”:{“text”:”ASAP Mobile Fall-Arrest Device”,”heading”:”h1″},”font”:{“font_size”:”18″,”font_weight”:”bold”}}},{“settings”:{“name”:”Paragraph”,”iconClass”:”fa fa-paragraph”},”options”:{“text”:{“text”:”The Petzl ASAP mobile fall-arrester moves smoothly up and down the rope with little tending; locks up if it senses a free fall or shock. Cost: around $250″}}},{“settings”:{“name”:”Image”,”iconClass”:”fa fa-camera”},”options”:{“image”:{“url”:”https://cdnassets.hw.net/a4/56/d2257b1945cfb792c18111b80762/0318jlcbackfill-web-rollover-d.jpg”}}},{“settings”:{“name”:”Button”,”iconClass”:”fa fa-link”},”options”:{“button”:{“text”:”Website”,”link_to”:”https://www.petzl.com/INT/en/Professional/Mobile-fall-arresters/ASAP”,”new_tab”:1,”height”:35}}}]}}]}}},{“id”:”oval-8813″,”title”:”oval-e”,”type”:”oval”,”x”:59.807,”y”:44.101,”width”:5.106,”height”:4.732,”default_style”:{“opacity”:0},”mouseover_style”:{“opacity”:0.5451127819548872,”background_opacity”:1},”tooltip_content”:{“content_type”:”content-builder”,”squares_settings”:{“containers”:[{“id”:”sq-container-214731″,”settings”:{“elements”:[{“settings”:{“name”:”Heading”,”iconClass”:”fa fa-header”},”options”:{“heading”:{“text”:”Absorbica Energy-Absorbing Device”,”heading”:”h1″},”font”:{“font_size”:”18″,”font_weight”:”bold”}}},{“settings”:{“name”:”Paragraph”,”iconClass”:”fa fa-paragraph”},”options”:{“text”:{“text”:”Petzl’s Absorbica is a tear-webbing device, which limits the force transmitted to the user in case of a fall. Cost: about $60″}}},{“settings”:{“name”:”Image”,”iconClass”:”fa fa-camera”},”options”:{“image”:{“url”:”https://cdnassets.hw.net/48/47/0a2c5d774aa78980e395add08e64/0318jlcbackfill-web-rollover-e.jpg”}}},{“settings”:{“name”:”Button”,”iconClass”:”fa fa-link”},”options”:{“button”:{“text”:”Website”,”link_to”:”https://www.petzl.com/US/en/Professional/Lanyards-and-energy-absorbers”,”new_tab”:1,”height”:35}}}]}}]}}},{“id”:”oval-7570″,”title”:”oval-f”,”type”:”oval”,”x”:64.461,”y”:27.227,”width”:5.106,”height”:4.732,”default_style”:{“opacity”:0},”mouseover_style”:{“opacity”:0.5451127819548872,”background_opacity”:1},”tooltip_style”:{“position”:”bottom”},”tooltip_content”:{“content_type”:”content-builder”,”squares_settings”:{“containers”:[{“id”:”sq-container-988671″,”settings”:{“elements”:[{“settings”:{“name”:”Heading”,”iconClass”:”fa fa-header”},”options”:{“heading”:{“text”:”Carabiner Connectors”,”heading”:”h1″},”font”:{“font_size”:”18″,”font_weight”:”bold”}}},{“settings”:{“name”:”Paragraph”,”iconClass”:”fa fa-paragraph”},”options”:{“text”:{“text”:”The author uses a variety of Petzl carabiners with different shapes, sizes, gate openings and locking systems. Cost: varies ($15 to $40)”}}},{“settings”:{“name”:”Image”,”iconClass”:”fa fa-camera”},”options”:{“image”:{“url”:”https://cdnassets.hw.net/b2/0e/52cc06054b63951e910c6d73cfce/0318jlcbackfill-web-rollover-f.jpg”}}},{“settings”:{“name”:”Button”,”iconClass”:”fa fa-link”},”options”:{“button”:{“text”:”Website”,”link_to”:”https://www.petzl.com/INT/en/Professional/Connectors”,”new_tab”:1,”height”:35}}}]}}]}}},{“id”:”oval-353″,”title”:”oval-g”,”type”:”oval”,”x”:68.851,”y”:64.882,”width”:5.106,”height”:4.732,”default_style”:{“opacity”:0},”mouseover_style”:{“opacity”:0.5451127819548872,”background_opacity”:1},”tooltip_content”:{“content_type”:”content-builder”,”squares_settings”:{“containers”:[{“id”:”sq-container-780331″,”settings”:{“elements”:[{“settings”:{“name”:”Heading”,”iconClass”:”fa fa-header”},”options”:{“heading”:{“text”:”The Petzl RIG”,”heading”:”h1″},”font”:{“font_size”:”18″,”font_weight”:”bold”}}},{“settings”:{“name”:”Paragraph”,”iconClass”:”fa fa-paragraph”},”options”:{“text”:{“text”:”Petzl’s RIG Compact self-braking descender device allows you to descend and lock yourself into a secure position. Cost: about $200″}}},{“settings”:{“name”:”Image”,”iconClass”:”fa fa-camera”},”options”:{“image”:{“url”:”https://cdnassets.hw.net/87/88/7b643b074df99c3de276100311df/0318jlcbackfill-web-rollover-g.jpg”}}},{“settings”:{“name”:”Button”,”iconClass”:”fa fa-link”},”options”:{“button”:{“text”:”Website”,”link_to”:”https://www.petzl.com/INT/en/Professional/Descenders/RIG”,”new_tab”:1,”height”:35}}}]}}]}}}]});
});
})(jQuery, window, document);
The photo above shows a roundup of the author’s fall-arrest and work-positioning equipment: abrasion-resistant arborist rope (a); Protecta permanent ridge roof anchor with integral D-ring (b); DBI-Sala D-ring strap anchor (c); fall-arrest lanyard—Petzl ASAP mobile fall-arrester (d) clipped to a Petzl Absorbica energy-absorbing device (e); Petzl carabiners (f); Petzl RIG Compact self-braking descender for work-positioning (g); and Petzl Absorbica-I single lanyard with a compact, integrated energy absorber for clipping onto stationary points (h).
Ropes, Anchors, and Lanyards
For our lifelines, we use arborist ropes, which are abrasion resistant, strong, and lightweight. We typically anchor the ropes to the roof framing with the DBI Sala-style D-ring strap anchors, tying the ropes off with a figure-eight knot —with an additional safety knot tied at the end. OSHA requires that each anchor be able to support a weight of 5,000 pounds in case the anchor point is shock loaded. While the true capacity of the anchor might be hard to quantify, it needs to be substantial enough to really work and not just offer some false sense of security.
We employ a couple of different fall-arrest lanyard setups. For our rope work, we use Petzl’s ASAP mobile fall-arresters. The ASAP moves smoothly, following you up and down the rope with little tending. But, if it senses a free fall or shock, it locks the rope (much like a car seat belt). We clip the ASAP to a Petzl Absorbica energy-absorbing device, which we then clip on to the dorsal attachment point of our harness. The Absorbica is a tear-webbing device—cloth webbing packed into its protective pouch is released, which limits the force transmitted to the user in case of a fall.
At stationary anchor points, such as being clipped on to our Genie lift’s cage when it’s airborne, we use Petzl’s Absorbica-I single lanyard with a compact, integrated energy absorber. This lanyard is longer than the one we use in our rope setup and allows more freedom to move around while we’re working. We clip it on to our front attachment point.
Two-Rope Positioning System
We often employ a two-rope positioning system, which allows us to lean against our ropes and work with both hands free (see lead image). In addition to the fall-arrest lifeline, we install a second, separate rope and anchor setup, along with a self-braking descender. We use Petzl’s RIG Compact self-braking descenders, which allow you to descend and lock yourself into a secure position. This piece of equipment was a game changer for us.
In the photo above, crew member Scott Killian uses a two-rope positioning system while inspecting a newly installed standing-seam-metal roof on a church. We typically drop off our crew at their rope positions with our 65-foot Genie lift (its cage is seen here, peeking over the ridge). If we encounter any sharp edges that may compromise our fall-arrest and work-positioning ropes—in this case, the edge of the metal roofing—we protect them with pieces of old fire hose.
If you are interested in using this gear, I recommend learning as much as possible before employing it in the field. Petzl has an excellent website with lots of informative videos to get you started. Always use the fall-arrest and work-positioning equipment as the manufacturer has intended. Also, we like to keep a Petzl catalog in our job trailer in case an inspector visits our jobsite—if the equipment doesn’t say Protecta or DBI Sala on it, an OSHA inspector might want to take a closer look at your setup. The catalog illustrates the approved two-rope and fall-arrest systems, as well as many other scenarios.
While it’s not the industry standard, we’ve found climbing gear to be lighter and more comfortable than traditional construction safety equipment. We feel we work safer and more efficiently using it. Working at heights is no joke and we all know the consequences. It’s important to find gear that you’re comfortable with and will actually use.